- Joined
- Sep 12, 2013
- Messages
- 17
- Motherboard
- B75M-D3V
- CPU
- i5-3450
- Graphics
- GeForce GTX 660
- Mac
- Classic Mac
- Mobile Phone
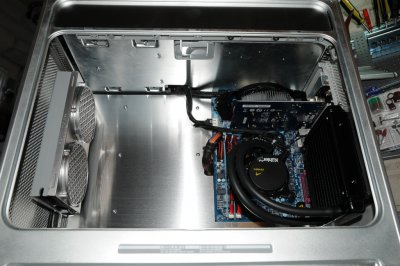
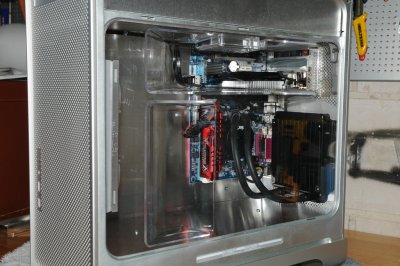
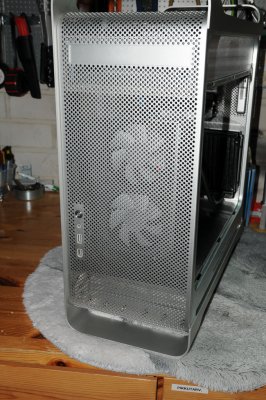
My first G5 Hackintosh: Bad Apple - "Clean, simple and empty inside"
Background and goal:
A fully functional Hackintosh to be used in photo editing, other daily use and maybe also gaming. Until now I have used a 2009 MBP for everything. For couch surfing as it is and with a Henge Docks dock, Magic Trackpad, Wireless keyboard and a 23" Cinema Display for desktop use. Now I'm thinking of selling the MBP and getting a second-hand Macbook Air for the couch and travel use.
The original idea was to do this with a fairly limited budget but that idea was updated a bit along the way. I planned to do it with an i3 processor, 8GB of RAM and so on. I upgraded many components a bit but still tried to keep it somewhat economical.
I thought I'd go for a simple Hackintosh without any special tricks or anything. Try to manage the cables neatly and so on. Then I saw Ersterhernd's second G5 mod. First I thought I would use that as an example someday later but as it turns out, that's quite close to what I actually did already this time. So thank you Ersterhernd for that excellent example and ideas! You might as well call this "Inspired by Ersterhernd".
Used hardware:
G5 case with the glass door
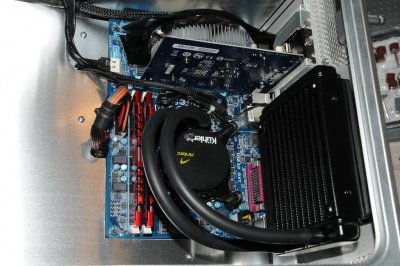
"120mm mATX backplate conversion kit" and the "G5 motherboard tray" the Laser Hive
Front panel cable: http://g5atxcables.weebly.com/g5-atx-adapter-cables.html
IOGear Bluetooth 4.0 dongle
G.Skill RipjawsX DDR3 1600 Mhz 16 GB (2 x 8GB)
Samsung 830 SSD 128GB
Seagate Barracuda 1TB
Gigabyte B75M-D3V
Intel i5-3450
Gigabyte GV-N640OC-2GI GeForce GT640 2048 MB DDR3 PCI Express x16
Corsair CX500M V2 CX 500W
Antec Kühler H2O 620 V4
2 x Fractal Design 92mm cooler
Work done:
- Saved the original PSU case because it was easier to build on it than without it
- Placed the PSU and disks on the top shelf - threw the optical drive away
- Installed a clean cover plate on the top shelf
- Used a 1,5mm single cut L-shaped cover plate to hide all cables
- Used a 0,8mm cover on the PSU (I was going to use this also in the L-plate but it was too thin and bent too easily
- Used 15mm aluminum bars as raisers below the L-plate
- Original twin-cooler assembly used at front of the case
- (It felt bad but did) cut the mobo tray to make running the cables easier
What next?
- Successfully installed OS X and Multibeast stuff yesterday. Next trying the update things for the first time and starting to move software and files from the MBP.
Completed build photos:


Link to project photos: https://www.dropbox.com/sh/e476xsrhi6y1zad/e4Zg0LcOhp
Background and goal:
A fully functional Hackintosh to be used in photo editing, other daily use and maybe also gaming. Until now I have used a 2009 MBP for everything. For couch surfing as it is and with a Henge Docks dock, Magic Trackpad, Wireless keyboard and a 23" Cinema Display for desktop use. Now I'm thinking of selling the MBP and getting a second-hand Macbook Air for the couch and travel use.
The original idea was to do this with a fairly limited budget but that idea was updated a bit along the way. I planned to do it with an i3 processor, 8GB of RAM and so on. I upgraded many components a bit but still tried to keep it somewhat economical.
I thought I'd go for a simple Hackintosh without any special tricks or anything. Try to manage the cables neatly and so on. Then I saw Ersterhernd's second G5 mod. First I thought I would use that as an example someday later but as it turns out, that's quite close to what I actually did already this time. So thank you Ersterhernd for that excellent example and ideas! You might as well call this "Inspired by Ersterhernd".
Used hardware:
G5 case with the glass door
"120mm mATX backplate conversion kit" and the "G5 motherboard tray" the Laser Hive
Front panel cable: http://g5atxcables.weebly.com/g5-atx-adapter-cables.html
IOGear Bluetooth 4.0 dongle
G.Skill RipjawsX DDR3 1600 Mhz 16 GB (2 x 8GB)
Samsung 830 SSD 128GB
Seagate Barracuda 1TB
Gigabyte B75M-D3V
Intel i5-3450
Gigabyte GV-N640OC-2GI GeForce GT640 2048 MB DDR3 PCI Express x16
Corsair CX500M V2 CX 500W
Antec Kühler H2O 620 V4
2 x Fractal Design 92mm cooler
Work done:
- Saved the original PSU case because it was easier to build on it than without it
- Placed the PSU and disks on the top shelf - threw the optical drive away
- Installed a clean cover plate on the top shelf
- Used a 1,5mm single cut L-shaped cover plate to hide all cables
- Used a 0,8mm cover on the PSU (I was going to use this also in the L-plate but it was too thin and bent too easily
- Used 15mm aluminum bars as raisers below the L-plate
- Original twin-cooler assembly used at front of the case
- (It felt bad but did) cut the mobo tray to make running the cables easier
What next?
- Successfully installed OS X and Multibeast stuff yesterday. Next trying the update things for the first time and starting to move software and files from the MBP.
Completed build photos:


Link to project photos: https://www.dropbox.com/sh/e476xsrhi6y1zad/e4Zg0LcOhp
