Contribute
Register

final made an matx macpro

Status
Not open for further replies.
Joined
Jan 10, 2018
Messages
5
Motherboard
asrock H270m pro4
CPU
i7-6700
Graphics
sapphire rx580 4gig pulse
Mac
  1. iMac
Classic Mac
  1. iMac
  2. Performa
  3. Power Mac
Mobile Phone
  1. iOS
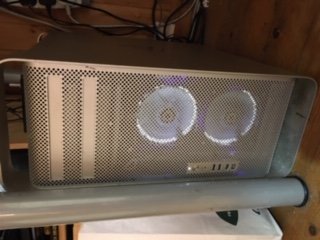
finally finished a macpro conversion made up from secondhand parts collected over the last year or so
asrock 270m pro4. i5 6500, sapphire rx 580 4g, corsair h60 aio cooler. 600w psu fitted in old macpro psu case

rear panel cut out to fit a old pc rear frame for slots etc.
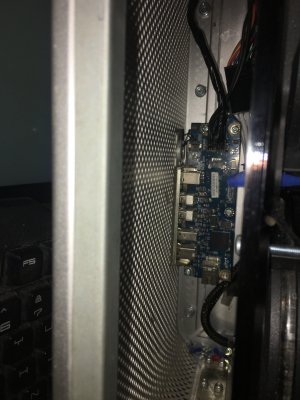
front panel on button works still got the usb ports to do.
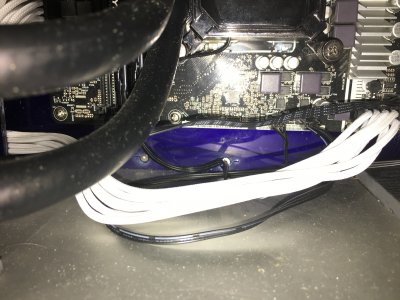
custom blue acrylic motherboard tray and cable cover. white cables and fans
front fanc and radiator on custom mount made from the blue acrylic

now to install a copy of high sierra wish me luck.
 

Attachments

  • image0.jpeg
    image0.jpeg
    33.2 KB · Views: 496
  • image1.jpeg
    image1.jpeg
    39.4 KB · Views: 517
  • image3.jpeg
    image3.jpeg
    28.4 KB · Views: 481
Congratulations! at simple sight, it looks very well done. Would you be able to upload better quality images? And also please show your backplate IO! That's the most important part of a Mac Pro/G5 mod in my opinion, as there's where the actual conflict between ATX and these cases reside.

Thanks!
 
hi thanks

heres a few more photos the mother board tray is a single piece of acrylic attached using the shelf screw holes at the top and the side plate screw holes at the bottom using countersunk 3mm screws. nice and solid but took 2 goes to get lined up.

The rear plate took some time to get it lined up and used a couple spare pc backplates

most pleased with the 600w atx psu board fitting into the orginal case.

planned upgrade is to the fans i used cheap ones and thier too noisy maybe the g12 watercooler aio kit for the rx 580

cpu seems to sit at 28-40c even when gaming so the h60 is working well in a push pull setup. the twin front fans make the front of the case super cool to touch even when turned down..

might use some more acrylic to direct the top fan at the gpu.

still cant get high seirra to work just get a black screen at loginonce you move back to the internal drive.

front power switch wiring plans works perfectly just the usb to wire up . the external module has 2 usb2 2x usb3 headphones and mic im going to fit about where it is there space under the top and just the cables to route.
 

Attachments

  • IMG_0988.jpg
    IMG_0988.jpg
    2.3 MB · Views: 368
  • IMG_0989.jpg
    IMG_0989.jpg
    2.2 MB · Views: 337
  • IMG_0992.jpg
    IMG_0992.jpg
    1.9 MB · Views: 310
  • IMG_0991.jpg
    IMG_0991.jpg
    2.1 MB · Views: 321
  • IMG_0994.jpg
    IMG_0994.jpg
    2.3 MB · Views: 301
  • IMG_0993.jpg
    IMG_0993.jpg
    2.7 MB · Views: 303
  • IMG_0998.jpg
    IMG_0998.jpg
    2.3 MB · Views: 354
Last edited:
next update to kill the loud rx580 fans and tame the heat buildup in the case. Gpu is now fitted with a nzxt g12 and a corsair h55 AIO. great upgrade. got the fans setup in push pull for the coolers and a single extracter. slowly reducing the fans curves to get a quiet system. need to tidy up but it all works great.
IMG_1097.jpg
 
Nice work! Could you share your dimensions for the acrylic motherboard tray, cable cover and front fan/radiator mount?
Also, is that the Laser Hive kit you're using for the back, or your own design?
 
hi i didnt keep the dimensons but im going to get them soon i want to paint the rear plate so will have to take it apart and ill take pics of the parts. the rear plate is all my own work with a rotary dremil and lots of bits and drills. id like to perferate it to match the mac hole pattern i messed up the first back plate so did it twice.
 
Status
Not open for further replies.
Back
Top