
- Joined
- Oct 2, 2015
- Messages
- 19
- Motherboard
- MSI H170A GAMING PRO
- CPU
- i5 6500
- Graphics
- GTX 1060
NEED:
8GB or More Unibeast USB - Follow Steps 1 & 2 from http://www.tonymacx86.com/threads/u...apitan-on-any-supported-intel-based-pc.172672
Extra USB for Downloaded Utilities & Prerequisite files
Utilities:
Unibeast 6.2.0 http://www.tonymacx86.com/resources/unibeast-6-2-0.314
Multibeast 8.2.2 http://www.tonymacx86.com/resources/multibeast-el-capitan-8-2-2.318
EFIMounter v3 http://www.tonymacx86.com/resources/efi-mounter-v3.280
OsxAptioFixDrv-64.efi https://drive.google.com/file/d/0B9HwWZ_XhBMtSDd2UlNoMUNzUVk/view
Config.plist = Attached here (Dont forget to delete (FOR HD & FOR USB) from the file name . its there to show difference between them)
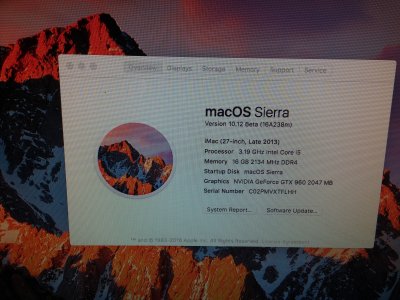
Everything is working
* For Audio and Network don’t know because am use audio interface and wireless card and it works perfect for me
Install Setup And Configuration
1) Copy all downloaded files to a spare USB
2) Follow Steps 1 & 2 from this http://www.tonymacx86.com/threads/u...apitan-on-any-supported-intel-based-pc.172672
2) In finder you should now find a mounted drive called EFI. If not Run EfiMounter v3 and click mount and choose the corresponding drive.
3) Navigate into /EFI/CLOVER/drivers64UEFI/
4) Delete OsxAptioFixDrv-64.efi & Copy OsxAptioFixDrv-64.efi to /EFI/Clover/drivers64UEFI
5) Go Back a folder and delete config.plist and replace with the Attached
BIOS Configuration
LAN Option ROM - Disabled
Network Stack - Disabled
Serial(COM) Port 0 - Disabled
Parallel(LPT) Port - Disabled
Windows 8.1/10 WHQL- Disabled
Windows 7 Installation - Disabled
Intel Virtualization - Disabled
Intel VT-D - Disabled
CFG Lock - Disabled
Installation
1) Boot up the computer and enter the Boot selection menu by tapping F11 on the post screen
2) Select the USB Drive you created earlier with Unibeast and hit ENTER
3) Once in the El Capitan install screen make sure to format the HDD you will be using to install El Capitan on by going up the top of the screen and selecting Utilities then Disk Utility. Make sure to select the correct HDD. Give the hdd a name of your choosing
4) Once install finishes and reboots boot the USB again and boot from the formatted drive you renamed earlier in Clover
5) Run through the initial configuration screen and create your User
6) Once on the desktop plug the and copy all the downloaded files you copied earlier to the desktop.
7) Run extract Multibeast and run it.
8) Select Quickstart - UEFI Boot Mode (Make sure the HDD is selected not the USB & click Build > Install)
9) Install the Nvidia Web Drivers http://www.tonymacx86.com/threads/n...cs-drivers-for-os-x-10-11-4-346-03-06.188837/ and restart
10) Follow Step 4
11) Run EFIMounter v3 & select the HDD not the USB.
12) Once mounted navigate into /EFI/CLOVER/ and delete config.plist and replace with the Attached
Now you should be ready to reboot into a working Hackintosh System
CREDITS AND THANKS TO
Leeum & bob3000
CREDITS AND THANKS TO
TONYMACX86.COM
8GB or More Unibeast USB - Follow Steps 1 & 2 from http://www.tonymacx86.com/threads/u...apitan-on-any-supported-intel-based-pc.172672
Extra USB for Downloaded Utilities & Prerequisite files
Utilities:
Unibeast 6.2.0 http://www.tonymacx86.com/resources/unibeast-6-2-0.314
Multibeast 8.2.2 http://www.tonymacx86.com/resources/multibeast-el-capitan-8-2-2.318
EFIMounter v3 http://www.tonymacx86.com/resources/efi-mounter-v3.280
OsxAptioFixDrv-64.efi https://drive.google.com/file/d/0B9HwWZ_XhBMtSDd2UlNoMUNzUVk/view
Config.plist = Attached here (Dont forget to delete (FOR HD & FOR USB) from the file name . its there to show difference between them)
Everything is working
* For Audio and Network don’t know because am use audio interface and wireless card and it works perfect for me
Install Setup And Configuration
1) Copy all downloaded files to a spare USB
2) Follow Steps 1 & 2 from this http://www.tonymacx86.com/threads/u...apitan-on-any-supported-intel-based-pc.172672
2) In finder you should now find a mounted drive called EFI. If not Run EfiMounter v3 and click mount and choose the corresponding drive.
3) Navigate into /EFI/CLOVER/drivers64UEFI/
4) Delete OsxAptioFixDrv-64.efi & Copy OsxAptioFixDrv-64.efi to /EFI/Clover/drivers64UEFI
5) Go Back a folder and delete config.plist and replace with the Attached
BIOS Configuration
LAN Option ROM - Disabled
Network Stack - Disabled
Serial(COM) Port 0 - Disabled
Parallel(LPT) Port - Disabled
Windows 8.1/10 WHQL- Disabled
Windows 7 Installation - Disabled
Intel Virtualization - Disabled
Intel VT-D - Disabled
CFG Lock - Disabled
Installation
1) Boot up the computer and enter the Boot selection menu by tapping F11 on the post screen
2) Select the USB Drive you created earlier with Unibeast and hit ENTER
3) Once in the El Capitan install screen make sure to format the HDD you will be using to install El Capitan on by going up the top of the screen and selecting Utilities then Disk Utility. Make sure to select the correct HDD. Give the hdd a name of your choosing
4) Once install finishes and reboots boot the USB again and boot from the formatted drive you renamed earlier in Clover
5) Run through the initial configuration screen and create your User
6) Once on the desktop plug the and copy all the downloaded files you copied earlier to the desktop.
7) Run extract Multibeast and run it.
8) Select Quickstart - UEFI Boot Mode (Make sure the HDD is selected not the USB & click Build > Install)
9) Install the Nvidia Web Drivers http://www.tonymacx86.com/threads/n...cs-drivers-for-os-x-10-11-4-346-03-06.188837/ and restart
10) Follow Step 4
11) Run EFIMounter v3 & select the HDD not the USB.
12) Once mounted navigate into /EFI/CLOVER/ and delete config.plist and replace with the Attached
Now you should be ready to reboot into a working Hackintosh System
CREDITS AND THANKS TO
Leeum & bob3000
CREDITS AND THANKS TO
TONYMACX86.COM
Attachments
Last edited:

")