- Joined
- Feb 20, 2011
- Messages
- 195
- Motherboard
- Asus Maximus Hero XI Z390
- CPU
- i9-9900K
- Graphics
- RX 560
- Classic Mac
- Mobile Phone
I was asked to provide a simple "linear" description drawn from Toleda's excellent but complex guide ( http://www.tonymacx86.com/hdmi-audio/143760-audio-hdmi-audio-applehda-guide.html )
Toleda's guide covers all the different possible configurations in one thread and some readers find it difficult to extract the steps needed for one particular build.
So here is what works for me with the simple case of a socket 1150 Gigabyte mainboard with integrated graphics with Gigabyte Z87-HD3 and a Z87MX-D3H, Intel Core i5-4570, Mavericks 10.9.5 or Yosemite 10.10, HD4600 graphics only, HDMI monitor only attached and Clover-EFI booting (I presume it would work for most series 7 and 8 Gigabyte boards, as long as it is for the integrated HD4000 / HD4600 graphics and not a dedicated display card).
This method uses the Clover-EFI booting method which is faster and "cleaner" than Chimera but may be more complicated to configure correctly.
Start with an unmodified sound system (no Voodoo or other sound kexts). After a clean install of the system, I used Multibeast only for FakeSMC and Networking (realtek)
The hdmi audio fix chosen here depends on two elements.
A) the configuration of Clover-EFI patches the audio kexts as needed "on the fly", this has the advantage that it should persist through minor system updates.
B) The second element needed is the patched DSDT.
1. If you already have a running system, make a clone backup on another harddisk first, in case something goes wrong!
A)
2. Either download and install Clover-EFI from http://sourceforge.net/projects/cloverefiboot/ , or use the enclosed compressed EFI.
Use Disk Utility to mount the hidden EFI partition (you first have to enable the Debug menu by pasting this lie in Terminal:
defaults write com.apple.DiskUtility DUDebugMenuEnabled 1
Then relaunch Disk Utility and select "Show every partition" in the Debug menu).
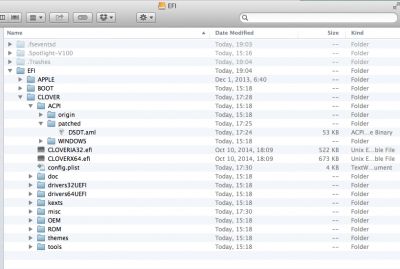
If you use the enclosed EFI, extract it and drag the entire EFI folder onto the EFI partition, so that the contents looks like this (the volume is called EFI, but there is also a folder called EFI at the top level):

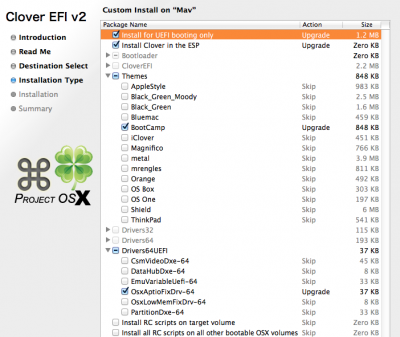
If you install Clover-EFI from scratch, these are the settings I used:

(I still found the drivers in the enclosed EFI archive work better than the standard hfs version that comes with the clover installer.)
Either way, you should edit the SMBIOS section of config.plist to use a new random serial number (you can use the one that Multibeast put into your extra partition or use Clover Configurator).
Toleda's patching on-the-fly of the audio kexts happens in the "KernelAndKextPatches" section of the config.plist. He provides different patches depending on the mainboard and system version: https://github.com/toleda/audio_CloverHDMI
For the configuration described here, I used "config-hdmi_hd4600-92_v2.plist" since it's a HD4600 processor running Mavericks greater than 10.9.2
For Yosemite you would use "config-hdmi_hd4600-100.plist" instead (the "100" stands for 10.10.0) and the other ones are for different mainboards. So if you use the enclosed EFI installation and have a different configuration, replace the "KernelAndKextPatches" section by Toleda's file that matches your system.
3. Reboot and set your bios to boot UEFI-only (the basic Bios settings are to load optimized defaults, then disable Vt-d and set booting options to UEFI-only), then test if your system runs with the Clover-EFI booting. There are many possible settings in config.plist described here: http://clover-wiki.zetam.org/Configuration
B) Once you have a stable running system with Clover-EFI, proceed with patching the DSDT for hdmi audio:
4. Download MaciASL: http://maciasl.sourceforge.net/
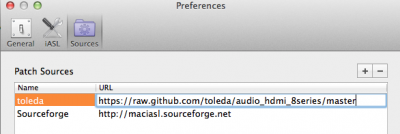
Run MaciASL, open its preferences, click on "sources" and add: https://raw.github.com/toleda/audio_hdmi_8series/master (this link does not work for clicking on: it's only meant for pasting into the MaciASL preferences!)

5. Close preferences and click on "Patch", wait a few seconds for the patches from Toleda to load, then click on "8series-clean-compile", then click on "apply". Wait a couple of seconds for the patch to complete and when the lower portion of the main panel goes blank, close the Patch dialog.

6. Click on "Compile." The dsdt must compile without errors before proceeding (warnings and optimizations are ok)
7. Click on "Patch" again and this time select "Desktop-HD5K/AMD/Nvidia-A1".
(There are other options, but this one works for me -- apply the one that fits your hardware).
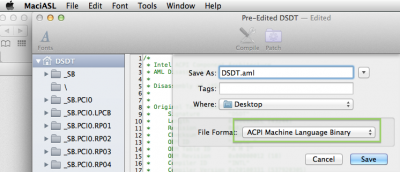
8. Compile again and "Save as..." dsdt.aml (make sure to set the format to "ACPI Machine Language Binary")

9. Copy the file to EFI/Clover/ACPI/Patched/dsdt.aml in the EFI partition.
10. Reboot and check if your sound preferences output now lists the hdmi monitor -- if not, try rebuilding the kernel cache with DPCIManager or by reinstalling FakeSMC with Multibeast.
For troubleshooting and expert advice, go to Toleda's threads.
Toleda's guide covers all the different possible configurations in one thread and some readers find it difficult to extract the steps needed for one particular build.
So here is what works for me with the simple case of a socket 1150 Gigabyte mainboard with integrated graphics with Gigabyte Z87-HD3 and a Z87MX-D3H, Intel Core i5-4570, Mavericks 10.9.5 or Yosemite 10.10, HD4600 graphics only, HDMI monitor only attached and Clover-EFI booting (I presume it would work for most series 7 and 8 Gigabyte boards, as long as it is for the integrated HD4000 / HD4600 graphics and not a dedicated display card).
This method uses the Clover-EFI booting method which is faster and "cleaner" than Chimera but may be more complicated to configure correctly.
Start with an unmodified sound system (no Voodoo or other sound kexts). After a clean install of the system, I used Multibeast only for FakeSMC and Networking (realtek)
The hdmi audio fix chosen here depends on two elements.
A) the configuration of Clover-EFI patches the audio kexts as needed "on the fly", this has the advantage that it should persist through minor system updates.
B) The second element needed is the patched DSDT.
1. If you already have a running system, make a clone backup on another harddisk first, in case something goes wrong!
A)
2. Either download and install Clover-EFI from http://sourceforge.net/projects/cloverefiboot/ , or use the enclosed compressed EFI.
Use Disk Utility to mount the hidden EFI partition (you first have to enable the Debug menu by pasting this lie in Terminal:
defaults write com.apple.DiskUtility DUDebugMenuEnabled 1
Then relaunch Disk Utility and select "Show every partition" in the Debug menu).
If you use the enclosed EFI, extract it and drag the entire EFI folder onto the EFI partition, so that the contents looks like this (the volume is called EFI, but there is also a folder called EFI at the top level):

If you install Clover-EFI from scratch, these are the settings I used:

(I still found the drivers in the enclosed EFI archive work better than the standard hfs version that comes with the clover installer.)
Either way, you should edit the SMBIOS section of config.plist to use a new random serial number (you can use the one that Multibeast put into your extra partition or use Clover Configurator).
Toleda's patching on-the-fly of the audio kexts happens in the "KernelAndKextPatches" section of the config.plist. He provides different patches depending on the mainboard and system version: https://github.com/toleda/audio_CloverHDMI
For the configuration described here, I used "config-hdmi_hd4600-92_v2.plist" since it's a HD4600 processor running Mavericks greater than 10.9.2
For Yosemite you would use "config-hdmi_hd4600-100.plist" instead (the "100" stands for 10.10.0) and the other ones are for different mainboards. So if you use the enclosed EFI installation and have a different configuration, replace the "KernelAndKextPatches" section by Toleda's file that matches your system.
3. Reboot and set your bios to boot UEFI-only (the basic Bios settings are to load optimized defaults, then disable Vt-d and set booting options to UEFI-only), then test if your system runs with the Clover-EFI booting. There are many possible settings in config.plist described here: http://clover-wiki.zetam.org/Configuration
B) Once you have a stable running system with Clover-EFI, proceed with patching the DSDT for hdmi audio:
4. Download MaciASL: http://maciasl.sourceforge.net/
Run MaciASL, open its preferences, click on "sources" and add: https://raw.github.com/toleda/audio_hdmi_8series/master (this link does not work for clicking on: it's only meant for pasting into the MaciASL preferences!)

5. Close preferences and click on "Patch", wait a few seconds for the patches from Toleda to load, then click on "8series-clean-compile", then click on "apply". Wait a couple of seconds for the patch to complete and when the lower portion of the main panel goes blank, close the Patch dialog.

6. Click on "Compile." The dsdt must compile without errors before proceeding (warnings and optimizations are ok)
7. Click on "Patch" again and this time select "Desktop-HD5K/AMD/Nvidia-A1".
(There are other options, but this one works for me -- apply the one that fits your hardware).
8. Compile again and "Save as..." dsdt.aml (make sure to set the format to "ACPI Machine Language Binary")

9. Copy the file to EFI/Clover/ACPI/Patched/dsdt.aml in the EFI partition.
10. Reboot and check if your sound preferences output now lists the hdmi monitor -- if not, try rebuilding the kernel cache with DPCIManager or by reinstalling FakeSMC with Multibeast.
For troubleshooting and expert advice, go to Toleda's threads.


