
- Joined
- May 28, 2018
- Messages
- 126
- Motherboard
- Dell XPS 8930
- CPU
- i7-8700
- Graphics
- RX 580
Guide: Dell XPS 8930: High Sierra 10.13.6 / Mojave 10.14.2
Thank you for all the resources you guys provided on this forum, especially Rehabman for all the wonderful tools. I also want to thank slave-zeo for his guide that I used as a starting point.
Note on Mojave:
Please see this new post on clean install to Mojave (4/6/2019)
Please see bottom on upgrade to Mojave using IGPU (12/23/2018)
Update 6/26/19: I have finally mapped the remaining USB C ports. The only catch is all the USB ports on this system go over 15-port limit. So you may have to disable some ports, or you may have to use the remove USB port limit patch which gives me trouble sometimes (e.g. USB devices gets "unplugged" as I plug another USB device in)
Model: Dell XPS 8930
CPU: i7 8700 Coffee Lake
Chipset: z370
Graphics: Intel UHD Graphics 630 / GeForce 1050Ti
Ram: 16GB
Audio: ALC3861
Harddisk:
Installed macOS version: 10.13.5
Updated macOS version: 10.13.6, 10.14.2
What doesn’t work:
Step 4: Set up nVidia discrete GPU and Intel integrated GPU
Update (03/18/2019): Please see the corrected SSDT-UIAC zip file for correct USB injection for SD Card reader. Thanks @lisai9093.
Update (06/26/2019): The most up-to-date SSDT-UIAC contains the correct USB injection for the front USB C port. Please note the 2.0 port of the rear 3rd and 4th USB 3.0 port, as well as internal bluetooth has been disabled. Please comment/uncomment out the correct port injections to suit your own needs.
Step 7: Fix NightShift for external monitor
(Nvidia has already updated their web driver so the steps to patch the web driver are no longer necessary.)
Step 15 (update 12/23/2018): Upgrade to macOS Mojave
Thank you for all the resources you guys provided on this forum, especially Rehabman for all the wonderful tools. I also want to thank slave-zeo for his guide that I used as a starting point.
Note on Mojave:
Please see this new post on clean install to Mojave (4/6/2019)
Please see bottom on upgrade to Mojave using IGPU (12/23/2018)
Update 6/26/19: I have finally mapped the remaining USB C ports. The only catch is all the USB ports on this system go over 15-port limit. So you may have to disable some ports, or you may have to use the remove USB port limit patch which gives me trouble sometimes (e.g. USB devices gets "unplugged" as I plug another USB device in)
Model: Dell XPS 8930
CPU: i7 8700 Coffee Lake
Chipset: z370
Graphics: Intel UHD Graphics 630 / GeForce 1050Ti
Ram: 16GB
Audio: ALC3861
Harddisk:
- 500GB WD-Black (2nd generation) m.2 NVMe x4 + OEM 2TB Harddisk fusion drive
- 512GB Intel SSD for Windows
- 2TB 3.5” HDD for Time Machine
Installed macOS version: 10.13.5
Updated macOS version: 10.13.6, 10.14.2
What doesn’t work:
- OEM Wifi
USB C ports (because I do not have any USB-C devices to map the ports. All untested ports are disabled)- High Sierra only: Intel integrated graphics: it has to be disabled or the machine will not boot. I turned it into a headless state so it can do computations and enable Quick Sync
- GeForce’s HDMI port does not have audio
- macOS High Sierra bootable USB drive (created with another macOS computer)
- Ubuntu bootable live USB drive
- A USB wifi adaptor (optional, you can use ethernet instead), or
- A BCM943602CS PCI-e card with a spare USB 2.0 cord. Should work out of the box when connected correctly. See below
- An external drive large enough for macOS clone
- Apps (please google and download the latest version)
- AppleHDA Patcher
- CarbonCopyCloner
- Clover Configurator
- KextBeast
- MaciASL
- Rehabman’s Fork (RehabMan / OS-X-MaciASL-patchmatic / Downloads — Bitbucket)
- RehabMan’s patches (https://github.com/RehabMan/Laptop-DSDT-Patch)
- MultiBeast
- Nvidia Web Drivers
- IORegistry Explorer 2.1
- UniBeast
- EFI Drivers:
- AptioMemoryFix-64
- ApfsDriverLoader-64
- Kexts:
- /Library/Extensions
- AppleALC
- AtherosE2200Ethernet
- DisplayMergeNub (For enabling Night Shift only)
- FakePCIID_NVIDIA_HDAU
- FakePCCID
- FakeSMC
- IntelGraphicsFixup
- Lilu
- NvidiaGraphicsFixup
- Shiki
- USBInjectAll
- XHCI-200-series-injector
- EFI/Clover/kexts/other
- FakeSMC
- FakeSMC_ACPISensors
- FakeSMC_CPUSensors
- FakeSMC_GPUSensors
- FakeSMC_LPCSensors
- AtherosE2200Ethernet
- /Library/Extensions
- Follow this guide to create the bootable drive using UniBeast (https://www.tonymacx86.com/threads/...ierra-on-any-supported-intel-based-pc.235474/)
- Dell has a 500Mb EFI folder in front and a Recovery partition at the end of the disk. I tried installing just by using Disk Utilities in the macOS installer to wipe the disk. That was a mistake. The computer kept trying to boot into recovery but couldn’t because the main OS has been wiped.
- I ended up booting with Ubuntu live USB to wipe the drive clean and delete all existing partitions
- Boot computer with Ubuntu live USB
- Click on the “Activities” text on the top left corner, then in the search bar on top in the middle of your screen, type in “disks”. First result should be Ubuntu’s “disk utilities”
- Choose the correct hard disk (disk size is a good estimate), and delete all partitions you see there
- For ethernet, install AtherosE2200Ethernet.kext into EFI/Clover/kext/others folder of install macOS USB drive
- Plug the USB drive into the machine you want to install hackintosh onto
- Boot into bios and make the suggested changes
- Intel SpeedStep, Virtualization, VT for Direct I/O = Enabled
- SATA Operation: ACHI
- Everything else = disabled
- Secure Boot = Disabled
- Boot using the EFI installation drive
- Follow the macOS installation wizard, install onto SSD or HDD first. Use CarbonCopyCloner to copy to fusion drive later
- Disable hibernation:
Code:
sudo pmset -a hibernatemode 0
sudo rm /var/vm/sleepimage
sudo mkdir /var/vm/sleepimage
Step 4: Set up nVidia discrete GPU and Intel integrated GPU
- Open Clover Config in EFI folder with Clover Configurator
- In ACPI, add entries “change GFX0 to IGPU, 47465830, 49475055;” and “change B0D3 to HDAU, 42304433, 48444155”
- In boot, check disablefxfirmware on the top left, and NeverHibernate on the top right
- 4K monitors only: Boot Graphics -> EFILoginHiDPI = 1, UIScale = 2
- Graphics-> Inject Intel, ig-platform-id = 0x59120003 (Makes Intel iGPU into headless state (no display) to enable Intel Quick Sync
- Kernel and Kext Patches -> Apple RTC, AppleIntelCPUPM, DellSMBIOSPatch
- SMBIOS -> choose iMac18,3; generate Serial number and UUID for iMessage
- System Parameters -> Inject Kexts = Yes, Inject System ID = Yes, NvidiaWeb = Yes
- Install Drivers -> OsxAptioFix3Drv-64, HFSPlus-64, and NTFS-64
- Save clover config and close Clover Configurator
- Download and install the latest IntelGraphicsFixup.kext, Lilu.kext, NvidiaGraphicsFixup.kext, and Shiki.kext into /L/E
- Download and install the latest Nvidia Web Driver
- Reboot
- Many Nvidia devices in AppleHDA in 10.13.4+ have been removed
- Open IOReg and look up HDAU, combine vendor-id and device-id, note 2nd pair is reversed with first pair, and fourth pair with third, mine is DE10B90F
- Open Clover Configurator to open clover config
- Kernel and Kext Patches -> com.apple.driver.AppleHDAController, DE10B90F, DE10C00A, 10.13.4+ Nvidia HDMI Fix, 10.13.4,10.13.5
- May require replugging of HDMI or use Display Port with HDMI adaptor
- Side note: For 3.5mm audio port go to Clover Configurator -> Devices -> Audio -> Inject: 1 and install AppleALC into /L/E
Update (03/18/2019): Please see the corrected SSDT-UIAC zip file for correct USB injection for SD Card reader. Thanks @lisai9093.
Update (06/26/2019): The most up-to-date SSDT-UIAC contains the correct USB injection for the front USB C port. Please note the 2.0 port of the rear 3rd and 4th USB 3.0 port, as well as internal bluetooth has been disabled. Please comment/uncomment out the correct port injections to suit your own needs.
- Follow these two guides:
- Add the port limit patch in clover config -> kernel and kext patches -> kextsToPatch -> com.apple.driver.usb.AppleUSBXHCIPCI, 837D8c10, 837d8C1B, “change 15 port limit to 24”, 10.13.x
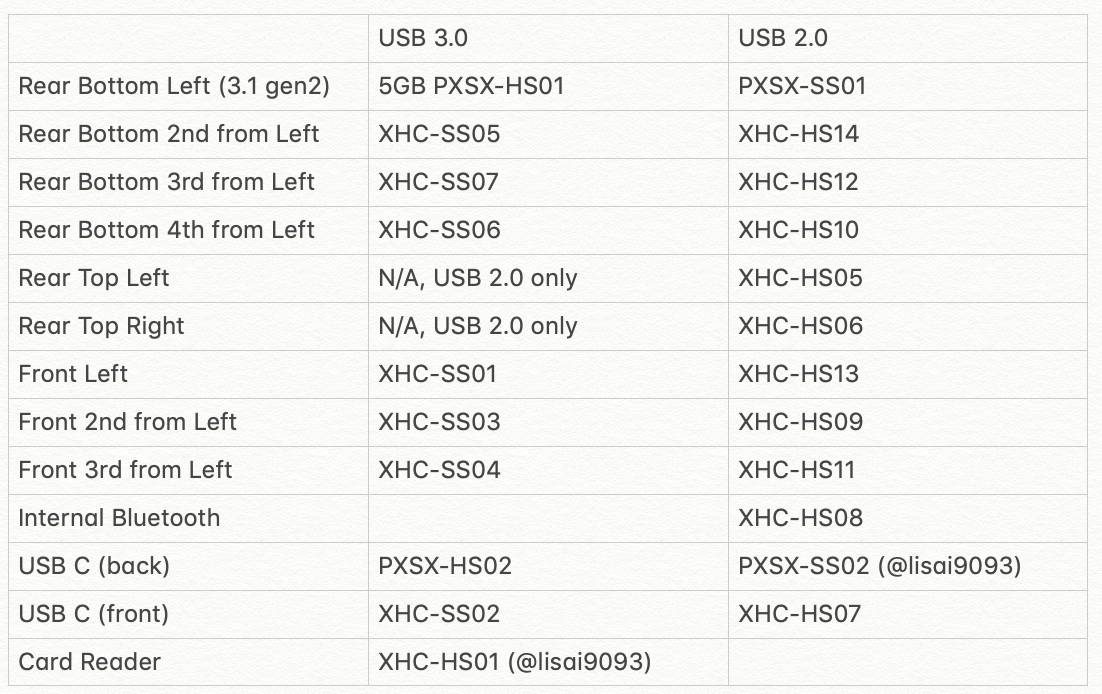
- Below is a table of what ports in IOReg correspond to physical port location
- Do not use FakePCIID_XHCIMux.kext because chipset z370 does not have an EHCI controller to move USB 2.0 ports to
- Use bootleg uia_exclude=SS06;SS07 to disable any ports that you do not need in case it goes over the 15-port limit
- Turn off the 15-port limit after done
- Update (03/18/2019) With SD Card reader working, my config would go over 15 ports. I ended up disabling the USB port for internal bluetooth because I am using a separate bluetooth+wifi card
I do not have any USB-C device so I do not have them tested/listed/enabled- May need to turn on clover config -> devices -> USB -> fix ownership. I did not have to until I cloned my drive onto a fusion drive and lost all my USB ports except for the USB 3.1 gen 2 port under PXSX
- PXSX is a different USB controller (ASMedia 1242) pci1b21_1242. This controller controls the USB 3.1 gen2 port, the rear USB type-c port (2.0 and 3.0), and an unknown “internal” port.
- The 3.1 gen2 port is misrecognized as an internal port. Edit DSDT by looking for Device (HS01) and change “Return (TUPC (0xFF))” to “Return (TUPC (0x03))
- Not sure if necessary: Open the Info.plist in USBInjectAll.kext and add these lines under <key>Configuration</key> <dict>
Code:
<key>Configuration</key> <dict>
        <key>1b21_1242</key>
        <dict>
            <key>port-count</key>
            <data>BAAAAA==</data>
            <key>ports</key>
            <dict>
                            <key>HS01</key>
                                <dict>
                            <key>UsbConnector</key>
                            <integer>3</integer>
                            <key>port</key>
                            <data>AQAAAA==</data>
                        </dict>
                        <key>HS02</key>
                        <dict>
                            <key>UsbConnector</key>
                            <integer>9</integer>
                            <key>port</key>
                            <data>AgAAAA==</data>
                        </dict>
                        <key>SS01</key>
                        <dict>
                            <key>UsbConnector</key>
                            <integer>255</integer>
                            <key>port</key>
                            <data>AwAAAA==</data>
                        </dict>
                        <key>SS02</key>
                        <dict>
                            <key>UsbConnector</key>
                            <integer>9</integer>
                            <key>port</key>
                            <data>BAAAAA==</data>
                        </dict>
                    </dict>
</dict>
Step 7: Fix NightShift for external monitor
- Will break HDMI audio! Use flux if you want to keep HDMI audio
- Must use Displayport! Configure with display port!
- Download required files. You will need two programs to proceed. The first is FixEDID, which can be found here: FixEDID, the second is DarwinDumper and can be found here: DarwinDumper
- Open FixEDID, wait for the fields to auto-load, and minimize FixEDID, do not close it.
- Open DarwinDumper, click Deselect All, check the EDID box, choose a output folder on your Desktop, and click Run. You will be prompted for your password, and the dump directory will auto-open when it is done. Close DarwinDumper, and copy EDID.bin to your desktop.
- Unminimize FixEDID, click Open EDID Binary File, select your EDID.bin. Now in the drop down menu under that button choose “Apple iMac Display” or “Apple iMac Retina Display,” and click the Make button. You should have a few new files now, but you can ignore all of them except DisplayMergeNub.kext, which you will need.
- Install into /L/E/ with KextBeast
- Upon rebooting you can go to Apple > About This Mac and under the Displays tab you will find your Mac now considers your external monitor to be your internal monitor, as a result Night Shift should not be auto enabled anymore, and you can now access the Night Shift preference pane from Settings.
- For those who want to reverse this process so that your external monitor is no longer considered a built-in display by your Mac, you can simply run the command sudo rm /Library/Extensions/DisplayMergeNub.kext && sudo reboot.
- Put FakeSMC_ACPISensors.kext, FakeSMC_CPUSensors.kext, FakeSMC_GPUSensors.kext, and FakeSMC_LPCSensors.kext into EFI/Clover/kexts/Other
- Reboot
- Use HWMonitor or other monitoring software
- Apply the following DSDT Patches
- _Wak Arg0 v2: For sleep/wake
- HPET
- SMBUS
- IRQ: For sound
- OS Check
- Mutex with non-zero SyncLevel
- Add IMEI
- Shutdown fix v2
- PXSX USB Fix from 0x99 to 0x03 (see step 6.9.)
- PXSX USB Power Injection (see step 6.9.1)
- Apply the following SSDT Patches
- SSDT-UIAC (Follow Rehabman’s USB PORT injection guide)
- SSDT-USBX (Follow Rehabman’s USB POWer injection guide, may be combined into SSDT-UIAC)
- SSDT-EC (Follow Rehabman’s USB POWer injection guide)
- Use CarbonCopyCloner to copy the OS to an external drive
- Install clover on the external drive, and copy your EFI folder of the boot disk onto the EFI folder of the external drive
- Boot into the external drive
- Use disk utilities to wipe the internal SSD and HDD
- Create fusion drive with terminal diskutil. When choosing the SSD, instead of merging the entire SSD and HHD into one logical drive, merge the SSD’s main partition with the HDD instead. That way you can retain the recovery partition on the SSD. I have heard creating recovery partition on the HDD will cause problems down the road. https://www.gillware.com/blog/data-recovery/fusion-drive-data-recovery/
- Clone macOS from external drive to the newly created fusion drive using CarbonCopyCloner
- I had trouble with my USB after creating my fusion drive, even when booting from the external disk or USB install drive. Turning on fix ownership in clover config -> devices -> USB solved it for me
- Set the SSD in fusion drive as the 1st UEFI boot option in BIOS
- Mount EFI and open config.plist in clover configurator
- In GUI, add custom entries
- In Volume, choose RECOVERY partition of SDD, type in custom title and check box “Title / FullTitle”, choose OSX in type and Internal in VolumeType, copy the UUID
- In Volume, choose Recovery partition of SSD and do the same as step 9.3.1
- For default boot, paste the copied UUID from step 9.3.1 to Boot - Default Boot Volume and set a Timeout for countdown to auto boot
- I originally tried to use the BCM94360CS2 MacBook Air card with m2 (a+e key) adapter for the built-in USB connection and internal antennae. Sadly there was not enough clearance to install the card. The m2 port is too close to the PCI-e x16 port that this card simply won't fit. A flex cable for a+e keyed m2 ports costs $40+, so I went the other route instead.
- I ended up purchasing a BCM943602CS PCI-e card and installed into the PCI-e x1 port.
- For handoff to work, you would have to plug in the 4-pin port on the card into a USB port. Unfortunately the XPS 8930 does not have an available internal USB header. What I ended up doing was cutting an spare USB 2.0 cable that I have, and attach the cable that came with the Wifi+Bluetooth card to it so I can plug it into an external USB 2.0 port. You would only need to connect the 4 color wires to their corresponding color wires of the cut USB cable. Breadboard jumper wires, heat-shrink tubings and the heat gun from my Arduino project came in really handy. You can probably make do with electrical tape although the connection wouldn't be as good. For a more robust cable, soldering is recommended.
- After connecting everything, Wifi and Bluetooth should work out of the box.
- All continuity except Apple Watch unlock works for me. Not sure why unlock isn't working.... probably not worth the 12 hours of research just to avoid typing in my password.
- I stayed on Clover 4558. If you have updated to 4586, be sure to custom install AptioMemoryFix-64 and ApfsDriverLoader-64 into EFI/clover/drivers64UEFI. My understanding is the update would delete your current Aptio fix
- If you are staying on Clover 4558, put the most up-to-date apfs.efi into your EFI/clover/drivers64UEFI
- Download the update from the Mac App Store
- Follow the installation instructions
- When the system reboots, make sure you stay in front of the computer. You'll need to pick the InstallP boot partition in Clover several times
- If the update is stuck at "Calculating time remaining," I unplugged all USB devices except for my mouse and keyboard, and the installation resumed very quickly.
- After booting back into macOS, install the new Nvidia web drivers. I just updated through the Nvidia preference pane.
- Redo audio patch if audio is broken.
- Re-disable hibernation.
(Nvidia has already updated their web driver so the steps to patch the web driver are no longer necessary.)
- Download the update from the Mac App Store
- Follow the installation instructions
- When the system reboots, make sure you stay in front of the computer. You'll need to pick the InstallP boot partition in Clover several times
- If the update is stuck at "Calculating time remaining," I unplugged all USB devices except for my mouse and keyboard, and the installation resumed very quickly.
- After you log in, Nvidia web driver will disable itself saying it is not compatible.
- Do the following to re-enable Nvidia web driver (thanks Reggie and namio):
- Open Terminal
- Paste/Type the following into Terminal: sudo nano /Library/Extensions/NVDAStartupWeb.kext/Contents/Info.plist
- Enter Password
- Find <key>NVDARequiredOS</key> by scrolling down or using search with ⌘f
- Replace build number with yours (17G3025) between the <string></string> below <key>NVDARequiredOS</key>
- Press Ctrl+x on your keyboard to open save prompt
- Press Y
- Enter to save
- Paste/Type into Terminal to rebuild cache:
-
Code:
kextcache -update-volume /System/Library/Extensions - Restart Hackintosh
- I tested the upgrade with a clone of my main system on a second Harddisk, so I cannot tell if it'll work well on fusion drive/SSD
- Mojave does not support Nvidia 1050-Ti. This guide uses the onboard Intel UHD 630 chipset. The Nvidia card will have to be physically removed. Dell bios does not support disabling discrete graphics cards. In fact, it appears that Dell disables integrated graphics when it senses a discrete graphics card installed.
- Remove IntelGraphicsFixup, NvidiaGraphicsFixup, and Shiki from /Library/Extentions. These have been replaced with WhateverGreen
- Install WhateverGreen with KextBeast or Clover Configurator
- In Clover Configurator
- Update clover to the latest version
- Under Boot, uncheck -disablegfxfirmware, add "-cdfon" to custom flags for better 4K support
- Under Devices, on bottom right side click the "Properties" tab and add these entries:
- Click "+" on the left pane, and type in "PciRoot(0x0)/Pci(0x2,0x0)". This is the path for the IGPU
- Click "+" on the right pane to add the following properties
- AAPL, ig-platform-id, 07009B3E (Proper device ID for WhateverGreen to use the IGPU UHD 630
- framebuffer-stolenmem, 00009003 (This and below are to increase VRAM for better 4K support)
- frambuffer-patch-enable, 01000000
- framebuffer-unifiedmem, 00000080
- framebuffer-fbmem, 00000000
- In Graphics, uncheck everything and make every field empty
- In SMBIOS, change to iMac18,1. You may need to regenerate a new serial
- Install Mojave through the App Store. Make sure your Nvidia card has been physically removed before proceeding or it will not boot up.
- Computer will reboot a few times. I left it overnight and in the morning I have Mojave installed.
- I only tested Display Port but not HDMI.
- I noticed audio is no longer working. However I use a USB speakers so I probably won't investigate very much. Look into WhateverGreen and FBPatcher if you intend to fix it.
- I tried disabling discrete graphics by patching SSDT. In SSDT-2, I added the line "PGOF(Zero)" into "Method (_INI" under "\_SB.PCI0.PEG0" PCI0.PEG0 is the path for the discrete graphics card, PGOF() appears to be the power off method, and Zero appears to tell the method which PEG to turn off. It didn't seem to do anything. I assume since the bios disabled IGPU before SSDT tables are loaded, this patch would not work to avoid having to physically remove the discrete card
Attachments
Last edited: