- Joined
- Nov 1, 2012
- Messages
- 1,007
- Motherboard
- GA-Z77X-UP5 TH
- CPU
- i7-3770K
- Graphics
- HD4000 / GTX 1050 Ti
- Mac
- Classic Mac
- Mobile Phone
Installing an additional GPU, and revisiting the case layout
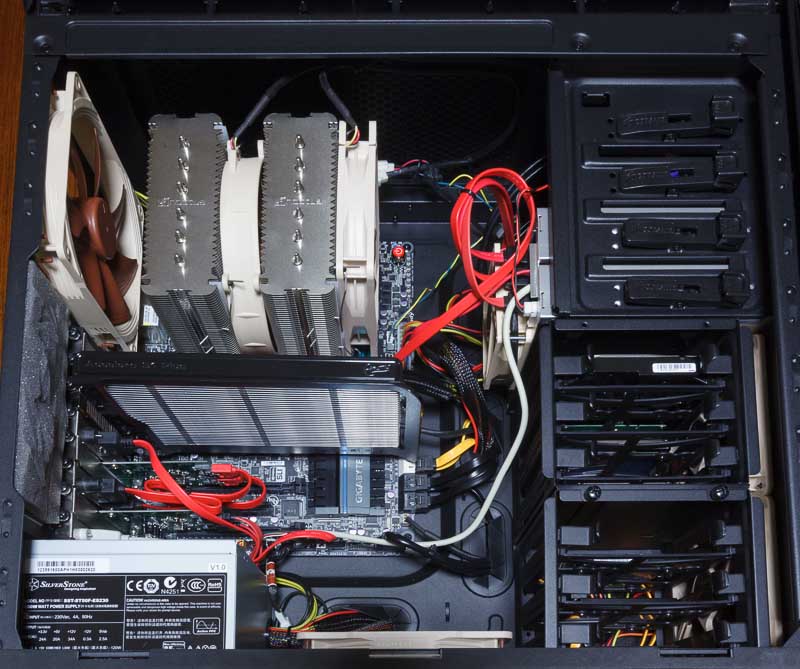
Even though the HD4000 graphics was enough for my current work, I decided to experiment with adding a GTX 650 card to the system. So I had to look at how I would mount it in lammergeier. The machine is housed in a Corsair Obsidian 550D case, which is a roomy case with easy access. Since the initial build I had tidied up the cabling so that very few cables ran above the motherboard, and this was partly in order to facilitate the airflow to cool the Northbridge/etc chips. They weren't running hot, but I didn't want to waste any efficiency.
This is how I first put the GTX 650 in the system:

There're just enough slots for the GPU! Here you can see the Gigabyte GV-N650OC-2GI with its default heatsink and fan. I installed it this way at first to make sure things worked on the software side (which was easy).
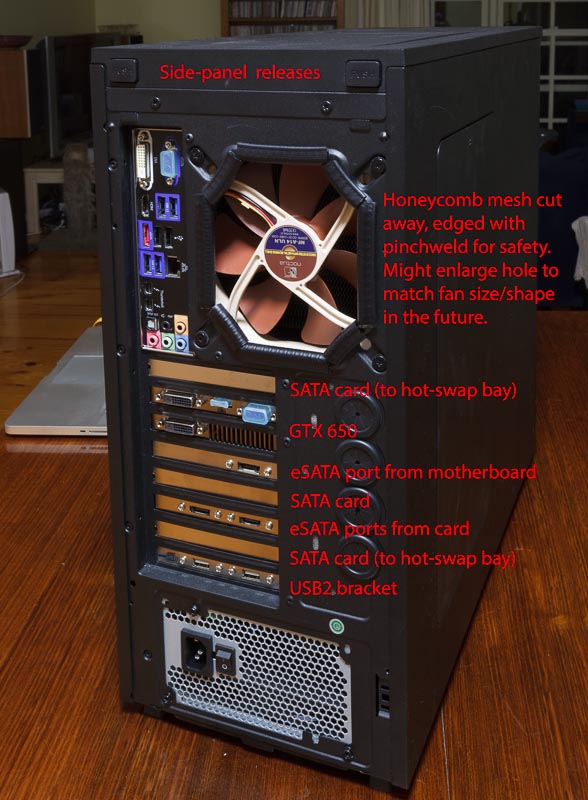
There are three PCIe SATA cards in there (one's hiding just above the GPU), and I've used a couple of 1m-long SATA cables to run behind the motherboard between the cards and the hot-swap bay without cluttering up the airflow. A single cable isn't going to have a big effect on the airflow, but once a few SATA and USB cables start heading in different directions it does get messy very quickly. Two of the shorter SATA cables would be eliminated if I had used one 2-port eSATA card, but there's still enough room for everything. There's a 2-port USB2 bracket at the bottom. By this time I was no longer using the FW400 (1394a) port so was able to remove the cable+bracket for that, freeing up a slot.
Incidentally, the SATA colour scheme in this case is currently:
Fans
Multiple fans are in this system:
")
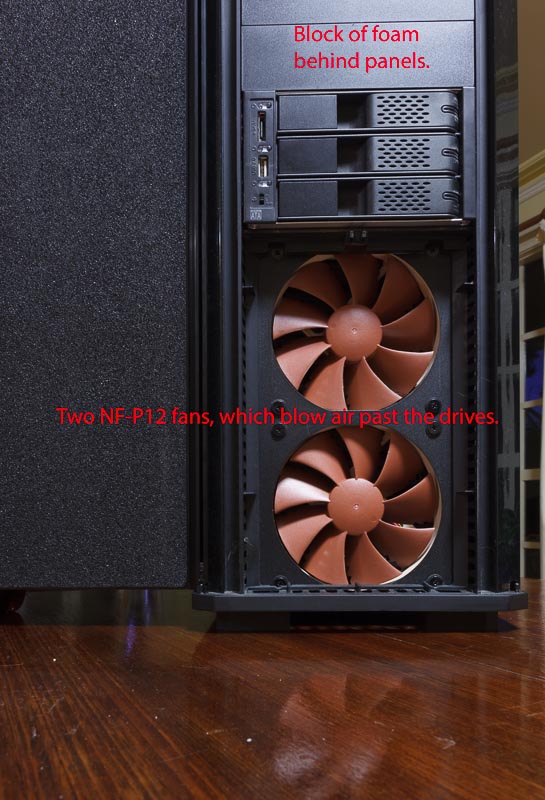
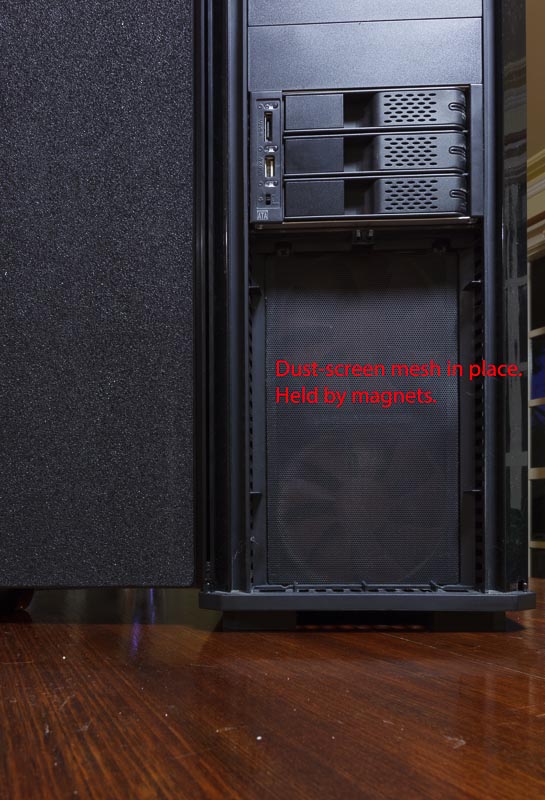
While I had the case out on the table I took some more photos showing where the front fans fit into the setup:
PCIe bandwidth
Choosing which cards went into which slots wasn't just a case of where things would physically fit: I first chose these positions based on PCIe speed. The GA-Z77X-UP5 TH motherboard has a total of six PCIe slots:
Here's the view from the back:
So that's all fine, but I did mention I'm a tinkerer didn't I? I had bigger plans for the card...
A silent GPU!
The Gigabyte GTX 650 has a fan which is generally regarded as quiet. However it was noticeable as I already had a fairly quiet machine, especially when the GPU was working hard. The 9-bladed GPU fan ramped up to ~1900 rpm (32 revs/second) which might explain some of the harmonics I could hear in the noise. Despite the card being inside the Obsidian 550D case, about half the GPU fan's output is through slots in the rear panel so noise from there can bounce off the nearby wall. Also after a few days there was a new sound. I stopped the GPU fan with my finger, and the noise went away. The fan started up again, but without the noise. So it seems to have been an imbalance in the fan.
The GPU temperatures weren't bad. The hottest I saw it go was almost 60C, which is less than my overclocked i7 goes. At idle it was in the low 30s.
I replaced the Gigabyte heatsink with a quieter solution: the Arctic Accelero S1 Plus (which cost me AU$29). This beast is completely passive, with no fan of its own (although an additional fan module is available for higher-spec GPUs). However any airflow will help the fins dissipate heat, and the existing flow of air through my case should be perfect for it. It's actually rated to be able to cool the 110W GTX 650 Ti with no fan, so the 64W GTX 650 should be no trouble.
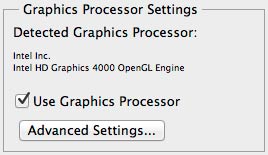
Fitting the heatsink involved unbolting the existing heatsink/fan, cleaning the board, gluing on (with the provided thermal glue) heatsinks to all of the RAM and VRM chips, and bolting the massive heatsink to the GPU (GK107) chip. If you're gluing heatsinks to both sides of the board it's easiest if you don't mix all of the G-1 glue at once. Do about half, and fix the heatsinks to one side. Then wait the 5 hours for it to set. To be sure I then cured the board in an oven around 70C for 10 minutes. Then mix the rest of the glue and do the same for the other side of the board. Prior to starting the gluing process I carefully decided which heatsinks were going to go where on the voltage regulators, and used a hacksaw to cut up some of the VRM heatsinks so every regulator chip got a heatsink (even if some only have two fins). When positioning the heatsinks be careful to not short out any of the SMT capacitors (some of which are taller than the nearby regulator chips). While all this was going on the machine was happily running with the HD4000 graphics of course.
The heatsink comes with a pre-applied layer of thermal paste, however I felt it was too thick and in order to optimise the heat transfer I cleaned it off and used a dab of Noctua NT-H1 paste. Incidentally, while the original heatsink made contact with the GK107 chip, the VRM and RAM chips were not actively cooled except by airflow (especially the ones on the rear of the board!). All of this is removable later, so I stowed the Gigabyte heatsink and fan safely in my parts bin. Once everything was set, back into the case it went:

As you can see, it seems perfectly positioned in this case to take advantage of the fan in the bottom of the case (although I may add a guide to send more air down to the rear of the cooler).
The thin black cable you can see just above the GPU is something I made that connects to the now-unused fan connector on the GTX 650, letting me feed in sense information from another fan.
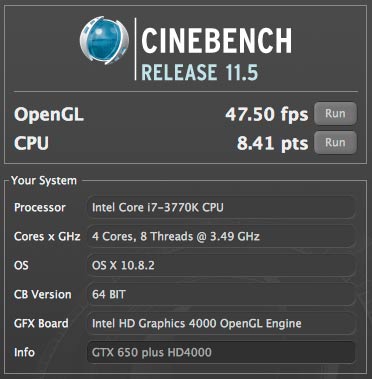
The GPU temp used to idle around 30C and peak at 60C. After the fan removal and heatsink upgrade the idle temp is around 28C and the highest I've seen (running Heaven) is 58C. For AU$29 it's quieter, and no hotter.

The GPU clocks ramp up under load automagically.
In this sample (I will probably change the cabling later) the fans are:
Details of software configuration and benchmarks will come later.
Even though the HD4000 graphics was enough for my current work, I decided to experiment with adding a GTX 650 card to the system. So I had to look at how I would mount it in lammergeier. The machine is housed in a Corsair Obsidian 550D case, which is a roomy case with easy access. Since the initial build I had tidied up the cabling so that very few cables ran above the motherboard, and this was partly in order to facilitate the airflow to cool the Northbridge/etc chips. They weren't running hot, but I didn't want to waste any efficiency.
This is how I first put the GTX 650 in the system:
There're just enough slots for the GPU! Here you can see the Gigabyte GV-N650OC-2GI with its default heatsink and fan. I installed it this way at first to make sure things worked on the software side (which was easy).
There are three PCIe SATA cards in there (one's hiding just above the GPU), and I've used a couple of 1m-long SATA cables to run behind the motherboard between the cards and the hot-swap bay without cluttering up the airflow. A single cable isn't going to have a big effect on the airflow, but once a few SATA and USB cables start heading in different directions it does get messy very quickly. Two of the shorter SATA cables would be eliminated if I had used one 2-port eSATA card, but there's still enough room for everything. There's a 2-port USB2 bracket at the bottom. By this time I was no longer using the FW400 (1394a) port so was able to remove the cable+bracket for that, freeing up a slot.
Incidentally, the SATA colour scheme in this case is currently:
- Yellow: SATA3 to SSDs.
- Black: SATA2 to HDDs.
- Red: eSATA/hot-swap feeds.
Fans
Multiple fans are in this system:
- Two Noctua 120mm fans at the front draw air across the drives and into the lower part of the case.
- One Noctua 140mm fan at the bottom of the case pushes air up across the motherboard and towards the CPU.
- A Noctua 80mm fan at the rear of the 3-drive hot-swap bay draws air across the drives and pushes it towards the CPU. This fan is only on when any of those drives are powered up.
- The NH-D14 cooler on the CPU has two fans, blowing air towards the rear of the case. The central 140mm fan protrudes down below the heatsink fins, and helps pull air across the motherboard components nearby.
- One Noctua 140mm fan at the rear of the case pushes air out.
While I had the case out on the table I took some more photos showing where the front fans fit into the setup:
PCIe bandwidth
Choosing which cards went into which slots wasn't just a case of where things would physically fit: I first chose these positions based on PCIe speed. The GA-Z77X-UP5 TH motherboard has a total of six PCIe slots:
- Three v2 x1 slots, although they are all switched into a single PCIe lane to the host.
- One v3.0 x4 slot.
- One v3.0 x8 slot (which runs at x4 if the x4 slot is occupied).
- One v3.0 x16 slot (which runs at x8 if the x4 or x8 slots are occupied).
- One SATA card is in a x1 slot.
- One SATA card is in the x4 slot.
- One SATA card is in the x8 slot.
- A GPU card can go in the x16 slot (although it will run at x8). With PCIe v3.0 the theoretical bandwidth of this is 7.8 GB/s, which shouldn't be a significant bottleneck.
Here's the view from the back:
So that's all fine, but I did mention I'm a tinkerer didn't I? I had bigger plans for the card...
A silent GPU!
The Gigabyte GTX 650 has a fan which is generally regarded as quiet. However it was noticeable as I already had a fairly quiet machine, especially when the GPU was working hard. The 9-bladed GPU fan ramped up to ~1900 rpm (32 revs/second) which might explain some of the harmonics I could hear in the noise. Despite the card being inside the Obsidian 550D case, about half the GPU fan's output is through slots in the rear panel so noise from there can bounce off the nearby wall. Also after a few days there was a new sound. I stopped the GPU fan with my finger, and the noise went away. The fan started up again, but without the noise. So it seems to have been an imbalance in the fan.
The GPU temperatures weren't bad. The hottest I saw it go was almost 60C, which is less than my overclocked i7 goes. At idle it was in the low 30s.
I replaced the Gigabyte heatsink with a quieter solution: the Arctic Accelero S1 Plus (which cost me AU$29). This beast is completely passive, with no fan of its own (although an additional fan module is available for higher-spec GPUs). However any airflow will help the fins dissipate heat, and the existing flow of air through my case should be perfect for it. It's actually rated to be able to cool the 110W GTX 650 Ti with no fan, so the 64W GTX 650 should be no trouble.
Fitting the heatsink involved unbolting the existing heatsink/fan, cleaning the board, gluing on (with the provided thermal glue) heatsinks to all of the RAM and VRM chips, and bolting the massive heatsink to the GPU (GK107) chip. If you're gluing heatsinks to both sides of the board it's easiest if you don't mix all of the G-1 glue at once. Do about half, and fix the heatsinks to one side. Then wait the 5 hours for it to set. To be sure I then cured the board in an oven around 70C for 10 minutes. Then mix the rest of the glue and do the same for the other side of the board. Prior to starting the gluing process I carefully decided which heatsinks were going to go where on the voltage regulators, and used a hacksaw to cut up some of the VRM heatsinks so every regulator chip got a heatsink (even if some only have two fins). When positioning the heatsinks be careful to not short out any of the SMT capacitors (some of which are taller than the nearby regulator chips). While all this was going on the machine was happily running with the HD4000 graphics of course.
The heatsink comes with a pre-applied layer of thermal paste, however I felt it was too thick and in order to optimise the heat transfer I cleaned it off and used a dab of Noctua NT-H1 paste. Incidentally, while the original heatsink made contact with the GK107 chip, the VRM and RAM chips were not actively cooled except by airflow (especially the ones on the rear of the board!). All of this is removable later, so I stowed the Gigabyte heatsink and fan safely in my parts bin. Once everything was set, back into the case it went:
As you can see, it seems perfectly positioned in this case to take advantage of the fan in the bottom of the case (although I may add a guide to send more air down to the rear of the cooler).
The thin black cable you can see just above the GPU is something I made that connects to the now-unused fan connector on the GTX 650, letting me feed in sense information from another fan.
The GPU temp used to idle around 30C and peak at 60C. After the fan removal and heatsink upgrade the idle temp is around 28C and the highest I've seen (running Heaven) is 58C. For AU$29 it's quieter, and no hotter.
The GPU clocks ramp up under load automagically.
In this sample (I will probably change the cabling later) the fans are:
Fan 1: 120mm fan on NH-D14 CPU cooler.
Fan 2: Upper front 120mm fan.
Fan 3: 140mm fan on NH-D14 (driven by the same voltage from the CPU_FAN motherboard header as the 120mm fan).
Fan 4: 140mm exhaust fan.
Fan 5: 140mm bottom intake fan.
GPU Fan: Lower front 120mm fan.
Having the GPU fan sensor is useful, as I've used all the motherboard's sensors. Now the only fan in the system not being monitored is the 80mm one on the hot-swap bay. However as it's usually off when the system boots, whatever fan sensor I hooked it up to would be ignored by the system as inactive.Fan 2: Upper front 120mm fan.
Fan 3: 140mm fan on NH-D14 (driven by the same voltage from the CPU_FAN motherboard header as the 120mm fan).
Fan 4: 140mm exhaust fan.
Fan 5: 140mm bottom intake fan.
GPU Fan: Lower front 120mm fan.
Details of software configuration and benchmarks will come later.
Last edited by a moderator: