
- Joined
- Feb 12, 2012
- Messages
- 253
- Motherboard
- MSI Z77A-G45
- CPU
- i5-3570K
- Graphics
- GTX 660
- Mac
- Mobile Phone
DarfWeder's Thin MiniITX Build: Asus H81T – Core i5-4570s - HD4600
Episode IV: A new hope
Episode IV: A new hope
Components
Apple OS X Mavericks 10.9 @ Apple's App Store
Mac OS X 10.9.1 Mavericks - Apple Store (U.S.)
Asus H81T LGA 1150 Intel H81 Thin MiniITX Intel Motherboard
http://www.amazon.com/gp/product/B00HGO7GXM/
Intel Core i5-4750s Haswell 2.9GHz LGA 1150 65W Quad-Core Processor Model BX80646I54570S
http://www.amazon.com/gp/product/B00CO8T9VW/
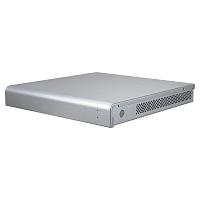
Lian Li PC-Q05A Silver Aluminium Mini ITX media center HTPC Case
http://www.amazon.com/gp/product/B00C11ZBL4/
Intel Cooling Fan/Heatsink CPU Fan BXHTS1155LP
http://www.amazon.com/gp/product/B0065ZUXS8/
HP Compaq AC Adapter 135W i.e. HP Compaq NX9420
http://www.amazon.com/gp/product/B002T1QE80/
Already Owned
1 x Toshiba 120GB SATA 2.5” 8MB 5400RPM internal Hard Drive
http://www.amazon.com/gp/product/B002GW163U/
Samsung 2 x 2GB SO-DIMM 204 Pin PC-8500 DDR3 1066MHz Memory Module
http://www.amazon.com/gp/product/B002BJ37JO/
Comments
I had been tempted by the design of the case, the fan solution (common on laptops) and the challenge to build something very much like a MAC mini. First of all I wanted this PC case for its sleek looks. In hindsight you may want more USB ports in the case's front than the 4 available on the backplate of the motherboard (2 USB2 and 2 USB3). The choice for the motherboard from Asus was mostly a money factor compared to what Gigabyte or the Intel boards cost (like +70% for the Intel DQ77KB). The Intel board had been done, so poses no challenge, also several Gigabyte boards had been done with more or lesser success. The Asus was not done by anyone yet, not even in Google there was a reference to it in conjunction with OS X... With my good experiences with Asus from years ago, together with a bad board as my second Hackintosh build that made me go back to MSI again (the Z77), this sounded like a fun thing to do. I knew it was not going to be a walk in the park but I had never anticipated it to become quite as challenging as it turned out.
As I have quite some broken laptop parts lying around, they just begged for getting reused. Altogether, this is my build. I intend to use it for (quiet) remote working and possibly hooking it up to a TV although that is a bonus, and wasn't a requirement. The Quad Core should give me plenty of power to even run Lightroom, Premiere Pro, iMovie, or Photoshop.
My budget was around the 350 euros but you could easily do this with around 350 dollars. The board seems more expensive in the States as normally whatever the euro price is, is also the dollar price without converting euros to dollars. For instance my power supply cost me around 30 euro but the same in the States cost 30 dollars. The motherboard was 70 euros here but is 100 in the States.
As with all Thin MiniITX builds, the power supply is EXTREMELY quiet and external. No fan... it's a laptop power supply... (brick). The fan on the processor is less quiet than I had hoped but we can still mess with the BIOS settings to get it quieter.
The case does not offer a lot of room, 2 slots for 2.5” HDD or SSD and that's about it. No room for a DVD or BluRay drive, not even a slim one, but that was fine by me.
The physical build
When you put the parts together in the case, start by getting everything out of it, so remove the drive cage, the two pieces of aluminum building an isolated area for the exhaust of the fan.
Getting the backplate in is a bit of challenge and the motherboard resists getting in pretty much. Easy does it though. Take your time, it is a tight fit. You have a choice of where your “power” light comes, either to the side or the front. The “HDD working” light is on the front already... however the front “power on” light uses a three pin terminal that is not compatible with the 2 pin header on the motherboard, unless you do a small mod on it. The 2 pin terminal fits obviouslt but lights up on the side. I am contemplating a small mod to the case so I can get more USB ports in it, but the only viable choice is right next to the power button towards the rear of the case. Or run a (powered) USB hub if you need more than 2 USB 2 and 2 USB 3 ports.
The BIOS
This was something which could have bitten me in the behind. The BIOS only allows original BIOS files to be loaded. That could pose some issue as also the DOS flash tool from Intel is not working on this platform (yet?). I had done a dry run with PMPatch to remove the locking issue in the BIOS but I have not been hit by any KP's so far. So, in that regard we either have been lucky or haven't reached that point yet.
There is some odd things you need to set in the BIOS though, and mainly the SECURITY BOOT option has to be set to “Other OS”. Even with this setting, you will have to go the extra mile, to get it to boot without the USB stick later.
Personally I do not like the Asus BIOS and its setup that much, but that's personal. Here are the main settings I am running:
- AI Tweaker / CPU Core Ratio Auto
- CPU Power Management / EIST enabled + Turbo Enabled, CPU C-States Auto.
- Advanced / CPU config: Intel Adaptive Thermal Monitor Enabled, Execute Disable bit: enabled, Intel Virtual Tech: disabled
- Monitor: CPU Fan profile: Silent.
- Boot : USB support – Full init. Secure boot – Other OS
- Intel xHCI mode: Smart Auto. (don't know which section it came from, it's in my favourites)
The Secure boot option to Other OS is a must, at least when your only system will be OS X. I do not run Windows or dual boot.
Installation
This is as straight forward as they come, the usual USB stick created etc. If your HDD has no system on it, then it should boot from the USB stick. Otherwise enter the BIOS and via Advanced/Boot, scroll to the bottom and find the USB key (indicated like 7598MB...) and click on it, that makes it boot from it.
As boot options for the initial install you need npci=x2000 PCIRootUID=0
At times both seem necessary, sometimes only npci but best to enter both. ONLY for installing OS X.
After the installation of OS X, it will reboot and again you need the USB stick to boot, but this time choose your HDD to boot into and not the install. You do not need to enter anything anymore at this stage...!
When you get to your desktop, the fun begins.
MacIASL / getting a good DSDT
MacIASL is proving to be the tool to get for this. Get it here [u]http://maciasl.sourceforge.net[/u]
After downloading, run it, and open Preferences, Sources, and enter a new Name like ToledasPatches and enter the URL [noparse]https://raw.github.com/toleda/audio_hdmi_8series/master[/noparse]
This is the only thing you really need here. I've left it on ACPI 4.0.
When you now compile your DSDT you will a bundle of errors. Do not be alarmed. Click the PATCH button and in the side bar choose under ToledaHDMIAudio the 8series-Clean-Compile
Then click Apply. Compile again. Your compile will now be clean with only some warnings. I'm fine with that.
Save the DSDT then to your desktop as DSDT.aml (ACPI machine language binary/compiled).
SSDT Speed Stepping/Power Management
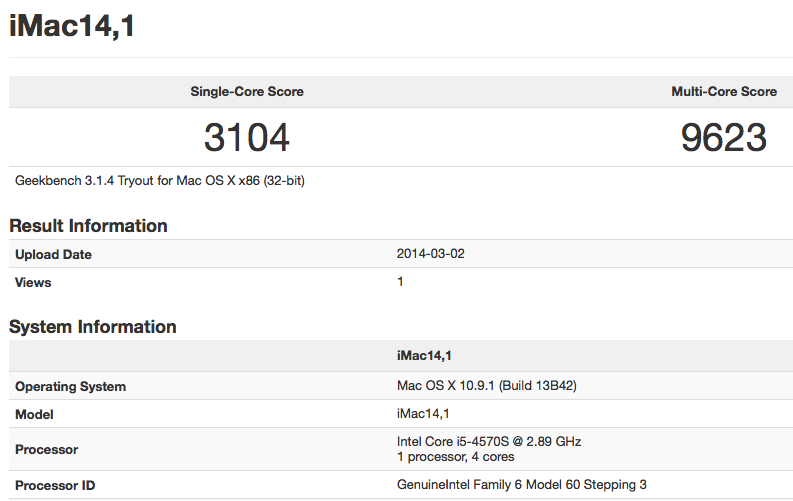
The thread is here http://www.tonymacx86.com/ssdt/86906-ssdt-generation-script-ivybridge-pm.html . Download the zip file and run the application, and then run it again. The parameters are different per CPU but require base frequency, Turbo (max) frequency etc. This can all be looked up normally if you don't know this already ([u]http://ark.intel.com[/u] is a good source
Save the compiled (binary/aml) file to your desktop. It will normally give it a name like ssdt_pr.aml which later you can change to ssdt.aml when you put it in /Extra (later!).
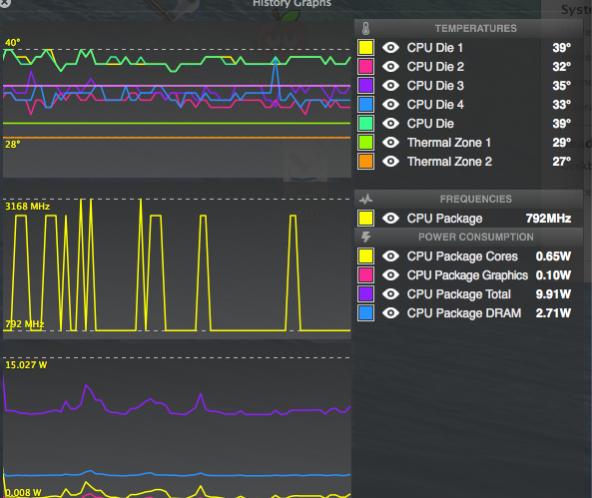
For my i5-4570s I have seen at least 3 multipliers in HW monitor, 8, 29 and 32. That's good enough, also as I run it with iMac 14,1 settings.
Running Multibeast
Even if followed correctly and Chimera installs or is installed after running MB, you will still need to reboot with the USB stick. Do not be alarmed, we will fix it later. Without the USB stick the BIOS will automatically be shown again, after which you select the USB stick and off you go by choosing your Mavericks installation.
The installation details can be seen in the screen shot from MB here

Oddity 1: Although we install with DSDT from the previous steps, we install the sound card without DSDT and select the current ALC887 kext, even though DPCIManager says it is a ALC888. The manufacture's saying it is a 887 so we go for that.
Oddity 2: We deselect so do NOT generate CPU states
Oddity 3: We do not install our network kext as the one with MB does not recognize it.
Oddity 4: HDAEnabler is on but for Audio via HDMI you will later delete HDAEnabler1.kext from S/L/E... but you can leave it in now if you don't do audio via HDMI later.
Now run the install till it is complete. It will take a while. Do not reboot!
Copy your SSDT.aml (or SSDT_PR.aml but rename it to ssdt.aml) file to /Extra. If you can't find the Extra folder in Finder, go to Preferences, Sidebar, and click on the HDD so it shows up in the sidebar.
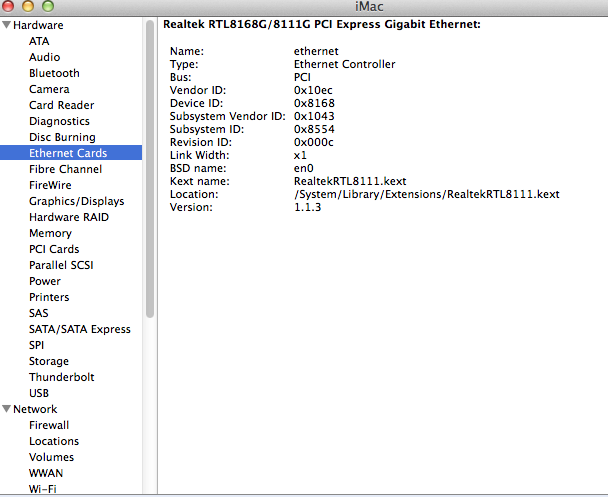
Network adapter kext
As said, the MB kext for this Realtek 8111G doesn't work. Get it here: http://www.insanelymac.com/forum/topic/287161-new-driver-for-realtek-rtl8111/
At the bottom of the 1st post is a link to a precompiled binary. Click that and download the KEXT.
Follow the instructions in the 1st post to the letter on how to install it. In short: after removing the Realtek81xx.kext from S/L/E (as I had tried installing it), I used DPCIManager to rebuild permissions et al, rebuild cache, install the KEXT, rebuild cache.
Do not reboot! we're not done yet.
Move Chimera to the EFI partition incl. /EXTRA
This is absolutely necessary. The description is here, follow it to the letter.
http://www.tonymacx86.com/401-install-bootloader-extra-efi-partition.html
So, after doing THAT you can reboot and it will boot just fine into OS X Mavericks.
It's not for the faint of heart, but it is necessary to do all this to get it to work.
EDIT
Obviously to me, maybe not so much for you, there were some gaps or things that didn't work yet.
- HDMI AUDIO (March 4, 2014)
- Sleep
Sleep is not working right, but I will get to that at some later stage. I really don't put my stormtroopers to sleep and do nothing.
Audio over HDMI
Holy smajolies! It does work, but not out of the box, that's for sure. To make it work I used two threads on the board to get it to work.
http://www.tonymacx86.com/hdmi-audio/108302-haswell-hdmi-audio.html
http://www.tonymacx86.com/graphics/125239-hd4600-hd4000-hd3000-framebuffer-edits.html
If you follow my build you already have done part of it.
Earlier we installed HDAEnabler via MB in S/L/E (there is the HDAEnabler1.kext) which you now remove and rebuild cache with DPCIManager. (Basically follow the thread)
Before you can start to update your /Extra/DSDT or SSDT.aml file you need to mount the partition (EFI) via terminal, issue sudo -s and after the password issue mount_hfs /dev/disk0s1 /Volumes/EFI (the EFI volume should be there already).
The exact sequence can also be found in the thread mentioned above about moving the bootloader to the EFI partition and moving /EXTRA.
Back to getting HDMI Audio to work.
I chose to enable HDMI audio via DSDT rather than SSDT so I followed option 1.
With MacIASL I checked if P0P2 was present. If it is not present it says to run a specific script. If you do it wrong or twice you will get compile errors. You need to either revert then or better, you should have made a copy and call it copy or original.
I applied the MaciASL/Patch/Desktop-HD5K/AMD/Nvidia-A1 script, compiled and saved
Ran DPCIManager to rebuild the cache.
Obviously you don't do the enabling via the second method via SSDT. Don't forget to save it in the right place on the EFI partition in /EXTRA, or if you opened it from there then it will save it there.
The first link for the HDMI Audio stuff, then talks about framebuffer edits, but I went to look at the second thread I posted on this, the HD4600 framebuffer edits. There is some more info there although more info can also be confusing. I really had to read this thing about 5 times before it made SOME sense. The guys are technically excellent but for a novice in doing this, there could be some more guidance and explanations. Something, we as geeks, do. We skip the "oh they should know that" part. Anyway...!
First thing to do there, as per usual is read ALL the first post, and you will find out that you probably need IOJones first, which is more or less on the end of the first post

You will find the link under the TOOLS section download nr 2. Then start that up after the download and follow the "how to find the port number" explanation. Although for me it wasn't exactly as described, I figured I have port 5 and 6 occupied, with DVI or HDMI, and there is no DP display port on the box anyway so for that reason I chose to use patch "c" . You can find the Framebuffer config table described earlier in that post and you will see that option "C azul" will have port 5 and 6 with dvi or hdmi, and 7 without a display (ND no display) or PD (display port). Well, there it is.
I could then download the "C" script (you need to click the "view raw" button following the display of the link). Obviously this is specific for the processor etc but we're talking about this build with a HD4600 GPU.
After the download double click the it and it will do the patch for you if you put in your password.
Make sure on the EFI partition /Extra/org.chameleon.Boot.plist, that there is a key IGPEnabled and a string Yes with it.
Reboot or better shut down. Connect HDMI cable to TV.
This should all work fine now when booting. In System Preferences you can now choose Sound, and have the OUTPUT go to your HDMI (last option, scroll down). There is no volume control, this is normal, as volume must be controlled on the device itself (TV).
If anybody interested then I can post the new DSDT. It works also without the frame buffers in that sense that the system comes up, although without the frambuffer edit HDMI audio still doesn't work.
Applause!
The only thing remaining now (for me) is the sleep part. But not that I care that much for it, I'm not even sure for an iMAC def that it should or could work! We'll find out, but I think it should work. May have to move to Clover though (oh no! All that work!!!)
Images


Attachments
Last edited by a moderator: