
- Joined
- Feb 12, 2012
- Messages
- 253
- Motherboard
- MSI Z77A-G45
- CPU
- i5-3570K
- Graphics
- GTX 660
- Mac
- Mobile Phone
DarfWeder's MSI Z77A-G45 i5-3570K 16GB GTX660-HD4000
Components
Motherboard: MSI Z77A-G45
[Amazon-de]http://www.amazon.de/dp/B007JRGVUA/?tag=tonymacx8603-21
CPU Intel Core i5-3570K
[Amazon-de]http://www.amazon.de/dp/B007RUZKK6/?tag=tonymacx8603-21
Transcend JetRam DDR 3 1333MHz CL9
[Amazon-de]http://www.amazon.de/dp/B00432SYWW/?tag=tonymacx8603-21 (This is the 2x4GB although I have the same in 2x8GB however it seems to not be on offer from Amazon.de. Specwise it is the same, CL9.)
Scythe Shuriken Rev B CPU Cooler
[Amazon-de]http://www.amazon.de/dp/B001R2KSZW/?tag=tonymacx8603-21
Samsung 840 evo 250GB SSD as prime
Seagate ST2000DM001 7200rpm 64MB 2TB for data
Bitfenix BFC Neo case
LG GH22NS SATA Optical drive black
[Amazon-de]http://www.amazon.de/dp/B001G4Z0S6/?tag=tonymacx8603-21
JouJye ST-125 SATA HDD Swop enclosure
[Amazon-de]http://www.amazon.de/dp/B003HLJWP8/?tag=tonymacx8603-21
Apple Bluetooth Adapter (involved soldering)
Apple Bluetooth Trackpad
[Amazon-de]http://www.amazon.de/dp/B003XLYAWC/?tag=tonymacx8603-21
OS X High Sierra from App S
Below this section follows the original write up with slightly different components...
Originally ML was installed, but now it’s gotten High Sierra. Quite a jump.
The new install guides and procedures from this board are a lot easier to complete.
Bios settings remained the same, flashing was not undone, so OS was changed.
Now there is no need for DSDT or anything. No flags to boot the system, although had to hard reset it once during bootup. The next reboot with -v went through and got to the desktop...
From a cold boot it takes 15-20 seconds for the prompt, this is quite a quick machine still.
Due to family matters I’ve not been as active but it’s still like riding a bicycle for me. The only issue was to get the system to boot the uefi memory stick. But that got sorted and it was a breeze after that!
Now what follows is the old write up.
Comments
My reasons for the components as I bought them are below.
This installation is as smooth as they come. One thing you will need, if you don't want to edit your DSDT is the new BIOS which you need to flash in the BIOS via M-Flash after you download and stick the file on a FAT32 formatted USB stick,
( http://biosrepo.wordpress.com/msi/ which reminds me to make a donation) as flashing the BIOS is imperative for a good running system.
After building the machine, I set the BIOS to
In that regard the board is pretty good and less confusing than others.
Make sure you use a USB keyboard and mouse to do the setup now.
Without flashing the BIOS you will run into something like a boot loop after installation and booting without the Unibeast stick, so get the new BIOS from the biosrepo.wordpress.com site....
Basically you need to flash your BIOS with the file and link provided above.
After this is done, the system will boot as the CPU Power Mgt can now properly work due to the work of the people that modified the BIOS.
Follow the Unibeast guide to set up the OS. Make sure you make the Mountain Lion (ML) partition the FIRST partition on the hdd, as ML in that regard does not like you to set it up after for instance a Lion partition as 2nd partition. This can be a problem for some people but with Disk utility (DU) you can whilst in the Installer, split a partition, copy it (from 1st to 2nd) and then erase 1st so a new OS can be installed there. Make sure you put in the right source and destination for the copy, and use the mouse to drag the first partition from the left pane, to the source field, and the 2nd partition name is dragged into the destination field.
It takes about 15 to 20 minutes (it's about 15 on my board) to install OS X now.
It will automatically reboot and it should then be rebooted via the USB key again (you may want to manually select this (F11 upon boot) when you use a drive that has a previous (LION) installation on it… so it's not something you can do unattended but it will just not go any further
Reboot with the USB, maybe a -V as option to see what is going on but it is not necessary. I did so and at some point the system comes up and asks you the standard questions about the country, keyboard, apple ID etc, which you can fill skip mostly. Skipping this or not filling out the info does not have any effect later on app store and your ability to download updates fro i.e. iTunes etc.
One thing you need to specify is the user id and password plus a possible hint.
OS X ML should now come up, maybe still in 1024 x 768 mode and now it is time to download MB Multibeast for ML if you haven't done so already (it's no problem storing this on the root of the same USB drive you used to install OS X with). In my case I downloaded the app. When you use finder to launch the app it may come up with a warning that this was downloaded and it won't run it. In finder, left click the app, select Open, and you will be on your way. It's a nuisance but nothing serious.
Now run MB without DSDT and following options, or with DSDT (see attachment) but make sure you select the right audio driver type then
If you run it with the DSDT, then place the unzipped DSDT on your desktop so MB grabs it from there and puts it in /Extra.
In my case I am a little extra careful, and after each part (i.e. MB installing UserDSDT (which installs quite a bit of stuff), I run DPCIManager to rebuild permissions and the cache, then reboot, run another part of MB now with LAN, run DPCIManager, rebuild perms and cache, reboot...etc). This is a good tactic if at some point the thing breaks, as then you know WHICH part went bad!
Watch the magic happen when OS X now comes up without the USB stick, in my case about 15-20 seconds for the login screen… we're in business….
Sleep works perfect. I couldn't be happier with the way it works, after it goes to sleep a flashing power light reminds me of the state it is in, pushing the power button makes it come back which is the weirdest of things when you are not used to it. But I love it. It's like a magical dark force that attracts you.
Importing your old settings from another mac or drive.
This is basically taken from a write up on macs.about.com on how to migrate to another OS X version. The basic problem you will have is that your current userId is more or less blocking the merge or migration of the 'other you' on the other system. What happens in the background when a user is created is that a user is given a number like 501 for the first, then 502 etc.
This creates a problem as you now are 501 and your userId most likely also had 501. So, the thing to do is to create a few new users, call them one, and two (it depends on your situation how many users you migrate, the rule is like create one more userId than users you are moving so create one and two when just moving one user).
The last user in the list should still have admin rights, so make sure you select that.
Now when you have the extra users added, you delete the ones being the first ones. An example:
Originally userId during the install was set to 'darf' (well that would be me).
I created extra user accounts and made the last one admin, the list now looks like this:
1. darf (admin)
2. userTwo (no admin)
3. userThree (admin).
Now delete darf (in my case) and userTwo. You will only have the userThree left.
Logout and log on as userThree.
Now run migration assistant via launchpad/other and follow the steps. Either via a switch, which needs both mac's running, or like I did to save some time, put the other hdd in your case as 2nd hdd, and run the migration and make sure you select 'from other disk'
In my case I would NOT copy over the Applications, as they can be incompatible, and so you reinstall those (after a possible download).
Still all settings and files like documents, pictures etc will all be transferred.
If you were so clever to stuff data on another disk partition than where the user home directory is, then you need to copy these directories from the other disc manually (drag and drop in two finder windows works best for me).
During the migration the OS goes in a special mode and you can't do anything really, so a faster time to do this is better.
The migration will now have recreated your userIds from the previous installation like from Lion or Snow Leopard.
I.e. when on your previous installation had a user called LightSaber, this will now show up and use the same password. Good luck!
What doesn't work
USB 3 ports on the motherboard (on the backplate they work).
The Z77A motherboard has no separate USB 3.0 chip on board and leaves the Z77 chipset to do the USB work. As far as I know this is a current issue if you do not edit the DSDT... loading any kind of kext to enable the USB 3 is futile and will not work.
If you don't want to use the DSDT you will most likely not get USB 3 working. In my case with the DSDT the USB 3 ports on the back of the case work but not the ones on the motherboard that connect to USB 3 ports on the top of the case. To still be able to use those ports that are present on the top of my case I plugged the USB 2.0 terminal on the same cable as the USB 3 connector, in the USB 2 onboard terminal. So this gives me 4 USB ports on the top of the case, and is enough. The power is enough to run a normal external 2.5" hdd etc.
Via an extension cable the rear USB 3 ports can come 'to the desk'.
Not sure if it works
I have to find out still whether multi monitor works, but it seems from first looks that this should work. The board has a DVI-D connector on it so in theory this should work. No way to test as I only have one screen now. However, for a successful build I think there is no need for this. If anyone wants to borrow me a 27" monitor I will be happy to test it out for you.
==> Special thanks to PJALM for editing the DSDT in the chat, very helpful, and it worked first time.... may the force be with you. <==
Obi Wan Shinobi - MSI Z77A-G45 i5-3570K 16GB GTX 660 2GB 840 Evo 250GB
Revenge of the Sith
Revenge of the Sith
Components
Motherboard: MSI Z77A-G45
[Amazon-de]http://www.amazon.de/dp/B007JRGVUA/?tag=tonymacx8603-21
CPU Intel Core i5-3570K
[Amazon-de]http://www.amazon.de/dp/B007RUZKK6/?tag=tonymacx8603-21
Transcend JetRam DDR 3 1333MHz CL9
[Amazon-de]http://www.amazon.de/dp/B00432SYWW/?tag=tonymacx8603-21 (This is the 2x4GB although I have the same in 2x8GB however it seems to not be on offer from Amazon.de. Specwise it is the same, CL9.)
Scythe Shuriken Rev B CPU Cooler
[Amazon-de]http://www.amazon.de/dp/B001R2KSZW/?tag=tonymacx8603-21
Samsung 840 evo 250GB SSD as prime
Seagate ST2000DM001 7200rpm 64MB 2TB for data
Bitfenix BFC Neo case
LG GH22NS SATA Optical drive black
[Amazon-de]http://www.amazon.de/dp/B001G4Z0S6/?tag=tonymacx8603-21
JouJye ST-125 SATA HDD Swop enclosure
[Amazon-de]http://www.amazon.de/dp/B003HLJWP8/?tag=tonymacx8603-21
Apple Bluetooth Adapter (involved soldering)
Apple Bluetooth Trackpad
[Amazon-de]http://www.amazon.de/dp/B003XLYAWC/?tag=tonymacx8603-21
OS X High Sierra from App S
Below this section follows the original write up with slightly different components...
Originally ML was installed, but now it’s gotten High Sierra. Quite a jump.
The new install guides and procedures from this board are a lot easier to complete.
Bios settings remained the same, flashing was not undone, so OS was changed.
Now there is no need for DSDT or anything. No flags to boot the system, although had to hard reset it once during bootup. The next reboot with -v went through and got to the desktop...
From a cold boot it takes 15-20 seconds for the prompt, this is quite a quick machine still.
Due to family matters I’ve not been as active but it’s still like riding a bicycle for me. The only issue was to get the system to boot the uefi memory stick. But that got sorted and it was a breeze after that!
Now what follows is the old write up.
Comments
My reasons for the components as I bought them are below.
- Motherboard MSI Z77A-G45
Similar to my previous (own) build, I chose MSI again (the P55-GD55 build is also on this board). I have since built two more systems with Gigabyte, and only went 1 for 2 as the B75M-D3P board was faulty and had to be returned (there are more reports along those lines so in the end I didn't feel guilty but it cost me a week). So this made me decide to go back to MSI as I had seen some good reports on it. I ordered the mATX board but got the full ATX instead (mind you they charged me the right price for it).
This gives me some extra PCI slots to play with, but not using any of them at the moment.
After a failed attempt with a GA-B75M-D3P board which probably was faulty, this is my third build hence the Revenge of the Sith title. - Intel Core i5-3570K
As the core i3 from my previous build was running a bit out of steam in video and photo editing, the next level of CPUs was required. A 4-core for sure, including HD4000 for ease of setup, but the question was which one.
After some research I decided that the i5-3570K was the one giving me the most bang for the buck. I opted against the i7 due to its power consumption, cooling needs and price (about equal performance/price ratio). - Cooler Scythe Shuriken rev. B
I want two things from a cooler. Quietness, and it must clear RAM and anything else well enough. This cooler is not too expensive and has some good review from users which I can confirm. Together with Arctic Silver 5 it keeps the CPU temps nicely at bay. I'm still braking it in so to speak as the compound only reaches the maximum performance after about a week of settling in. At 3.4GHz the temps run up to about 40 and this should make for a long long CPU life. - Transcend JetRam DDR3 1333MHz, 2 x 8GB
In my opinion, a lot of RAM is overrated and is surrounded by a non understandable hype. As this was not going to be an no holds barred all flat out build but more a sensible one in terms of price and performance, and as I have good experiences with this kind of RAM, I opted for this. I can still expand with another 16GB for a good price, but this should be OK for the time being. There were times my hard drive was 8 times smaller than what we now have as memory. - Harddrive: Seagate SATA3 various models 750GB, 2TB
I use this brand since a long time and never have gone wrong with them. Their tactic to shield us from 4K allocation sizes and pretend to the OS to be 512 byte has saved me a lot of time and possible issues in OS X. I solely use 7200 rpm and 64MB cache drives, and they really make it a small rocket at times. Boot times are quick. - Case: Bitfenix Shinobi White, with black mesh inserts
There is only really one thing I demand from a case. Clear, serene lines to make it a pleasant case to look at.
No need for a black cases, I have enough of those in my daily life, and I don't want a case that looks like a storm trooper under my desk.
I also wanted USB ports and the Power button on the top of the case to make it easier to operate. Two USB 2.0 and two USB 3.0 slots make it easy to connect your USB devices, plus a hdd drive light and power light, headphone out and microphone, plus the power switch and a reset button (a rare feat these days).
This case has the power supply mounted in the bottom, so this is partially the reason why I opted for the specific power supply below. Although there is a large vent hole in the floor of the case for the power supply, from a principle and design point of view (heat goes up) the PSU in this place doesn't make sense to draw air from the floor.
The case is a real nice part to work with, no sharp edges, but the black (I think painted) screws are a bit over the top for me, you mostly don't see them anyway. At least the thumb screws for holding the sides are chromed.
The case offers holes for cable management but personally I find that a bit of waste of time and effort and would only use this when the situation demands it. There is a vented roof part too, and so really, the thing sits more in the open than anything else. - Power supply Arctic Cooling Fusion RF500
Again, like other components in this build I want it quiet, quiet, and quiet. The design of this PSU is unique. The 80mm fan actually sits outside of the PSU housing, attached via small rubber mounts, and intrudes in to the inner space of the case. In my case this was fine, it has plenty of room and getting air out and blowing it over the PSU components is a truly tried and tested method.
One gripe though, as the case is fairly large, the leads JUST reach…
The motherboard has a connector for an 8 pin MOLEX connector for the power supply to the CPU except this PSU doesn't have such a 4+4 MOLEX connector, only a single 4 pin connector. After checking the board I think the PCB lines all are on a single line anyway and the 4 pin connector fits towards the left side of the connector on the motherboard and things just run fine. I don't think this is in any way intruding or hampering any kind of performance or option. Maybe when running the i7 3770K you would want that 8 pin MOLEX connector to distribute the power more evenly over a higher number of pins. That's all I can think of.
- CD DVD ROM
It's a standard LG CD DVD SATA Writer at the moment but it will get replaced with a Sony Optiarc at some point, to enable auto sleep. Turning off the 'put hard disks to sleep' option in the Energy Saver preferences doesn't help unless you stick in a CD or DVD. As I normally work behind a computer, I don't really need sleep or autsleep to work though. - JouJye ST-125 hard drive swop enclosure
For me it does a few things that enable me to do a few important things:
By using this as a place where to put my primary hard disk I can swop this one out to basically do a sandbox on installing software. The way I use is it to normally have my main hdd there, and copy this via Disk Utility (DU) or SuperDuper to another, (3rd) external hdd like a 2.5" USB drive. After that process has completed, you can power off the machine.
Then remove the original hdd and replace with another hdd, say a 250GB SATA or so that you had laying around. Now boot with the Unibeast USB installer, go to Disk Utility, and restore the hard drive from the DU or SuperDuper copy.
Reboot and once more use the USB stick to boot, then select the SuperDuper hdd (it will get called that way) and boot normally. You are now only required to either install MB (MultiBeast) or simply run Chimera setup standalone, as you wish, to make the disk bootable.
Now you can reboot without the USB stick and install to what your heart likes and test if things work the way you think they should work.
If they don't there is no bill to pay, simply power down and swop in your original hard drive. If the new software works fine you have a choice of either using DU or SuperDuper to copy things across or install.
Another advantage is you get to dual boot albeit a little different from most other people's methods. Another hdd can be fitted sp you can take out the OS X hdd, and replace it with a Windows, or Linux disc. As I use a little storage attached to my network which I can access from all platforms, transferring data is easy and simple and requires no USB stick formatted to some specific format. FAT32 will do just fine for the router to recognize the storage.
This installation is as smooth as they come. One thing you will need, if you don't want to edit your DSDT is the new BIOS which you need to flash in the BIOS via M-Flash after you download and stick the file on a FAT32 formatted USB stick,
( http://biosrepo.wordpress.com/msi/ which reminds me to make a donation) as flashing the BIOS is imperative for a good running system.
After building the machine, I set the BIOS to
- the factory defaults,
- SATA controller is set to AHCI.
- The graphics card was set to
- IGP (internal graphics) with 64MB of ram,
- the DVMT size was set to max.
- Enable Resume from S3 by USB
- turn off the com ports if you don't use them anyway.
In that regard the board is pretty good and less confusing than others.
Make sure you use a USB keyboard and mouse to do the setup now.
Without flashing the BIOS you will run into something like a boot loop after installation and booting without the Unibeast stick, so get the new BIOS from the biosrepo.wordpress.com site....
Basically you need to flash your BIOS with the file and link provided above.
After this is done, the system will boot as the CPU Power Mgt can now properly work due to the work of the people that modified the BIOS.
Follow the Unibeast guide to set up the OS. Make sure you make the Mountain Lion (ML) partition the FIRST partition on the hdd, as ML in that regard does not like you to set it up after for instance a Lion partition as 2nd partition. This can be a problem for some people but with Disk utility (DU) you can whilst in the Installer, split a partition, copy it (from 1st to 2nd) and then erase 1st so a new OS can be installed there. Make sure you put in the right source and destination for the copy, and use the mouse to drag the first partition from the left pane, to the source field, and the 2nd partition name is dragged into the destination field.
It takes about 15 to 20 minutes (it's about 15 on my board) to install OS X now.
It will automatically reboot and it should then be rebooted via the USB key again (you may want to manually select this (F11 upon boot) when you use a drive that has a previous (LION) installation on it… so it's not something you can do unattended but it will just not go any further
Reboot with the USB, maybe a -V as option to see what is going on but it is not necessary. I did so and at some point the system comes up and asks you the standard questions about the country, keyboard, apple ID etc, which you can fill skip mostly. Skipping this or not filling out the info does not have any effect later on app store and your ability to download updates fro i.e. iTunes etc.
One thing you need to specify is the user id and password plus a possible hint.
OS X ML should now come up, maybe still in 1024 x 768 mode and now it is time to download MB Multibeast for ML if you haven't done so already (it's no problem storing this on the root of the same USB drive you used to install OS X with). In my case I downloaded the app. When you use finder to launch the app it may come up with a warning that this was downloaded and it won't run it. In finder, left click the app, select Open, and you will be on your way. It's a nuisance but nothing serious.
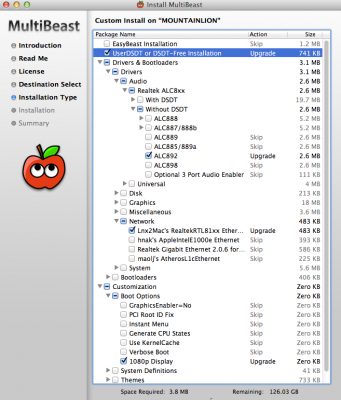
Now run MB without DSDT and following options, or with DSDT (see attachment) but make sure you select the right audio driver type then
- UserDSDT or without DSDT
- Drivers & Bootloaders / Drivers / Audio/ Realtek ALC8xx / With/Without DSDT depending on if you got the DSDT / ALC892
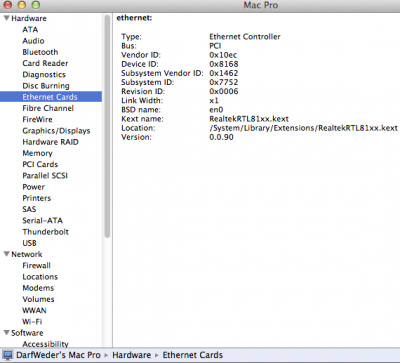
- Drivers & Bootloaders / Drivers / Network / Lnx2Max's RealtekRTL81xx Ethernet
in my case I wanted the HD4000 to be supported and use a 1080p display so I checked - Customization / Boot Option / 1080p display
If you run it with the DSDT, then place the unzipped DSDT on your desktop so MB grabs it from there and puts it in /Extra.
In my case I am a little extra careful, and after each part (i.e. MB installing UserDSDT (which installs quite a bit of stuff), I run DPCIManager to rebuild permissions and the cache, then reboot, run another part of MB now with LAN, run DPCIManager, rebuild perms and cache, reboot...etc). This is a good tactic if at some point the thing breaks, as then you know WHICH part went bad!
Watch the magic happen when OS X now comes up without the USB stick, in my case about 15-20 seconds for the login screen… we're in business….
Sleep works perfect. I couldn't be happier with the way it works, after it goes to sleep a flashing power light reminds me of the state it is in, pushing the power button makes it come back which is the weirdest of things when you are not used to it. But I love it. It's like a magical dark force that attracts you.
Importing your old settings from another mac or drive.
This is basically taken from a write up on macs.about.com on how to migrate to another OS X version. The basic problem you will have is that your current userId is more or less blocking the merge or migration of the 'other you' on the other system. What happens in the background when a user is created is that a user is given a number like 501 for the first, then 502 etc.
This creates a problem as you now are 501 and your userId most likely also had 501. So, the thing to do is to create a few new users, call them one, and two (it depends on your situation how many users you migrate, the rule is like create one more userId than users you are moving so create one and two when just moving one user).
The last user in the list should still have admin rights, so make sure you select that.
Now when you have the extra users added, you delete the ones being the first ones. An example:
Originally userId during the install was set to 'darf' (well that would be me).
I created extra user accounts and made the last one admin, the list now looks like this:
1. darf (admin)
2. userTwo (no admin)
3. userThree (admin).
Now delete darf (in my case) and userTwo. You will only have the userThree left.
Logout and log on as userThree.
Now run migration assistant via launchpad/other and follow the steps. Either via a switch, which needs both mac's running, or like I did to save some time, put the other hdd in your case as 2nd hdd, and run the migration and make sure you select 'from other disk'
In my case I would NOT copy over the Applications, as they can be incompatible, and so you reinstall those (after a possible download).
Still all settings and files like documents, pictures etc will all be transferred.
If you were so clever to stuff data on another disk partition than where the user home directory is, then you need to copy these directories from the other disc manually (drag and drop in two finder windows works best for me).
During the migration the OS goes in a special mode and you can't do anything really, so a faster time to do this is better.
The migration will now have recreated your userIds from the previous installation like from Lion or Snow Leopard.
I.e. when on your previous installation had a user called LightSaber, this will now show up and use the same password. Good luck!
What doesn't work
USB 3 ports on the motherboard (on the backplate they work).
The Z77A motherboard has no separate USB 3.0 chip on board and leaves the Z77 chipset to do the USB work. As far as I know this is a current issue if you do not edit the DSDT... loading any kind of kext to enable the USB 3 is futile and will not work.
If you don't want to use the DSDT you will most likely not get USB 3 working. In my case with the DSDT the USB 3 ports on the back of the case work but not the ones on the motherboard that connect to USB 3 ports on the top of the case. To still be able to use those ports that are present on the top of my case I plugged the USB 2.0 terminal on the same cable as the USB 3 connector, in the USB 2 onboard terminal. So this gives me 4 USB ports on the top of the case, and is enough. The power is enough to run a normal external 2.5" hdd etc.
Via an extension cable the rear USB 3 ports can come 'to the desk'.
Not sure if it works
I have to find out still whether multi monitor works, but it seems from first looks that this should work. The board has a DVI-D connector on it so in theory this should work. No way to test as I only have one screen now. However, for a successful build I think there is no need for this. If anyone wants to borrow me a 27" monitor I will be happy to test it out for you.
==> Special thanks to PJALM for editing the DSDT in the chat, very helpful, and it worked first time.... may the force be with you. <==
Attachments

Last edited: