Edhawk
Moderator
- Joined
- Aug 2, 2013
- Messages
- 6,296
- Motherboard
- Asus ROG Strix X570-F Gaming
- CPU
- Ryzen 9 3900X
- Graphics
- RX 6700 XT
- Mac
- Mobile Phone
Creating custom SSDT's for your system should be done using Corpnewt's SSDTTime python Script and the system DSDT.aml table.
First thing you need to do is get a hold of your system DSDT.aml.
Corpnewt's SSDT:
So now quit the script and close the Terminal window.
The contents of the Results folder now contains eight (8) items, all generated using your system DSDT.aml.
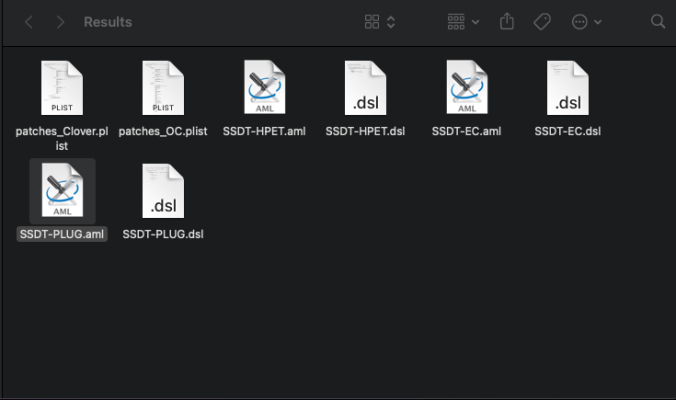 Results folder contents upon completion of tasks.
Add SSDT's and patches to config.plist:
I am going to assume you are using OpenCore.
Reboot your system with the changes in place.
When you get to the OC Boot Screen you need to use the ClearNvram and ResetSystem tools for the changes you have made to your OC setup to take effect correctly.
Note. Any system using a Skylake or newer CPU will also require the SSDT-USBX.aml table for USB power. This can be downloaded from below and added to the /OC/ACPI folder and config.plist with the other tables.
Simple really!
Edit 20/02/2022:
SSDT-USBX.aml should not be used alongside USBPorts.kext, as both the ACPI table and the kext contain USB power settings for your system, and it is never a good thing to duplicate these settings.
If on the other hand you decide to use the SSDT-UIAC.aml table, which Hackintool will generate when you configure your USB ports, then you do need to use the SSDT-USBX.aml table. As the SSDT-UIAC.aml table doesn't contain any USB power settings.
Thanks to @Henties for pointing this out.
Edit 25/09/2022:
Revised and updated version of SSDTTime-Master available that allows the user to generate more SSDT's and patches, based on their system DSDT.aml. See post #15 - updated SSDTTime-Master details
First thing you need to do is get a hold of your system DSDT.aml.
- The easiest way to do this is to use Hackintool.
- Download and copy the Hackintool app to the Applications folder if you don't already have it installed.
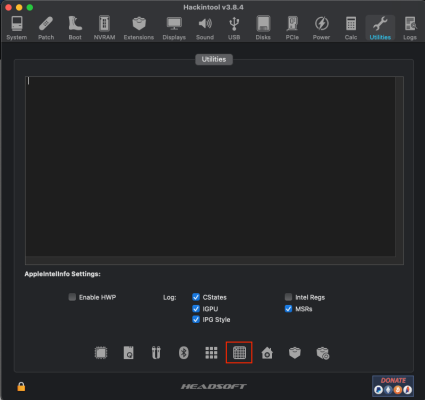
- Open Hackintool and navigate to the 'Utilities' tab.
- Select the Dump ACPI icon, highlighted in Red rectangle in screenshot below:
- This will start a wizard to extract your ACPI tables.
- The first thing it asks is where do you want to save the ACPI tables.
- Best thing to do is to use the create a 'New folder' option and create the folder on your Desktop or somewhere easy to find/locate.
- Name the folder 'ACPI' or something similar then Select 'Choose a destination folder'
- Hackintool will show a lot of text in the Utilities window. This just confirms the execution of the ACPI table extraction and disassembly of the said tables.
- What this means is you will find the DSDT and all the SSDT's from your system in the new 'ACPI' folder you created.
- The ACPI tables will be in two formats: for example DSDT.aml and DSDT.dsl
- DSDT.aml is the table in ACPI Machine Language Binary format (assembled and ready for use)
- DSDT.dsl is the same table but as a Disassembled ASL file (used when editing/patching the table)
- The ACPI tables will be in two formats: for example DSDT.aml and DSDT.dsl
Corpnewt's SSDT:
- Download Corpnewt's SSDTTime from his Github repository - https://github.com/corpnewt/SSDTTime
- Select the green coloured 'Code' button to download the SSDTTime Folder.
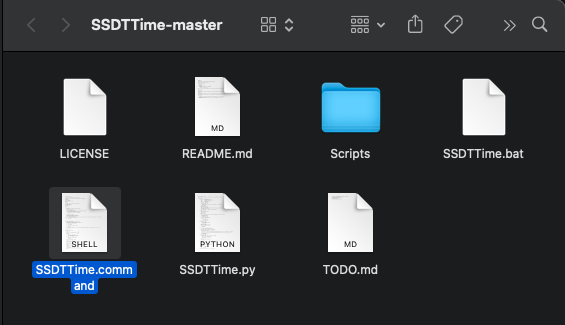
- Move The downloaded folder to your desktop and open it.
- Double-click on the SSDTTime.command icon.
- This should open the following Terminal window.
- SSDTTime will ask you to drop the DSDT.aml table on the Terminal Window.
- The script will then inspect the DSDT.aml and look at all the possible IRQ settings. It will point out those that clash with macOS and recommend you press the letter 'C' to select the default output, which you should do.
 SSDTTime script - select C for default IRQ options
- This will then create a new folder within the SSDTTime folder, named Results.
- Within this Results folder will be generated a pair of config.plist's, one for Clover and one for OpenCore, usually with three rename patches for the HPET, RTC and TMIR IRQ fixes.
- Plus two SSDT-HPET's one in ASL format the other in DSL format.
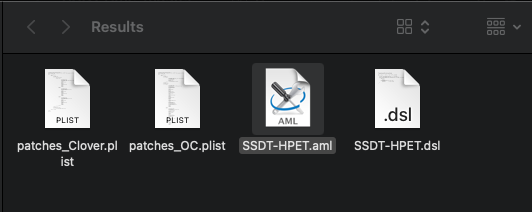 Results folder contents after FixHPET option completed
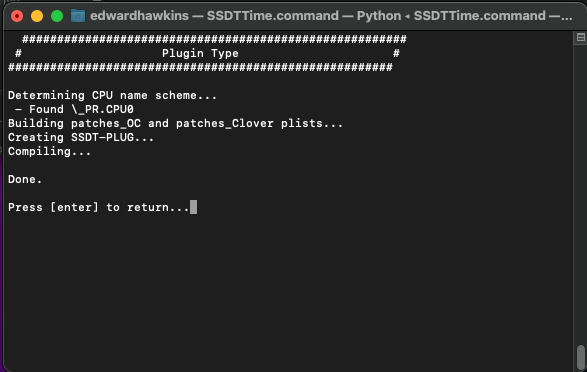
- The SSDTTime window will show the following, asking for you to press enter to return to the main menu:
 FixHPET Results
- Window above shows confirmation of rename patches and compilation of SSDT-HPET.
- When you return to the main menu you are asked to make another selection, this time FakeEC - option 2
- Upon Returning to the Main menu, you need to select option for the PluginType - option 4,
So now quit the script and close the Terminal window.
The contents of the Results folder now contains eight (8) items, all generated using your system DSDT.aml.
 Results folder contents upon completion of tasks.
Add SSDT's and patches to config.plist:
I am going to assume you are using OpenCore.
- Now you need to mount your macOS Drives EFI partition.
- Navigate to the /EFI/OC/ACPI folder
- Drag and drop the three SSDT's to your ACPI folder - SSDT-EC.aml, SSDT-HPET.aml and SSDT-PLUG.aml
- Open your config.plist using corpnewt's ProperTree plist editor.
- Select File > OC Clean Snapshot from the drop down list, as shown below.
- Save the changes to your config.plist, the three SSDT's should have been added to the ACPI > Add section.
- Keep the config.plist open.
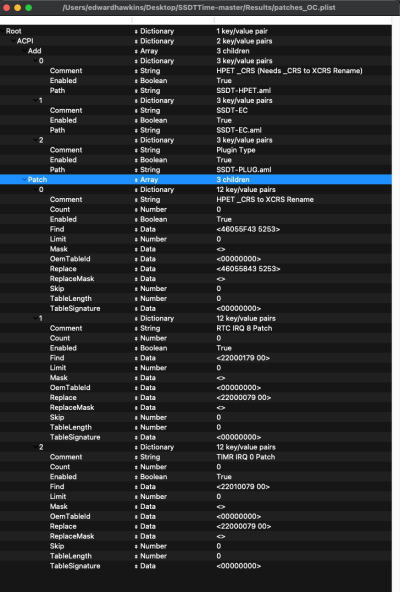
- Go to the ProperTree > File > Open command and select the 'patches_OC.plist' created and located in the Results folder.
- Go back to your main OC config.plist and select the ACPI > Patch name and right-click to display the sub-menu, select Paste to copy the patches to the config.plist.
- Save the config.plist.
Reboot your system with the changes in place.
When you get to the OC Boot Screen you need to use the ClearNvram and ResetSystem tools for the changes you have made to your OC setup to take effect correctly.
Note. Any system using a Skylake or newer CPU will also require the SSDT-USBX.aml table for USB power. This can be downloaded from below and added to the /OC/ACPI folder and config.plist with the other tables.
Simple really!
Edit 20/02/2022:
SSDT-USBX.aml should not be used alongside USBPorts.kext, as both the ACPI table and the kext contain USB power settings for your system, and it is never a good thing to duplicate these settings.
If on the other hand you decide to use the SSDT-UIAC.aml table, which Hackintool will generate when you configure your USB ports, then you do need to use the SSDT-USBX.aml table. As the SSDT-UIAC.aml table doesn't contain any USB power settings.
Thanks to @Henties for pointing this out.
Edit 25/09/2022:
Revised and updated version of SSDTTime-Master available that allows the user to generate more SSDT's and patches, based on their system DSDT.aml. See post #15 - updated SSDTTime-Master details
Attachments
Last edited:

