- Joined
- Oct 28, 2011
- Messages
- 3
- Motherboard
- None yet
- CPU
- None yet
- Graphics
- None yet
- Classic Mac
- Mobile Phone
Introduction:
Hi all. After several months looking through Ersterhernd's, Kiwi's and Dremel junkie's projects, I decided to roll up my sleeves and try my own iMac build. There are several reasons on why I'm trying to do this:


Note 1: I don't know what those gray smudges could be.
Note 2: Light conditions were not ideal when I took those pictures, five months ago. I'm sorry for that.
The seller advertised it with an intermittent defect: It remains working only almost a minute after booting, then suddenly it turns off. Sometimes it works for an hour or two. Sometimes it couldn't even start. I was thinking that it could be some bulging caps.
When it arrived and I opened it, the caps were not bulging at all. All of them were already replaced. There was some coil whining noise, so I stated that the PSU was somewhat dying. There was no Ambient Light Sensor anymore. I think that the PSU were previously replaced with a non-ALS iMac PSU
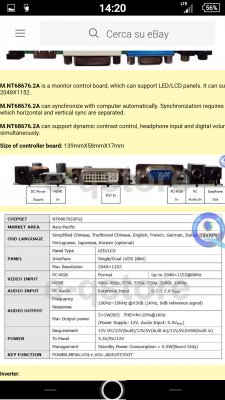
This specimen uses an IdTech display, which is somewhat different from LM201W03 found on several tutorials out there (Dremel Junkie), albeit using the same connector and inverter cables/box found on Ersterhernd's G5.
I have some plans to this one, based on Ersterhernd's iSight G5 steps (use an aftermarket PSU with an 12-24v upconverter):
")
More notes:
Since I'll do everything in my spare time and somewhat tight budget, this project will run on "baby-steps".
Since english is not my primary language, please forgive some grammar mistakes and misspellings.
Cezar
Hi all. After several months looking through Ersterhernd's, Kiwi's and Dremel junkie's projects, I decided to roll up my sleeves and try my own iMac build. There are several reasons on why I'm trying to do this:
- I always wanted to have an All-In-One PC, built by me.
- I like older iMacs look-and-feel.
- I think it will be a nice project to de-stress.
- All-in-ones are expensive in Brazil, even the weakest ones (those with Celeron/Pentium procs). Specifically, Apple practices sky-high prices here. According to my calculations, I need to work almost five months to buy a Mid 2016 21.5 inch Core i5 2.8ghz iMac.
Note 1: I don't know what those gray smudges could be.
Note 2: Light conditions were not ideal when I took those pictures, five months ago. I'm sorry for that.
The seller advertised it with an intermittent defect: It remains working only almost a minute after booting, then suddenly it turns off. Sometimes it works for an hour or two. Sometimes it couldn't even start. I was thinking that it could be some bulging caps.
When it arrived and I opened it, the caps were not bulging at all. All of them were already replaced. There was some coil whining noise, so I stated that the PSU was somewhat dying. There was no Ambient Light Sensor anymore. I think that the PSU were previously replaced with a non-ALS iMac PSU
This specimen uses an IdTech display, which is somewhat different from LM201W03 found on several tutorials out there (Dremel Junkie), albeit using the same connector and inverter cables/box found on Ersterhernd's G5.
I have some plans to this one, based on Ersterhernd's iSight G5 steps (use an aftermarket PSU with an 12-24v upconverter):
- The first, cheaper and faster idea, is to put a NUC inside.
- Squeeze the most hardware I can, removing bottom cooling fans, cutting the backplate and bottom frame, fitting an inverted, upside-down mini-ITX board, with a IPC FlexATX 1U PSU.
More notes:
Since I'll do everything in my spare time and somewhat tight budget, this project will run on "baby-steps".
Since english is not my primary language, please forgive some grammar mistakes and misspellings.
Cezar