Contribute
Register

Can't Keep System Stable. Need Help

Status
Not open for further replies.
Joined
Nov 16, 2017
Messages
39
Motherboard
MSI MPG Z390 Gaming Pro Carbon AC
CPU
i9-9900K
Graphics
GTX 1070 Ti
Mac
  1. iMac
  2. Mac Pro
Mobile Phone
  1. Android
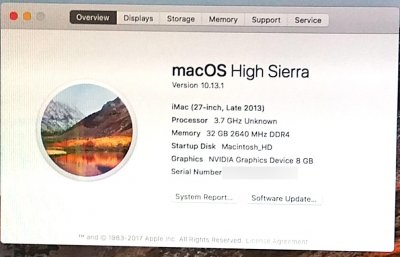
Running High Sierra.
Mobo: MSI Z370 Gaming Pro Carbon AC
CPU: i7-8700k
Graphics: Zotac 1070 Ti
Internal HD: Crucial MX300 1TB M.2 (2280) Internal Solid State Drive - CT1050MX300SSD4
Ram: Ballistix Sport LT 32GB Kit (16GBx2) DDR4 2400

Problems:
1) Audio not working.
2) Nvidia Card works once in a blue moon.
3) Ethernet not working.

After getting video card to work, then restarting, Mac OS will not boot.
It's almost like the EFI sector fries itself.
I could do nothing to the system nor the EFI sector and just reboot and the Mac OS will not boot anymore.
Doing nothing but trying to reboot without touching the boot arguments after a few tries it then boots.
But no video card working.
Sometimes it won't boot at anymore period.
So I copy back the EFI folder I kept as a backup before my changes.

I've had minor successes and then huge setbacks.
Last night I updated the BIOS on the mobo to the latest that MSI offers for that board.
At first I thought it made a stability difference, meaning an improvement.
I started from scratch and wiped the main internal drive.
Made a new USB Installer with UNIBEAST.
Installed the OS.
Boot from the freshly made OS on the internal OS.
Used MULTIBEAST with its default settings ( EFI Bootloader, iMac 14,2 identity, ALC1220 Driver ).
I install the Nvidia Drivers.
Reboot and shut off the USB Drive.
The System boots.
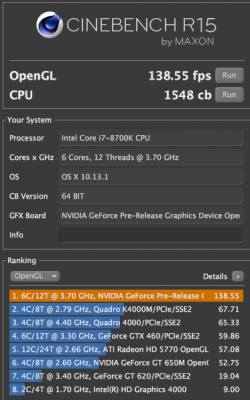
The video card is not working.
The Ethernet port is not working either.
Prior to the BIOS update, just getting here the ethernet would be working.

Then I try doing the extra steps I need to do to get the Video card working, and then Mac OS won't boot.
UGH!!!! This is so darn frustrating.

I found a post online about a Z370 gaming board.
He's claiming success and was kind enough to post his EFI.
I'm trying his EFI just as soon as I get home today.
Crossing my fingers.
 

Attachments

  • Hackintosh Cinebench Score.png
    Hackintosh Cinebench Score.png
    86.9 KB · Views: 253
  • Hackintosh_About.jpg
    Hackintosh_About.jpg
    221 KB · Views: 246
Last edited:
UPDATE:
I found another person online who is also using the 8700K CPU but a different Z370 mobo very similar to mine, just not exactly the same. Anyway. He was kind enough to post his EFI folder. I tried it out and everything worked immediately. Ethernet. Sleep cycle. Sound. iMessage and iChat. all works perfectly.

His post is on another website. If you search online for the following "Gigabyte Z370 AORUS Gaming 7 Hackintosh Build Guide" you will find his post. Basically here is what I did.

1) Erase a spare SSD USB drive.
2) Partition the drive so that there is a 16gb partition. The remainder is fine to format whatever size is left over.
3) Use unibeast to create a bootable drive on the 16gb partition and have it install the EFI boot loader on there along with High Sierra.
4) Connect the USB installer to the new station.
5) Boot off of the usb drive ( this requires you to have already setup the bios for your mobo as best as you can ).
For my mobo ( MSI Z370 Gaming Pro Carbon AC ) the settings are:
  1. Save & ExitLoad Optimized Defaults
  2. M.I.T. → Advanced Memory Settings Extreme Memory Profile(X.M.P.) : Enabled
  3. BIOS → Any Fast Boot Opions: Disabled
  4. (BIOS → Windows 7/10 Compatability : Disable all OS options
  5. (BIOS → LAN PXE Boot Option ROM : Disabled) My mobo doesn't have this option.
  6. BIOS → Storage Boot Option Control : UEFI
  7. (Peripherals → Super IO Configuration → Serial Port : Disabled) My mobo does not have any settings for Serial Ports in it. But I'm leaving this in because it was in the instructions I followed.
  8. Peripherals → Network Stack Configuration → Network Stack : Disabled
  9. Peripherals → USB Configuration → XHCI Hand-off : Enabled
  10. Chipset → Vt-d : Disabled
  11. Chipset → Integrated Graphics : Disabled
6) Install the OS first on the remaining partition of your USB Media.
7) When the system reboots you have to pick the remaining partition that you just installed the OS onto.
This may happen a few times. Just keep picking that partition until the install completes.
Another note is you may need to mess around with clover boot flags to get this to finish.
For my mobo "-v dart=0" works sometimes. Other times "npci=02000" did the job.
Other times still no boot flags at all. It literally depended on the "mood" of the system.
It was real finaky and made me want to pull my hair out because there was no rhyme or reason for the changes in boot flags required.​
8) Once you have a full OS High Sierra installed on the USB media.
You will need a second bootable drive if something goes wrong. Trust me you will need it.
Format the main drive you intend to boot from to:
  1. OS X Extended (Journaled)
  2. GUID Partition Map
9) Now boot off of the UEFI USB High Sierra Installer again and install High Sierra onto the main drive of your Hackintosh.
10) Once installed go through the same process of getting the OS to finish installing on your main Hackintosh drive as you did to get it on the USB remaining partition.
11) Once the main drive is bootable, mount the EFI partition of the drive onto your desktop.
11) put a copy of that EFI folder onto a new folder on your USB OS High Sierra drive somewhere you will find it.
12) use multibeast to install EFI boot loader, ALC1220 audio driver, and the default iMac 14,2 identity on the the main drive of your hackintosh.
13) Install the NVidia drivers for High Sierra.
14) Once it finishes it wants you to restart.DO NOT RESTART YET.. Force quit the installer.
13) Now this is where that EFI folder from the guide above comes into play.
14) once you have a bootable main drive on your hackintosh, mount the EFI for that drive onto your desktop.
15) Erase the EFI folder of your EFI drive. YES. Erase it and empty trash.
16) Copy the EFI folder you downloaded from the guide above your EFI partition.
17) Quit every thing. Eject all folders and EFI partitions. Shut down the computer.
18) When it's all shut down, disconnect the USB drive. Then boot up again.
19 ) Pick the newly installed main drive and remove all boot arguments.
20) If everything worked out, your system will boot with every feature active!!!!
21) CELEBRATE!!!!
22) CELEBRATE!!!!!!!!!
23) Remount the EFI partition of your new Hackintosh.
24) Open text editor. Go into preferences for text edit.
25) Change the settings to:
  1. New File -> Format: Plain Text
  2. Open and Save -> When saving a file: Uncheck Add ".txt" to plain text files
  3. Open and Save -> When Saving a File -> Opening Files: Unicode (UTF-8)
  4. Open and Save -> When Saving a File -> Saving Files: Unicode (UTF-8)
26) Quit Text Edit. Re open Text edit.
27) Edit the config.plist file in the following EFI/Clover/config.plist with text editor.
28) Do a find for the following string "boot".
29) Look for:
<key>Arguments</key>​
<string>dart=0 nv_disable=1</string>
30) Change it to:
<key>Arguments</key>​
<string></string>
31) Look for:
<key>DefaultVolume</key>​
<string>HighSierra</string>
32) Change it to:
<key>DefaultVolume</key>​
<string>NAME OF THE DRIVE YOU CREATED FOR YOUR HACINTOSH</string>
33) Quit everything. Eject the EFI partition. Reboot
34) if everything worked your station should be good to go!
35) CELEBRATE SOME MORE!!!!
36) CELEBRATE SOME MORE!!!!!!!!!
 
Last edited:
Congrats on your success, I'm considering this motherboard for an 8700k as well. Does the motherboard's built-in wifi work in High Sierra?
 
THANK YOU!
To be honest I didn't install the AC Wifi card because we have gigabit ethernet via RCN.
So I have no idea. :cry:
Sorry.
 
Does the motherboard's built-in wifi work in High Sierra?
MSI Z370 Gaming Pro Carbon AC has Intel Dual Band Wireless-AC 8265 card.
Intel WiFi is not supported.
 
Status
Not open for further replies.
Back
Top