BoomR
Moderator
- Joined
- Dec 18, 2011
- Messages
- 1,256
- Motherboard
- Gigabyte Z490 VISION D
- CPU
- i9-10850K
- Graphics
- RX 580
- Mac
- Classic Mac
- Mobile Phone
I'm dangerously close to being finished with my G5 case mod project. The last step was trying to get the front panel controls working. My particular priority is power button, power LED, USB, and 1394A, as this build replaces my recording studio golden build (see signature below if you're curious).
BRAVO and a big "THANK YOU" to all the hard work by eelhead in his post: G5 Front Panel Quick Guide. I didn't want to hijack his concise thread or take things down a rabbit hole with my findings, so I thought I'd start a related thread to share findings, photos, and an updated G5 wiring diagram that I put together. DEFINITELY read his post & all the follow-ups for all the "meat" of the "how-to" for this part of the project.
As mentioned in my reply to his original topic, I stumbled across a shelf full of the Silverstone FP32-B's (and also the -S for the silver version) at Fry's right before Christmas. This case panel is similar in nature to the Corsair Obsidian panel that chaosdesigns shared with us on eelhead's thread. I'm not sure the price on that one as the Corsair link doesn't seem to be working any more. I suspect the Silverstone option might be less expensive, as the FP32 has USB2.0 only. The price at Fry's was $14.95, and for me I thought a comparably priced option vs. all the pre-crimped leads + shipping, etc. from Pololu (which, btw, is still a GREAT solution).
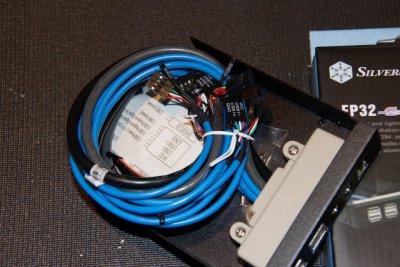
Here are a few pictures of the unboxing:


Like eelhead, I cut off one end of the Apple G5 front panel cable, then separated out all the various wires. I also used a little masking tape & a fine-point Sharpie pen to numer each wire (not shown in the pic below, though). In my experience, there were several of the wires that were heat-shrink'd together, so there was a bit of extra work to carefully extract everything. I also noted that not all the wires connecting into the multi-pin were of the same gauge. So please take care when stripping off the insulation!

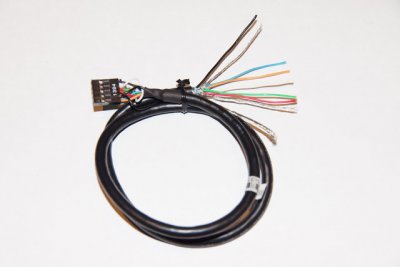
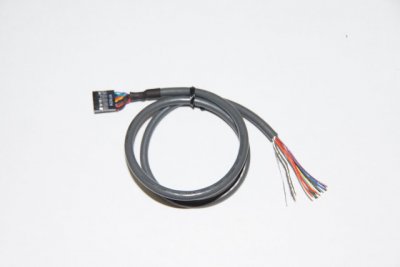
As you can see in the 2nd photo, all of the Silverstone's cabling runs into a moulded plastic junction; unlike the Corsair panel, you cannot simply pry the pins out of the Corsair panel's multi-pin & replace into the Apple multi-pin. So next is the job of cutting away, stripping, & prepping all the cables that I needed (the 1394 cable, the audio cable, and one of the 4 USB cables):


Now come the tricky & tedious part (for me): mapping all the Silverstone's wiring to the Apple front panel connector & leads. Not being the electronics whiz kid that I probably should be, it took me a second to realize that I was about to start wiring the harness incorrectly because of the way I was reading the wiring diagram that eelhead so graciously provided. Clearly user error on my part.
I was looking at the bottom side of the Apple multi-pin connector (the side that touches the motherboard) and going to wire according to the pin assignments as they would be from this view. Then as I looked more closely at the diagram and the connector in my hands, I noticed that pins 5/6 (and the wires that were attached here) were the "mesh" shielding connections for the USB and 1394. OOPS! The wiring diagram pin assignments should be read as if the multi-pin connector was plugged into the motherboard ("top-down").
Since I really appreciate the "Garanimals" approach to stuff like this, I took the liberty of making some annotations to the wiring diagram originally supplied by eelhead, as well as added some color-coding to help map the insulation color of the various Silverstone cable segments. I strongly suspect this is a "standard" color assignment for most PC case wiring harnesses, too. Here's my updated & annotated version of the wiring diagram:

(PDF version as a ZIP file at the end)
Note that there is some discussion on various G5 front panel wiring threads about the need to double-up the 12v for the 1394. As eelhead noted, this is not necessary. In fact, note in the picture below that Silverstone actually has both the 2 @ 12v connections, plus the 2 FW ground connections already doubled/jumper'd across on the multi-pin plug:

Finally, to help add some stress relief to all the delicate solder connections, I got some 1/16" black heat shrink insulation - this got added to each & every one of the solder connections. In the picture of my wiring harness below, I've not applied the heat yet, but at least you can see what the end-result will look like:

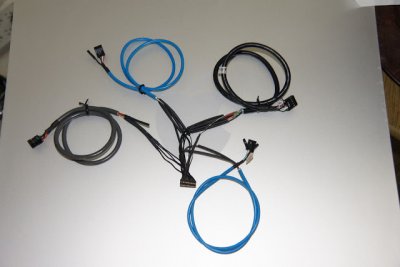
EDIT: I robbed one of the extra USB cables from what's left of the Silverstone and used it to create the leads for the power button (+) and power LED (+). I used some of the single pin molex connectors that I trimmed off the 1394A connector (they were "piggy-backed" off the main 1394A mobo connector). I carefully removed a couple of the wires from the 4-pin molex for the USB and gave them each their own single-pin connection. The power cable is the blue wire bundle at the bottom of the pic above.
I've tested the USB, FW, and power/power LED and everything works flawlessly! I've not tested the audio, as my computer sits in a different room than my recording studio & I never would use the headphone jack on the front. If someone discovers that my wiring of the audio in the annotated diagram above needs to be updated, please advise - I'm happy to make any revisions & upload the new version.
Hope this helps, gang!! Happy G5 case modding!!

BRAVO and a big "THANK YOU" to all the hard work by eelhead in his post: G5 Front Panel Quick Guide. I didn't want to hijack his concise thread or take things down a rabbit hole with my findings, so I thought I'd start a related thread to share findings, photos, and an updated G5 wiring diagram that I put together. DEFINITELY read his post & all the follow-ups for all the "meat" of the "how-to" for this part of the project.
As mentioned in my reply to his original topic, I stumbled across a shelf full of the Silverstone FP32-B's (and also the -S for the silver version) at Fry's right before Christmas. This case panel is similar in nature to the Corsair Obsidian panel that chaosdesigns shared with us on eelhead's thread. I'm not sure the price on that one as the Corsair link doesn't seem to be working any more. I suspect the Silverstone option might be less expensive, as the FP32 has USB2.0 only. The price at Fry's was $14.95, and for me I thought a comparably priced option vs. all the pre-crimped leads + shipping, etc. from Pololu (which, btw, is still a GREAT solution).
Here are a few pictures of the unboxing:


Like eelhead, I cut off one end of the Apple G5 front panel cable, then separated out all the various wires. I also used a little masking tape & a fine-point Sharpie pen to numer each wire (not shown in the pic below, though). In my experience, there were several of the wires that were heat-shrink'd together, so there was a bit of extra work to carefully extract everything. I also noted that not all the wires connecting into the multi-pin were of the same gauge. So please take care when stripping off the insulation!

As you can see in the 2nd photo, all of the Silverstone's cabling runs into a moulded plastic junction; unlike the Corsair panel, you cannot simply pry the pins out of the Corsair panel's multi-pin & replace into the Apple multi-pin. So next is the job of cutting away, stripping, & prepping all the cables that I needed (the 1394 cable, the audio cable, and one of the 4 USB cables):


Now come the tricky & tedious part (for me): mapping all the Silverstone's wiring to the Apple front panel connector & leads. Not being the electronics whiz kid that I probably should be, it took me a second to realize that I was about to start wiring the harness incorrectly because of the way I was reading the wiring diagram that eelhead so graciously provided. Clearly user error on my part.
I was looking at the bottom side of the Apple multi-pin connector (the side that touches the motherboard) and going to wire according to the pin assignments as they would be from this view. Then as I looked more closely at the diagram and the connector in my hands, I noticed that pins 5/6 (and the wires that were attached here) were the "mesh" shielding connections for the USB and 1394. OOPS! The wiring diagram pin assignments should be read as if the multi-pin connector was plugged into the motherboard ("top-down").
Since I really appreciate the "Garanimals" approach to stuff like this, I took the liberty of making some annotations to the wiring diagram originally supplied by eelhead, as well as added some color-coding to help map the insulation color of the various Silverstone cable segments. I strongly suspect this is a "standard" color assignment for most PC case wiring harnesses, too. Here's my updated & annotated version of the wiring diagram:

(PDF version as a ZIP file at the end)
Note that there is some discussion on various G5 front panel wiring threads about the need to double-up the 12v for the 1394. As eelhead noted, this is not necessary. In fact, note in the picture below that Silverstone actually has both the 2 @ 12v connections, plus the 2 FW ground connections already doubled/jumper'd across on the multi-pin plug:

Finally, to help add some stress relief to all the delicate solder connections, I got some 1/16" black heat shrink insulation - this got added to each & every one of the solder connections. In the picture of my wiring harness below, I've not applied the heat yet, but at least you can see what the end-result will look like:

EDIT: I robbed one of the extra USB cables from what's left of the Silverstone and used it to create the leads for the power button (+) and power LED (+). I used some of the single pin molex connectors that I trimmed off the 1394A connector (they were "piggy-backed" off the main 1394A mobo connector). I carefully removed a couple of the wires from the 4-pin molex for the USB and gave them each their own single-pin connection. The power cable is the blue wire bundle at the bottom of the pic above.
I've tested the USB, FW, and power/power LED and everything works flawlessly! I've not tested the audio, as my computer sits in a different room than my recording studio & I never would use the headphone jack on the front. If someone discovers that my wiring of the audio in the annotated diagram above needs to be updated, please advise - I'm happy to make any revisions & upload the new version.
Hope this helps, gang!! Happy G5 case modding!!

