- Joined
- Jan 17, 2017
- Messages
- 41
- Motherboard
- Gigabyte Z170X-Designaire
- CPU
- i7-6700K OC 4.6GHz
- Graphics
- WX 9100
Beskone's Skylake Thunderbolt Build
GA-Z170X-Designaire - i7-6700K - GeForce 980ti

ComponentsGA-Z170X-Designaire - i7-6700K - GeForce 980ti
Gigabyte GA-Z170X-Designaire Motherboard [Thunderbolt 3]
https://www.amazon.com/dp/B01H74VOY2/?tag=tonymacx86com-20
Intel Core i7-6700K 4.0Ghz Skylake Processor
https://www.amazon.com/gp/product/B012M8LXQW/?tag=tonymacx86com-20
Corsair Hydro Series Extreme Performance Liquid CPU Cooler H100i
https://www.amazon.com/dp/B009ZN2NH6/?tag=tonymacx86com-20
Corsair Carbide Series 330R Blackout Edition Ultra-Silent Mid-Tower Case
https://www.amazon.com/gp/product/B00R0ZHWC2/?tag=tonymacx86com-20
CORSAIR HXi750 (Platinum rated) Power Supply
https://www.amazon.com/dp/B00M2UINC8/?tag=tonymacx86com-20
CORSAIR Ballistic Sport LP 32GB (2 x 16GB) 288-Pin PC4-19200 DDR4 2400MT/s Memory
https://www.amazon.com/dp/B01AG9EZ6E/?tag=tonymacx86com-20
AMD RadeonPro WX9100 Video Card
https://www.amazon.com/dp/B076CWK6ZF/?tag=tonymacx86com-20
Crucial MX300 1TB SATA 2.5 Inch Internal Solid State Drive x 4
https://www.amazon.com/dp/B01IAGSDUE/?tag=tonymacx86com-20
Samsung 960 EVO Series - 500GB PCIe NVMe - M.2 Internal SSD
https://www.amazon.com/gp/product/B01LYFKJR7/?tag=tonymacx86com-20
BCM94360CD / BCM94331CD to PCI-E PCI Express x1 Adapter
https://www.amazon.com/gp/product/B017YQHEA6/?tag=tonymacx86com-20
ITTECC® Wifi Airport Wireless Card Bluetooth 4.0 Card Broadcom For iMac 802.11ac Mini PCI-E
https://www.amazon.com/gp/product/B01DJAE99A/?tag=tonymacx86com-20
LG WH16NS40 Super Multi Blue Internal SATA 16x Blu-ray Disc Rewriter
https://www.amazon.com/gp/product/B00E7B08MS/?tag=tonymacx86com-20
IO Crest 4 Port SATA III PCI-e 2.0 x1 Controller Card Marvell Non-Raid with Low Profile Bracket
https://www.amazon.com/gp/product/B00AZ9T3OU/?tag=tonymacx86com-20
Dell Ultra HD 4k Monitor P2715Q 27-Inch Screen LED-Lit Monitor
https://www.amazon.com/gp/product/B00PC9HFO8/?tag=tonymacx86com-20
SSD Mounting Bracket | ORICO 5.25 Inch to 3.5 2.5 Inch
https://www.amazon.com/gp/product/B010V4EREY/?tag=tonymacx86com-20
Comments
My 2011 iMac 27" was starting to die so I figured it was time to get something new and thought hacking together a CustoMac would be a fun project to take on.
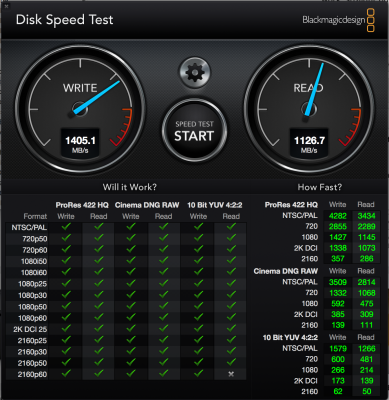
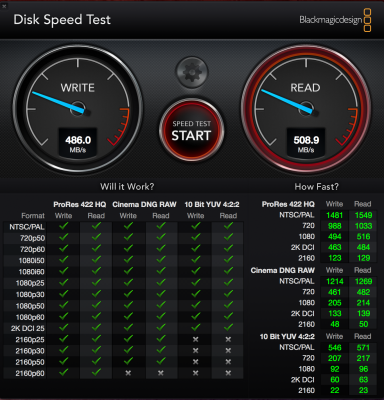
My iMac had a 240Gb SSD + 2TB Spinning disk setup, and I wanted to really push the boundaries of performance and storage with the new rig. So I decided on 4TB of SSD storage + 4 TB of spinning disk as an internal Time Machine volume for the Mac side of things and a 500GB M.2 drive for a Windows 10 install that I'll only use for Steam / Gaming.
I originally was going to just use the on-board graphics for the Mac, and get a 1080 for the gaming side, but ended up compromising and getting a 980ti and using it for both environments for simplicity.
I use a pretty old Firewire audio interface, so getting a board with Thunderbolt connectivity was a must have so I went with the Designaire as it has 2 Thunderbolt 3 ports, allowing me to leave the audio interface always connected and leaving me one port for future connectivity.
Installation Notes
Installation was fairly straightforward, I wanted to start with a fresh install so I used the Serria guide located here:
https://www.tonymacx86.com/threads/...ierra-on-any-supported-intel-based-pc.200564/
Now here's where it gets a little tricky.
Once booted to the installer, I created a 4 drive RAID 0 array in disk utility, then installed Sierra normally.
The thing with RAID arrays and Clover, is even though you have 1 Volume you see on your desktop, you will have 4 different EFI partitions. The installer will *RANDOMLY* pick one to install the EFI/CLOVER folder to. When using MultiBeast, it will get freaked out and will only write to the /EFI/CLOVER folder at the root level of the bootable volume (Macintosh HD/EFI/CLOVER/)
Once I figured this out, I was able to use MultiBeast to install the necessary Audio Codecs and then simply copy them from the HD location to the EFI partition. The EFI/CLOVER folder only needs to be on one of the partitions, and it doesn't matter which one.
One thing to note, although the Designaire has 6 internal SATA connectors, using the m.2 slot for my Windows drive disables SATA 4 & 5. This is why I bought the SATA PCI-E card, with my 4 SSD's taking up SATA 0-3 and the m.2 drive disabling SATA 4 & 5 I was a couple ports short of what In needed. S the card is running my 4TB time machine drive and the BluRay writer. I can't boot from the BluRay player, but that's fine as I can do USB installs.
I generated a custom SSDT for native power management using the guide here:
https://www.tonymacx86.com/threads/...-power-management.177456/page-21#post-1427865

I generated a custom SSDT for my USB ports using the guide here:
https://www.tonymacx86.com/threads/10-11-0-10-11-3-skylake-starter-guide.179221/
Using the Designaire's built in overclocking profiles I'm running at a very stable 4.6Ghz and with a acceptable vcore of ~1.3v
Once I installed Windows, I updated the BIOS to F21, and installed the Thunderbolt firmware patch. Now my Firewire audio works fine as long as it's connected to the computer at boot.
Benchmarks


So far this thing is a beast, I'm loving the speed and power and am looking forward to more tweaks and improvements as I get more familiar with the new rig!
Last edited: