
trs96
Moderator
- Joined
- Jul 30, 2012
- Messages
- 25,531
- Motherboard
- Gigabyte B460M Aorus Pro
- CPU
- i5-10500
- Graphics
- RX 570
- Mac
- Mobile Phone
In this thread, OpenCore bootloader will be referred to as OC.
OCAuxiliaryTools will be shortened to OCAT.

OCAuxiliaryTools will be shortened to OCAT.
What exactly is OCAT ?
OCAT is an app like Hackintool that serves various functions to help you build, edit and maintain your OpenCore EFI folder. It's primary advantage over manual EFI creation is that it gives beginners a graphical user interface that is easy to navigate. It greatly reduces the amount of time it takes to produce a custom, working EFI folder.
Now that anyone can download and use this app, there is no reason for beginners to copy and paste someone else's outdated EFI folder. You'll produce your own custom EFI in just a few minutes and then modify it to work with your specific hardware. You will still need to have a basic understanding of how OpenCore works to have success with OCAT. You will edit the config.plist, add kexts and drivers etc. View a video demo of this in Post #4 of this thread.
As you will see in the video, OCAT doesn't do all the work for you. It's not like copy/pasting a perfectly configured EFI folder from a Golden Build. You will still have to make plist edits, add certain kexts and drivers to make your USB installer bootable with no kernel panics. This requires research on your part to know what to do.
See post #2 for more info in the OpenCore documentation. OpenCore Reference Manual and links
When the time comes to upgrade your version of OpenCore, OCAT will make that a routine process that only takes a small amount of effort to accomplish. This app has made a lot of progress over the past few months and is now ready for use by everyone in the greater hackintosh community.
I've heard that configurator apps can corrupt my config.plist. Does OCAT suffer from that problem ?
You need to make sure any app you use is for the same release version of OC that your config.plist was made with. When you start fresh with a new EFI folder generated with OCAT this won't be a problem. The OpenCore version will match.
You can now do nearly everything, except making your custom USBPorts kext, with the OCAT app. You can use Hackintool for making that kext and for gathering other system info that you'll need.
Don't use multiple apps to edit your EFI folder. The Dortania guide suggests using ProperTree and other apps, which are ok to use with each other. Don't use them combined with OCAT. It will probably cause problems and errors. If you do need a standalone plist editor, I'd suggest using: https://www.fatcatsoftware.com/plisteditpro/
Can I use OpenCore Legacy Patcher to do the same things ?
OCLP is only used on hacks for a few specific use cases: When you need root patching for Broadcom Wifi/BT cards or unsupported graphics. I wouldn't attempt to use it to update OpenCore. It would likely create a mess of your EFI folder and make the system unbootable. Why ? Because your hackintosh doesn't contain the exact same hardware that a real Mac does.
How do I get started using the app ?
At first glance, how to use the OCAT app may not seem obvious. This post will cover what you need to get started.
Who is the author of this app ?
The primary OCAT developer is ic005k. Have a look at his Github Repo: https://github.com/ic005k
Gabriel Luchina originally created the EFI repo. 5T33Z0 used his Intel base configs as a starting point for creating the Intel config templates you will find in the database. He also maintains and updates them.
Six Step Introduction to OCAT Basics
1. Download the latest release from Github. There are Linux, Mac and Windows versions.
This intro guide will showcase the Mac version of OCAT. The Asset is titled: OCAT_Mac.dmg
2. Open up the app by right (or ctrl) clicking on it and choosing Open. May take a few tries. Also make sure to give Macserial permission to run (Allow Anyway) via the Security and Privacy tab in System Preferences.
You'll see that it is set to OC version 0.7.8. You'll want to click on the Upgrade OC icon shown below.
Click on "Latest Version" at the top of the menu. It's currently 0.8.8 in January of 2023. When you click on "Get Opencore" in the next step, it will download the newest OpenCore version in the repo.
___________
3. Next click on Get Opencore and then you will be updated to the newest available release.
The following video will demonstrate steps 1-3 and show some other important OCAT features.
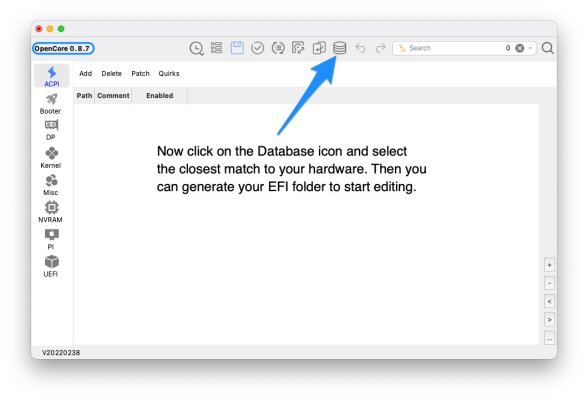
4. Open up the Database and
June 2023 EDIT: The config templates are no longer bundled with OCAT. Follow the directions below.
The config templates are for desktops only. They go back as far as the late 2009 iMacs and as new as 11th gen Rocket lake desktops for which there is no equivalent Mac by Apple. If you have a 12th or 13th gen Intel system look in Golden Builds and User Builds for hardware similar to or the same as yours. All unsupported chipsets (11,12,13) will need to use either iMacPro1,1 or MacPro7,1 SMBIOS to work. The Intel 700 series iGPUs are not macOS compatible.
See this page on Github for more details about how to get updated configs.
OC-Little-Translated/F_Desktop_EFIs/Config_Templates at main · 5T33Z0/OC-Little-Translated
ACPI Hotpatches and Guides for the OpenCore Bootmanager. Enhance and fine-tune your system by adding devices and enabling additional features not covered in the OpenCore Install Guide. - 5T33Z0/OC-...
 github.com
download the Config_Templates.zip Then select the best match for your hardware. Open it with OCAT.
Link to download zip file
Here's an example of a choice for a tenth gen Intel Comet Lake desktop system with a Core i3, i5 or i7 CPU.
Open the selected .plist with OCAT and then select "Edit" (in menu bar) > "Create EFI Folder on Desktop"
5. The OCAT menu corresponds to the order of your Config.plist
Here's how a config.plist looks when opened up with a plist editor. Note the eight separate sections.
You can then see that OCAT puts these in the same order along the sidebar.
To continue editing your new EFI with OCAT, open the EFI folder that has appeared on your desktop and double click on the config.plist that you'll find inside the OC folder.
It will then give you the option to make changes to your new config.plist and even generate your unique Serials and a SystemUUID. You'll need to add those to the config.plist before you can boot with your macOS USB installer drive.
You will also likely be adding custom kexts (USBPorts.kext) and SSDTs to the appropriate folders. See this section of the Dortania guide for details. https://dortania.github.io/OpenCore-Install-Guide/ktext.html#firmware-drivers
See the video tutorial in post #4 for an example of editing your EFI's config.plist and adding kexts/drivers etc.
6. When finished editing and adding your kexts/SSDTs make sure to save and check for errors/omissions.
Click on the blue diskette icon as shown in the OCAT app screenshot below.
Next click on the "checkmark in a circle" icon and then find out if everything is OK with OC Validate.
If you've done everything correctly, OC Validate should tell you that there are no issues.
Now you can make your 16GB+ USB installer by using the createinstallmedia method. Then add your EFI folder to the EFI partition of the USB. If installing Ventura, use the release version, not the beta.
How to Create a macOS Ventura Installation USB
Here's a quick guide to create a macOS 13 Ventura Public Beta Installation USB. Please note, this guide is not universal, and may not work for all systems. STEP 1: Download macOS Ventura Public Beta 1. Enroll in the Free Apple Beta Software Program 2. Download Public Beta Access Utility 3. Run...
Attachments
Last edited: