- Joined
- Dec 4, 2017
- Messages
- 145
- Motherboard
- Z690I Gigabyte Aorus Ultra Plus (DDR5)
- CPU
- i9-12900KS
- Graphics
- RX 6800
- Mac
- Mobile Phone
MSI-H370M-BAZOOKA - MSI Vega 56 Air Boost
Compatible with Mojave and Catalina
Compatible with Mojave and Catalina
Components
* Orange items are interoperable, meaning that you can decide on getting another model/brand of that component.
MSI H370M BAZOOKA mATX Motherboard - BHPhotoVideo / Amazon / Newegg
Intel Core i7-8700 ES (Engineering Sample) Processor (Any other 8th gen would do) - Aliexpress / ebay
Corsair Vengeance RGB Pro DDR4 Desktop Memory Kit 3200MHz (16GB x 4) - Newegg / Amazon
Seagate Barracuda 2TB 3.5' Internal Hard Disk Drive (SATA / 7200 RPM) - Newegg / Amazon
WD Red 4TB NAS Hard Disk Drive - 5400 RPM Class SATA 6Gb/s 64MB Cache 3.5 Inch - WD40EFRX - Newegg / Amazon
CRUCIAL MX500 2.5" SSD - Newegg / Amazon
Crucial P1 1TB 3D NAND NVMe PCIe M.2 SSD - CT1000P1SSD8 - Newegg / Amazon
EVGA SUPERNOVA 650G+ GOLD MODULAR PSU - Newegg / Amazon
MSI Radeon RX Vega 56 Air Boost 8G OC - Newegg / Amazon
Cryorig C7 CR-C7A 47mm CPU Fan - Newegg / Amazon
Corsair Crystal Series 280X RGB - Newegg / Amazon
Apple Broadcom BCM94360CD w/ the adapter to PCI-e - OSXWifi
Already Owned
Prism+ W270 monitor - Prism+
Introduction
There are only two reasons for me to get a hackintosh.
- To budget it out, pay less for a Mac and more for the specs.
- To max it out at the best price possible.
I've been running this build for 1 year 2 months now (I actually posted on medium) and I haven't had the courage to share this build in its entirety until i'm sure that it runs stable for a long period of time. This build is affordable, fast, quiet, and suits my testing needs for my gaming and development needs, catered for developers.
What doesn't work or ain't tested?
- Not implemented yet
- CFG Lock
- Not Working
- If there is, post it here!
Pre-Installation Configuration
BIOS - Ensure you are on the latest BIOS version (The factory version; The very first one, has issues with IGD Multi-monitor when enabled.)
- Settings/PCI Subsystem Settings/Above 4G Decoding - Enabled
- Settings/Advanced/Integrated Graphics Configuration/Initiate Graphics Adapter - Enabled
- Settings/Advanced/Integrated Graphics Configuration/Integrated Graphics Share Memory - 64MB
- Settings/Advanced/Integrated Graphics Configuration/IGD Multi-monitor - Enabled
- Settings/Advanced/Thunderbolt(R) Configuration - Disabled (Yes we need to disable Thunderbolt completely)
- Settings/Advanced/USB Configuration/USB Controller - Enabled
- Settings/Advanced/USB Configuration/XHCI Hand off - Enabled
- Settings/Advanced/USB Configuration/Legacy USB Support - Enabled
- Settings/Advanced/Windows OS Configuration/Windows 10 WHQL Support - Enabled
- Settings/Advanced/Windows OS Configuration/Fast Boot - Disabled
- Settings/Advanced/Windows OS Configuration/MSI Fast Boot - Disabled
- OC/CPU Features/CFG Lock - Disabled
- OC/CPU Features/Intel VT-D Tech - Disabled
Create your USB installer, prepare the necessary drivers and configurations on Clover and install macOS:
- Download macOS Mojave Sierra installer via App Store from a Mac or hackintosh.
- Download UniBeast.
- Initialize your USB flash drive with Mac OS Extended (Journaled) and name it USB.
- Launch UniBeast and let it create your USB installer.
- When finished, replace the EFI folder in the EFI partition with the one attached to the bottomof this post.
- Be sure to replace any SMBIOS-related configurations with your own one.
- I've been following Dortania's guide to get it up, you just need to follow this section specifically.
- This will ensure that you have a unique serial.
- I've been following Dortania's guide to get it up, you just need to follow this section specifically.
- Be sure to replace any SMBIOS-related configurations with your own one.
- Be sure to only use a USB 3.0 port to boot to your USB. Chassis ports that are 3.0 are fine too.
Post Installation
Audio
iMessage
We've come a long way. With the introduction of an OpenCore EFI iteration, this guide will help you breeze through.
Follow this guide and do NOT restart when they say so. This clears all cache and configurations related to the iCloud family that relates to iMessage and etc.Install the drivers for NVRAM support via Clover Configurator (Mount your EFI partition; Head to the ‘Install Drivers’ section and you’ll see EmuVariableUEFI-64.]. SourceDone!
Routine Tasks
Be sure to run
setup_var 0x6F5 0x00 on every BIOS change/macOS boot when coming from Windows (Or any other OS in fact). This is due to the fact that we are using the 'cleaner' approach for CFG Lock rather than using the patch (I would recommend that if you want less of a hassle, but it was stated that the current approach we take is more stable).Ports
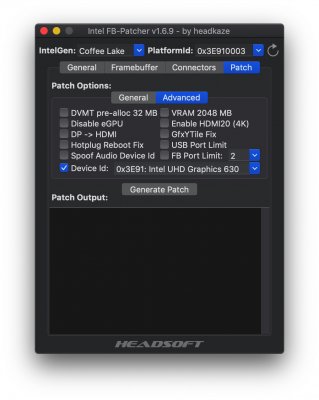
Over the past 6 months, another leap in the USB configuration side of things for hackintosh have been made. It is now extremely easy to propagate a SSDT on your own. Feel free to set it up on your own if you don't share the same parts (Like your case) as I do from here.
NZXT Tower Ports
- HS09 (Nearest to power button) - USB 2.0 Tower Port
- HS10 (Beside HS09) - USB 2.0 Tower Port
- SS06 (Beside HS10) - USB 3.0 Tower Port
- SS05 (Beside SS06 - USB 3.0 Tower Port
Motherboard Ports (All directions are according to, when the motherboard is placed inside your case)
- HS07 (Beside HS08) - USB 2.0 Motherboard Port
- HS08 (Beside LAN Port) - USB 2.0 Motherboard Port
- HS03 (Below HS08) - USB 3.1 Gen1 Motherboard Port
- HS04 (Below HS07) - USB 3.1 Gen1 Motherboard Port
- HS02 (Beside SS01) - USB 3.1 Gen1 TypeC Motherboard Port
- SS01 (Beside HS02) - USB 3.1 Gen1 Motherboard Port
Troubleshooting
- Input lag after waking up from idling - EFI 130520 onwards has functional sleep, lock without any lag after wake.
- When many programs are open, sudden Kernel Panic (KP)
Contributions
Native NVRAM
Greetings all! I just came across this thread and thought I'd contribute as I also use the MSI H370M Bazooka. Recent updates have made native NVRAM possible on all 300 series chipsets based motherboards. For the Bazooka, however, the MSR will need to be unlocked. I'm using firmware version 1.30 and the MSR address is 0x5C0 Use the attached file, unzip, and copy to EFI/Clover/ACPI/patched
Detailed instructions on unlocking are here
And a side note: don't forget to do proper USB fixes (ACPI patches) for your hack!
Versions
v1.0 - EFI.zip, Compatible up to 10.14.3.
v1.1 - 270419-EFI.zip, Compatible up to 10.14.4.
v1.2 - 101019-EFI.zip, Compatible up to 10.14.4, final EFI partition before Catalina.
v1.3 - 10.15-111019-EFI.zip, Compatible with 10.15.
v1.4 - 290320-EFI.zip, Compatible up to 10.15.4.
130520 / OpenCore - First OC iteration
200520 / OpenCore - Finally actually working properly. lol
Updates
macOS 10.14.2 Update can be installed just like a mac. Take note that there'll be two restarts during the installation process and you'll have to make sure you select the Installation partition.
From now on, we will be leveraging on the ApfsDriverLoader for APFS support.
 www.tonymacx86.com
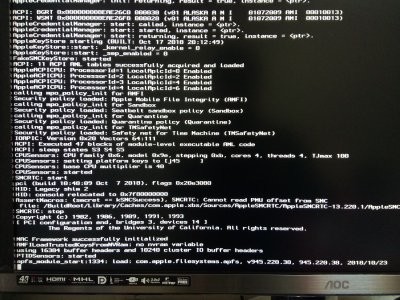
Take note that utilising the conventional apfs.efi driver will result in this
Will be including a new updated EFI folder on this thread that will support 10.14.4. Updates to FakeSMC and the other kexts are required in other to make 10.14.4 work.
security update 2019 High Sierra does require apfs.efi file updated?
Hello Please don't close this as duplicate because on the other forum topic no one is replying to my specific question and I need an advise on how to move on. In 2018 there was a security update 10.13.6 which i have installed the other day as I usually wait a bit before updating, now I see...
Take note that utilising the conventional apfs.efi driver will result in this
Will be including a new updated EFI folder on this thread that will support 10.14.4. Updates to FakeSMC and the other kexts are required in other to make 10.14.4 work.
I have been really busy with work lately thanks to COVID-19, really sorry guys please bear with me. I've started work on the SSDT for this build give me a little bit more time.
There's a new EFI backup zip I have attached here. Feel free to use it (If you have the same case as I do as well), else you will have to get your SSDT done!
There's a new EFI backup zip I have attached here. Feel free to use it (If you have the same case as I do as well), else you will have to get your SSDT done!
I've started work on getting OpenCore to work instead. On my previous couple of bootloader versions,
The above issues have been properly addressed. The system boots up much faster now.
Not working
I've also updated the thread, added what works or doesn't work, what BIOS configurations to do (granular)
- Graphics is buggy, playing games like Dota 2 causes random reboots.. without fail
- NVRAM was horrendous lol, idk what I was doing until today, took an hour to finally get what NVRAM does and how does it work on 300 series boards.
- Headless iGPU should be the way the way to go, didn't have the time to realise that it died after the switch to the first Catalina update.
The above issues have been properly addressed. The system boots up much faster now.
Not working
- Complete Audio -
- What's the problem?
- Audio works, just not when you are doing multiple audio outputs concurrently. (ATM, opening a game while having a voice chat could isolate the audio to the voice chat and the OS, causing you to lose in-game audio) - I haven't played around with the various ALC IDs
- What is functioning as expected?
- System Audio
- You can overlap this with programs like Spotify, no problems found. (Vice versa) Beeps output as usual when there ain't any issues popping up.
- System Audio
- AppleALC Troubleshooting
- alcid=1
- Problems with isolation (Multi-audio output is buggy)
- Reproduction methods
- The Dota 2 Way
- Open Spotify, play something
- Open a game (Preferably Dota 2, ensure its starting with Vulkan)
- Get in a Discord voice channel (Or any other voice chat apps)
- Go to settings in Dota 2
- Voila, reproduced.
- The easy way
- Open Spotify, play something
- Open System Preferences/Sound
- Move around Sound Effects, Output and Input Menus
- Voila, reproduced.
- The Dota 2 Way
- Reproduction methods
- Problems with isolation (Multi-audio output is buggy)
- alcid=2: Same as 1
- alcid=3: Same as 1
- alcid=1
- What's the problem?
I've also updated the thread, added what works or doesn't work, what BIOS configurations to do (granular)
Changes
- HPET IRQ patching
- This fixes ALC as well.
Changes
- Semi-proper CFG Lock implementation - This is the only "clean" fix I've looked around so far. It's very manual because every BIOS change requires the setup_var command to be executed again.
- CFG Lock Address for BIOS 7B24v18 - 0x6F5 -> Command to run in Modified GRUB Shell:
setup_var 0x6F5 0x00- IMPORTANT!
Do note that variable offsets are unique not just to each motherboard but even to its firmware version. Never try to use an offset without checking.
- IMPORTANT!
- CFG Lock Address for BIOS 7B24v18 - 0x6F5 -> Command to run in Modified GRUB Shell:
- General configuration tweaking - Compliance with OC for Coffee Lake.
- Airport Extreme PCIe Kext Injections (AirportBcrmFixup, etc.)
- Proper SMBUS Support via ACPI Patching
- Merged EC and USBX ACPI Patch
- Disabling real EC, fixing the random freeze issues
- NVRAM ACPI Patch
Attachments
-
EFI.zip25.6 MB · Views: 784
-
270419-EFI.zip26 MB · Views: 391
-
101019-EFI.zip30.6 MB · Views: 306
-
10.15-111019-EFI.zip26.4 MB · Views: 351
-
290320-EFI.zip27.5 MB · Views: 191
-
COMPILED-SSDT-290320.zip3.4 KB · Views: 133
-
EFI-130520.zip58 MB · Views: 270
-
140520-EFI.zip58 MB · Views: 180
-
200520-EFI.zip63.5 MB · Views: 377
Last edited: