- Joined
- Mar 17, 2011
- Messages
- 59
- Mac
- Classic Mac
- Mobile Phone
I waited until Mountain Lion came out, and then built a new Ivy Bridge-based system with a Gigabyte Z77-UP5-TH motherboard and i5-3570K CPU.
The install: Did a fresh install using UniBeast and MultiBeast 5.0.2, installed the following:
DSDT-Free Installation
Realtek Without DSDT ALC898
3rd Party SATA
hnak's AppleIntelE1000e Ethernet drivers
iMac 12,2
Added GraphicsEnabler=No to BIOS, was able to boot off the HD4000 graphics without a hitch.
The hardware: For this install, I used the Corsair H100 self-contained water-cooling system and two Cougar Vortex fans (higher airflow and quieter than the stock Corsair fans).
OCing the system: One thing to be aware of is that Ivy Bridge runs hotter than Sandy Bridge at the same clock speeds. Lots of overclockers have tested this out, and it just seems to be the norm with these chips. However, despite running warm, they're still stable at high speeds, and overclocking is easy. With the Gigabyte UP5 motherboard, this is how easy it was to get to 4.4GHz:
1) Hit F1 in BIOS to turn off that annoying 3D BIOS thing and get a standard menu
2) Go into MIT -> Advanced Frequency Settings, and set all the Turbo Boost settings (1-core through 4-core) to 44
3) Go into MIT -> Advanced Voltage Settings, and set the CPU Vcore to 1.23V
4) Benchmark system with Prime95 for at least 6 hours; if stable, lower Vcore by 0.01V and try again
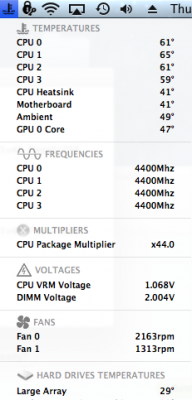
That's it, that's all you need to do. The chips are safe to run at 1.23V and should run stable at 4.4GHz at that speed. The only reason lowering Vcore matters is to reduce load temps and possibly extend the life of your chip. I brought my system down to 1.21V and it's now running stable here at 4.4GHz. Here's where my temps range, and under what circumstances:
60-65C: If I run Prime95 Torture Test -> SmallFFT (the most demanding CPU torture test I can find)
50-55C: Running Prime95 Torture Test -> Blend, Cinebench CPU, or anything else creating a high system load
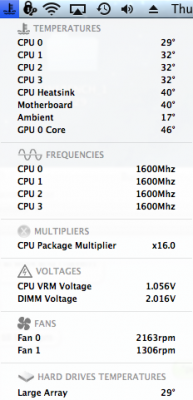
30-35C: System at idle, able to throttle down to 1.6GHz
From there, you can stick with 4.4GHz, or you can start increasing the voltage and Turbo multiplier further, now that you have a baseline OC you know your system supports.
Software: Mountain Lion works OOB with Ivy Bridge. You do not need an SSDT, even when overclocking! The CPU will throttle back and forth automatically between 1.6GHz and your Turbo Core settings, based on your system load. To monitor your CPU speed and temperatures, I recommend installing the following from MultiBeast 5.0.2, which are all you need to verify your system is OCing properly:
FakeSMC
FakeSMC Plugins -> Motherboard Plugins
FakeSMC Plugins -> HWMonitor App
You can also install the Radeon or Nvidia plugin to go with your discrete GPU, if you have one.
Once you've done this and rebooted, you'll find a program called "HWMonitor.app" in your Applications folder. Run it, and it will give you a real-time readout that looks like the attachments below. (One screenshot is of the system under idle, the other is the system under load running Prime95 Torture Test -> Small FFT.) If you go to System Preferences -> Users & Groups -> Login Items, you can click the + to add an item to your Login Items list, then go to your Applications folder and choose HWMonitor.app. This will cause HWMonitor to load automatically every time you boot up.
The install: Did a fresh install using UniBeast and MultiBeast 5.0.2, installed the following:
DSDT-Free Installation
Realtek Without DSDT ALC898
3rd Party SATA
hnak's AppleIntelE1000e Ethernet drivers
iMac 12,2
Added GraphicsEnabler=No to BIOS, was able to boot off the HD4000 graphics without a hitch.
The hardware: For this install, I used the Corsair H100 self-contained water-cooling system and two Cougar Vortex fans (higher airflow and quieter than the stock Corsair fans).
OCing the system: One thing to be aware of is that Ivy Bridge runs hotter than Sandy Bridge at the same clock speeds. Lots of overclockers have tested this out, and it just seems to be the norm with these chips. However, despite running warm, they're still stable at high speeds, and overclocking is easy. With the Gigabyte UP5 motherboard, this is how easy it was to get to 4.4GHz:
1) Hit F1 in BIOS to turn off that annoying 3D BIOS thing and get a standard menu
2) Go into MIT -> Advanced Frequency Settings, and set all the Turbo Boost settings (1-core through 4-core) to 44
3) Go into MIT -> Advanced Voltage Settings, and set the CPU Vcore to 1.23V
4) Benchmark system with Prime95 for at least 6 hours; if stable, lower Vcore by 0.01V and try again
That's it, that's all you need to do. The chips are safe to run at 1.23V and should run stable at 4.4GHz at that speed. The only reason lowering Vcore matters is to reduce load temps and possibly extend the life of your chip. I brought my system down to 1.21V and it's now running stable here at 4.4GHz. Here's where my temps range, and under what circumstances:
60-65C: If I run Prime95 Torture Test -> SmallFFT (the most demanding CPU torture test I can find)
50-55C: Running Prime95 Torture Test -> Blend, Cinebench CPU, or anything else creating a high system load
30-35C: System at idle, able to throttle down to 1.6GHz
From there, you can stick with 4.4GHz, or you can start increasing the voltage and Turbo multiplier further, now that you have a baseline OC you know your system supports.
Software: Mountain Lion works OOB with Ivy Bridge. You do not need an SSDT, even when overclocking! The CPU will throttle back and forth automatically between 1.6GHz and your Turbo Core settings, based on your system load. To monitor your CPU speed and temperatures, I recommend installing the following from MultiBeast 5.0.2, which are all you need to verify your system is OCing properly:
FakeSMC
FakeSMC Plugins -> Motherboard Plugins
FakeSMC Plugins -> HWMonitor App
You can also install the Radeon or Nvidia plugin to go with your discrete GPU, if you have one.
Once you've done this and rebooted, you'll find a program called "HWMonitor.app" in your Applications folder. Run it, and it will give you a real-time readout that looks like the attachments below. (One screenshot is of the system under idle, the other is the system under load running Prime95 Torture Test -> Small FFT.) If you go to System Preferences -> Users & Groups -> Login Items, you can click the + to add an item to your Login Items list, then go to your Applications folder and choose HWMonitor.app. This will cause HWMonitor to load automatically every time you boot up.