Yes. This requires you to either
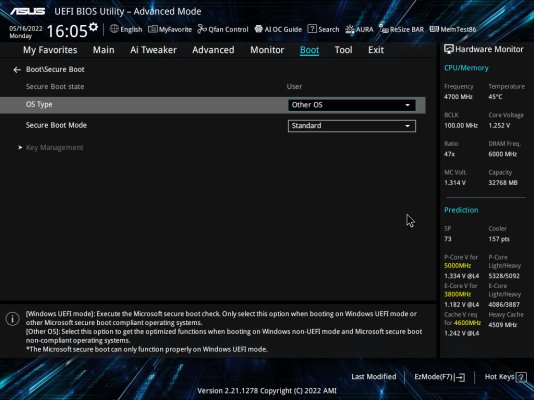
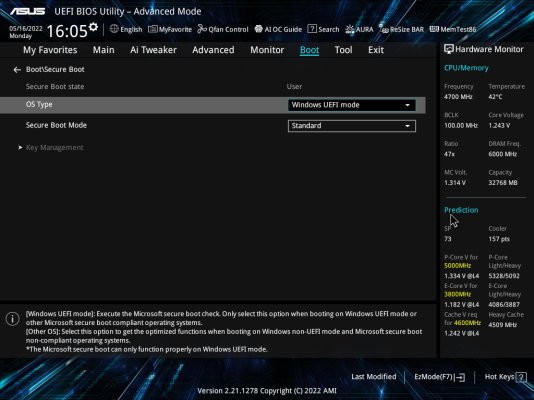
a) use motherboard GUI to add all the .EFI files from open core as "trusted" so the motherboard's firmware will allow loading if your .EFI in secure boot
b) Use linux UEFI Sign tools to sign all the .efi images from the open core EFI folder with your own private key. Then you need to upload your own private key to your motherboard. You also need to trust sign the Microsoft's UEFI key and 3rd party platform keys.
This is the general step for b) if you want to do it.
1. Generate PK, KEK, and ISK:
openssl req -new -x509 -newkey rsa:2048 -sha256 -days 365 -subj "/CN=Platform Key" -keyout PK.key -out PK.pem
openssl req -new -x509 -newkey rsa:2048 -sha256 -days 365 -subj "/CN=Key Exchange Key" -keyout KEK.key -out KEK.pem
openssl req -new -x509 -newkey rsa:2048 -sha256 -days 365 -subj "/CN=Image Signing Key" -keyout ISK.key -out ISK.pem
openssl rsa -in ISK.key -out ISK2.key
2. Convert pem to ESL
cert-to-efi-sig-list -g "$(uuidgen)" PK.pem PK.esl
cert-to-efi-sig-list -g "$(uuidgen)" KEK.pem KEK.esl
cert-to-efi-sig-list -g "$(uuidgen)" ISK.pem ISK.esl
3. Convert Microsoft’s public key to ESL
https://go.microsoft.com/fwlink/p/?linkid=321192
openssl x509 -in MicWinProPCA2011_2011-10-19.crt -inform DER -out MSWIN.pem -outform PEM
https://go.microsoft.com/fwlink/p/?linkid=321194
openssl x509 -in MicCorUEFCA2011_2011-06-27.crt -inform DER -out MS3P.pem -outform PEM
cert-to-efi-sig-list -g "$(uuidgen)" MSWIN.pem MSWIN.esl
cert-to-efi-sig-list -g "$(uuidgen)" MS3P.pem MS3P.esl
4. Convert Ubuntu’s cert to ESL (Optional if you want to be able to boot Ubuntu)
Ubuntu’s UEFI cert key is located here: /usr/share/grub/canonical-uefi-ca.crt
openssl x509 -in /usr/share/grub/canonical-uefi-ca.crt -out ubuntu.pem -outform PEM
cert-to-efi-sig-list -g "$(uuidgen)" ubuntu.pem ubuntu.esl
5. Combine self self ISK, Microsoft and Ubuntu ESL into 1 DB file:
cat ISK.esl MSWIN.esl MS3P.esl ubuntu.esl > db.esl
6. Sign your ESL file into AUTH format
sign-efi-sig-list -k PK.key -c PK.pem PK PK.esl PK.auth
sign-efi-sig-list -k PK.key -c PK.pem KEK KEK.esl KEK.auth
sign-efi-sig-list -k KEK.key -c KEK.pem db db.esl db.auth
7. Sign your EFI bootloader and EFI drivers with your private key:
sbsign --key ISK.key --cert ISK.pem bootx64.efi (Do it for all other .efi that is required by OpenCore)
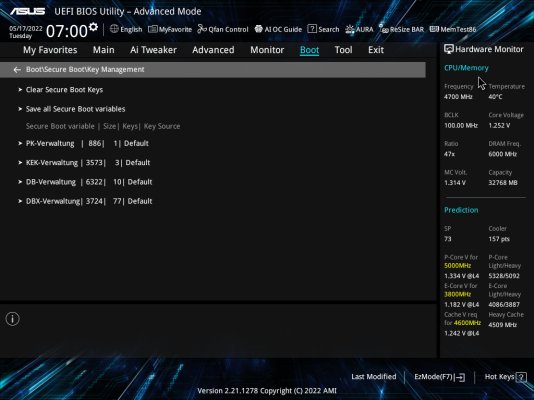
8. Load the *.auth files into bios per motherboard instructions


 . iGPU and dGPU totally disabled in order just the eGPU works, as I said if the iGPU or the dGPU are working I have black screen.