Contribute
Register

Asus X299 - Support

Status
Not open for further replies.
1. Radeon VII
2. Titan Ridge
3. Empty
4. Empty
5. WIFI/BT
6. Empty
7. USB Controller
another question, would there be any issue adding a second startech USB 3.1 controller in lets say slot 6? as well as there being one in slot 7. Thank you!
 
another question, would there be any issue adding a second startech USB 3.1 controller in lets say slot 6? as well as there being one in slot 7. Thank you!

Nope, X299 has many PCIe lanes. Just make sure to get one with a decent chipset, I prefer ASMedia and not Fresco (which is trash).
 
Hey x299 gang! I hope everyone is safe and sound.

Has anyone with the Asus x299 Prime Deluxe upgraded to the latest BIOS 3006?

Thanks in advance!
 
Patch the BIOS with the attached UEFIPatch version, flash it via flashback button to your board and add the aml to your EFI patched folder.

@egroys
 

Attachments

  • UEFIPatch.zip
    1.4 MB · Views: 106
  • SSDT-X299-CascadeLakeFix.aml
    98 bytes · Views: 113
Hi guys,

I'm trying to get my Asus WS X299 PRO with a i9-9940X to boot the installer. Can't get it to work.

I'm on the newest BIOS FW. From what I read here in the recent post I need a patched BIOS FW? And something for the processor?

What else do I have to keep in mind? I think the MSR lock disable doesn't work or something?

Is there anything else that I need to know for X299. I have a successful build on a Asus Z87-i PRO 1151 board with Mojave running flawlessly.. but somehow with my new PC it's a handful.

My specs:

Mainboard: ASUS WS X299 PRO
CPU: Intel i9-9940X (14 core, 3,3-4,5Ghz)
RAM: Corsair Vengeance LPX 64GB (4x16GB) DDR4 3200Mh
GPU: MSI Radeon RX Vega 64 Air Boost 8G + Zotac Nvidia GTX1080Ti
System Disks: Samsung 970 PRO 1TB (macOS); Samsung 850 EVO 256GB (Windows 10)
Thunderbolt 3: Gigabyte GC-Titan Ridge 40GB/s Intel Thunderbolt 3 Certified Add-in PCIe Adaptor
Power Supply: Corsair HX1200i
 
@Polanski You need only the patched BIOS which should be flashed via Flashback function and the attached SSDT from my previous post.

An DSDT is not necessary...

I've patched the BIOS already for you, insert first the SSDT from my previous post to your patched folder if you use clover.

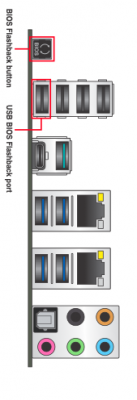
Afterwards extract the firmware and put it on an fat32 USB 2.0 stick, attach it to the Flashback Port and Press the flashback button for 3 Seconds and release it after.

The LED should blink for a while, if it stops after 3 times, something is going wrong.

It should blink until the flash process is done and takes some time...
1-2 Minutes is nothing special and as soon as it is done you can boot your system normally.

For a better overview I also attached a picture of the Port which has to be used for it and also the flashback button...

Bildschirmfoto 2020-04-07 um 23.14.48.png
 

Attachments

  • WSPRO.CAP.zip
    9.7 MB · Views: 81
Status
Not open for further replies.
Back
Top