Hello
@mgregrs , thanks for the personalized Bios, I already have the original but yours adds the personalized touch to the start of our Hack´s.
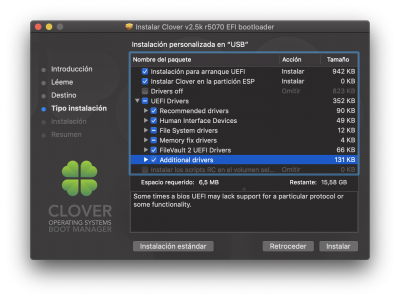
I read that you had problems installing Catalina, attached Efi for USB Boot and for the Hard Disk, first you have to install the Clover 5070 first with the options indicated in the illustration and then delete the EFI folder (remember to empty the trash) and replace with the attached one. This is valid for the USB installation and for the boot disk. I have the same motherboard and graphics as you and the EFI works for me to start High Sierra, Mojave and Catalina. The EFI folder is missing the Airport and Thunderbolt SSDTs, I don't use them. You also have to add your TSCAdjustReset.kext
I also found an old collaborator of the original KGP thread that has come up with the solution of the low resolution of the Vega 64 cards at boot, yesterday I tried with my Sapphire Nitro + Vega 64 and it worked perfectly, I don't know if they can be attached links from other sites, I will copy the instructions as is, ALL CREDITS TO:
@DSM2
I just copy and paste.
============================================================================
Nearly every User with a Vega GPU which use a 4K monitor over the DisplayPort noticed this already...
The screen resolution is fine under Windows and MacOS but is totally at odd during boot (VGA like).
It is a Vega Bios problem in combination with most 4K displays. (Not present with Nvidia GPUs)
The problem does not only affect the Splash Screen but also spreads over the entire boot process until the login screen is reached (Windows and MacOS).
I found a fix for this problem but I can only recommend it to users with Vega 64 reference design dual bios cards,
since you have to do a bios flash to your Vega under Windows.
I am not responsible for any damages !!! It's up to you to check your card, if it has a bios switch or not (only dual bios cards have them) !!!
If anything goes wrong, the dual bios function will save your card from the trash bin!
Always backup your original bios first before flashing the attached rom...
What do you need for this :
AMD/ATI ATIFlash - For backing up your Original Bios and flashing the new rom to your card.
Bios file
I've done the work for you and compressed the file with everything inside, so just download it!
How to :
1) Boot Windows
2) Unpack the download onto your desktop
3) Start ATIWinflash.exe and save your bios rom to your desktop
4) Close the Applikation afterwords
5) Run cmd in "Administrator Mode" - a black command prompt window opens
6) Type : cd %USERPROFILE%\desktop\atiflash
(USERPROFILE has to be changed to your user profile name under Windows)
7) Type: atiwinflash -unlockrom 0
8) Type: atiwinflash -f -p 0 unlock.bin
9) As soon as the flashing process is successful you will get a message saying: Restart System to complete VBIOS Update,
what of course you should do to finish the process.
If everything goes well and your card fits the bios, your Resolution issues should be gone now!
What if something goes wrong?
So you flashed the BIOS and your card doesn't work for one reason or the other?
If your card boots fine but does not work reliably in 3D, or doesn't work at all you can just boot via second Bios turning the switch in a different position.
As soon as you reach Windows desktop turn the switch again in the position the custom rom was flashed and flash back the original BIOS of your card.
(that's why you should always save your BIOS before doing any flashing experiments.)
Cheers,
DSM2
============================================================================
Then I have a couple of questions for you, I have (like you) an Asus Hyper 16x card, would you be so kind as to attach the SSDT for cosmetics?
Finally, when updating to Bios 1902 and now to 2002, I have lost the internal sound (AppleALC) I have updated the kext but I do not get sound, in the PCI cosmetic section it shows correctly “Realtek HD etc, etc…” but in the section sound does not appear, you know something about it, thanks for everything, greetings.

(very good news if we will be able to boot OSX with these new CPUs