- Joined
- Apr 10, 2015
- Messages
- 19
- Motherboard
- Rampage V Extreme
- CPU
- i7-5960x
- Graphics
- ROG Matrix Gtx980
- Mac
- Classic Mac
- Mobile Phone
Has anybody had luck with ThunderboltEX? How can we get it to work?
Thank you.
Thank you.
Index
Installation Guide El Capitan 10.11.5
Creating USB Installer
USB Installer - First Step (Formatting)Installation
USB Installer - Second Step
USB Installer - Third Step (Replacing files)
USB Installer - Fourth Step (Tools Folder)
Important noteFine Tuning
Installation - First Step (Formatting Hard Drive)
Installation- Second Step (Configure BIOS)
Installation - Third Step (Preparation)
Installation - Fourth Step (Installation)
Final Adjustments
Final Adjustments - First Step (Enable iCloud)Knowledge Base
Final Adjustments – Second Step (ALC1150 Audio Installation)
IntroductionCredits
Knowledge Base - Intel x99 Chipset Series
Knowledge Base (USBPorts)
Knowledge Base - Cancellation of Ports
Knowledge Base - Overview USB ports in Device List
Knowledge Base - SATA Ports
Knowledge Base - Overview Ports SATA Device List
Knowledge Base - NVMe
Knowledge Base - Sound Realtek ALC 1150
Bluetooth
PCI Device
Kexts
WIFI
Installation Guide El Capitan 10.11.5
Asus Rampage V Extreme
Version 1.2 English
Introduction
I wanted to make this alternative guide to help and provide much information as possible to all owners of the Asus Rampage V Extreme Motherboard under the Intel x99 Series Chipset platform and Haswell-E.
This guide is specifically aimed at Rampage V Extreme, but could provide inspiration for the development and installation in other Motherboards, although some files require modification and adaptation to work with your hardware, others do not need any changes.
It is 99.99% Vanilla, as it does not require patched kext for operation so it probably will be ready for a future update, remember that you should always make a backup in case something goes wrong. (I am not responsible for data loss.)
I hope that my guide is simple, intuitive and solve their problems, help you keep your system running fully and without any mistakes or complications, as well as provide installation and tuning it, you feel that this will be the easiest installation of its life, but there is much work behind all this hard work I've done research, hundreds of tests, bug fixes and contingencies, to achieve the end result that today I show in this Guide as I said it is thanks to the research and application of tools of big developers, without them much or none of this would be possible (see credits below).
Used Hardware
Then I will describe the hardware used to perform this installation.
UEFI BIOS: 3202
Motherboard: Asus Rampage V Extreme
CPU: Intel 5930k
RAM: 16GB Corsair Dominator 3000Ghz
Graphics: Gigabyte G1 GTX 980 Overclock
PSU: Corsair AX1500i
Hard Drive: x2 Samsung SSD 850 Pro
NVMe: x1 Samsung SM951 AHCI Mode
Cooler: Corsair GX110i
Case: Cosmos II
HUBs: x2 USB HUB Next
Mouse: Logitech G900 Chaos Spectrum
Keyboard: Logitech G910 Orion Spark
State and Functions
The following table shows the current status of components and functions are working.
Device Status
SpeedStep, Turbo, Sleep Working
Graphics Acceleration Working
HDMI Audio Working
WIFI (5Ghz) Working
Bluetooth (Airdrop, Continuity, etc.) Working
Realtek ALC1150 Audio Working
USB 3.0/2.0 Working
FaceTime / iMessage / AppStore Working
NVMe Working
Creating USB Installer
USB Installer - First Step (Formatting)
Let's create a USB installation with the image of Mac OSX El Capitan and for this, we will create a Vanilla USB with the image of the latest version of El Capitan, remember that the image of El Capitan must be located in Applications.
Recommend USB 3.0 since the time of creation and subsequent installation will be much faster.
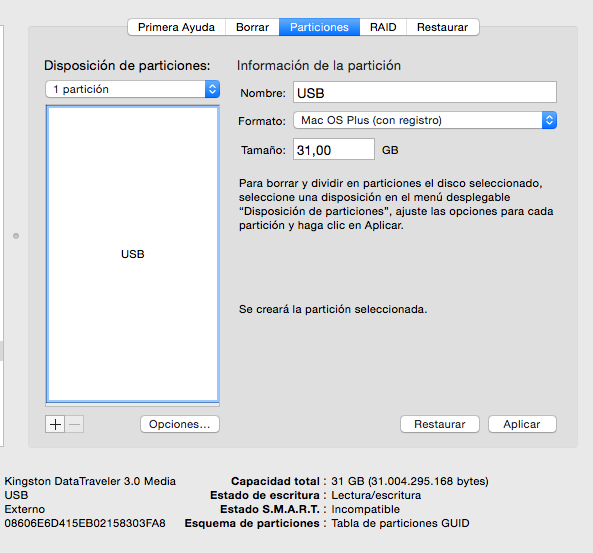
Let's format our Pen drive 2.0 / 3.0 and we will do as follows.
- Open Disk Utility and search the Pen drive 2.0/3.0.
- We named USB and select Mac OS Extended format (Journaled).
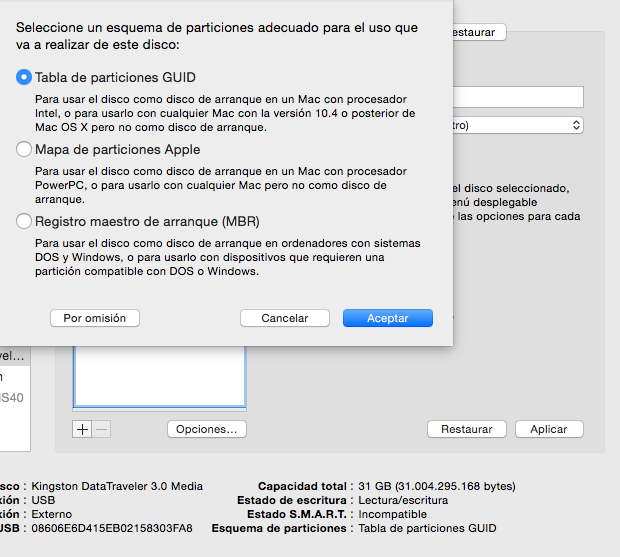
- We press on options and give it to the first option (Table GUID).
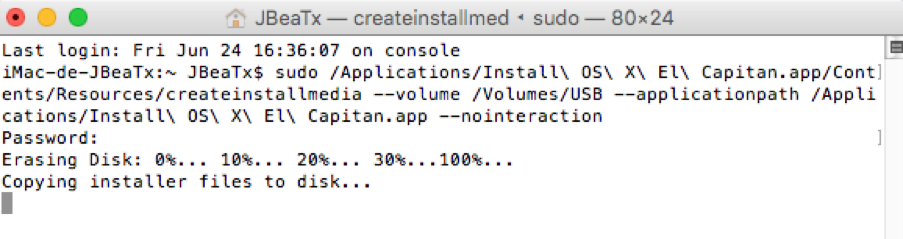
I finished this open terminal and type the following.
Code:sudo /Applications/Install\ OS\ X\ El\ Capitan.app/Contents/Resources/createinstallmedia --volume /Volumes/USB --applicationpath /Applications/Install\ OS\ X\ El\ Capitan.app --nointeraction
Once the process is completed we will proceed with our second step.
USB Installer - Second Step
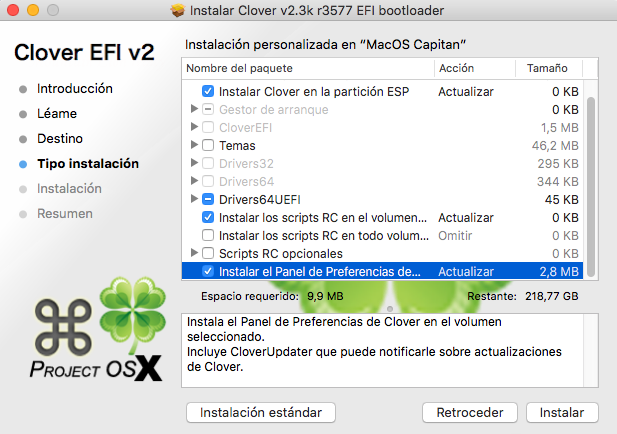
Let's download the latest version of EFI Clover and once the download is complete, proceed to install it on our USB now called "Install OS X El Capitan" and we will do as follows.
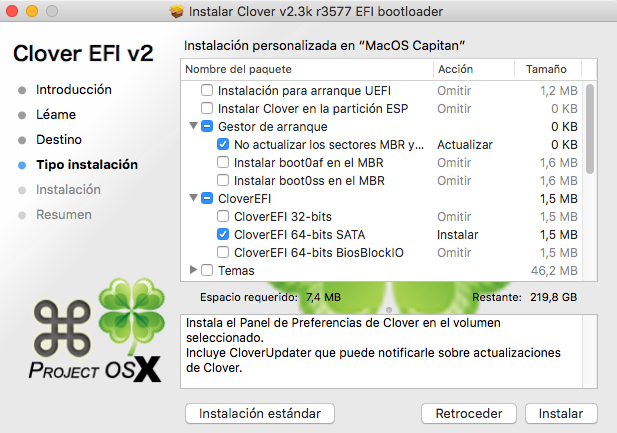
Once the process is completed we will proceed with our Step.
USB Installer - Third Step (Replacing files)
We will replace some files in the EFI partition, our Install OS X El Capitan and with this we finished and ready our USB installer for installation of El Capitan in our PC.
USB EFI Install (2.71mb)USB Installer - Fourth Step (Tools Folder)
Let's stick inside Install OS X El Capitan, a folder named Tools, which contains the tools and files needed for after installation. (Replace the files with newer versions if any).
¡With this we have done, the creation of USB Install OS X El Capitan.!
Installation
Important note:
To perform this installation, we recommend disconnecting any nonessential device for installation connected to your computer, Example: backup Hard Drives, External and internal Hubs, devices Corsair Link or the like, etc. These devices do not affect the installation, but I recommend doing so, then the installation is complete and that everything is working properly, proceed to connect each device and see that everything continues to work as it should. (Pay attention to the section below called knowledge base).
Installation - First Step (Formatting Hard Drive)
Let's format our installation disk preferably an SSD "HDD is not the best choice for an installation of Mac OSX" recommend an exclusive for our new facility SSD, as it will allow us to have fewer problems or other errors, and of course a Multi-boot several OS together.
Let's follow the steps for creating our SSD installation, which we will call "MacOS Capitan" is important to put this name so that everything works as planned.
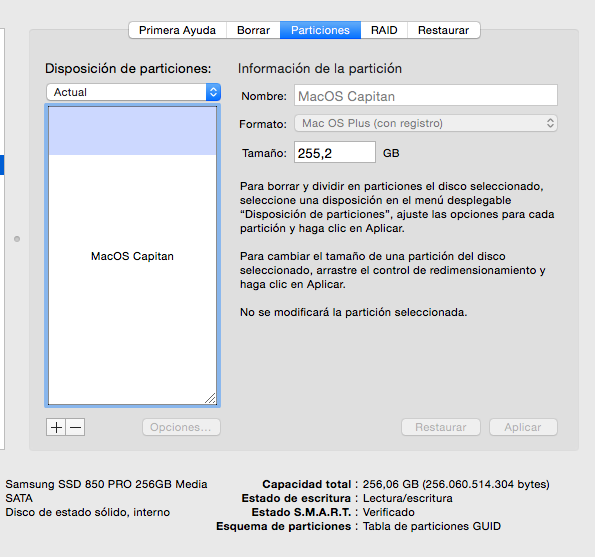
Once we finished we proceed to the second step.
Installation- Second Step (Configure BIOS)
UEFI BIOS: Version used in this guide will be 3202
We will make the following adjustments in our UEFI BIOS.
- Restore factory settings.
- Disabled CSM.
- Change Secure Boot to Other System
- Select USBInstaller to Primary Boot
- Enhanced Intel SpeedStep Technology (EIST) Disable
- Turbo Mode: Enabled.
- CPU C-States: Enabled.
- C1 State: Enabled.
- Disabled Intel VT for Directed I/O (VT-d)
- Intel xHCI Mode [Smart Auto]
- EHCI Legacy Support [Auto]
- xHCI Hand-off [Enabled]
- EHCI Hand-off [Enabled]
- No need to Disable (Bluetooth, WIFI and ASMedia 3.0)
- Press F10 to Save and Start
Finished our adjustments in the BIOS we will proceed with the third step.
Installation - Third Step (Preparation)
Place the USB Install OS X El Capitan, one of our USB 2.0 / 3.0 ports "preferably 3.0" for faster installation, do not worry about placing it in a, which will be recognized without problems USB 3.0 port.
Installation - Fourth Step (Installation)
Installation - Fourth Step (Installation)
Install and follow the steps installer and GUI Screen.
¡Ready! With this we have completed the installation!
Fine Tuning
Fine Tuning - First Step (First Start)
After the installation will start again from our Install OS X El Capitan and when we are on the desk of El Capitan we will proceed with the following facilities in order, but first let's go to our Tools Folder within our Install OS X El Capitan and we will stick to our desk when copying is complete we will expel our install OS X El Capitan and store it in a safe place for future installations.
Install Clover EFI
Let's do as follows.
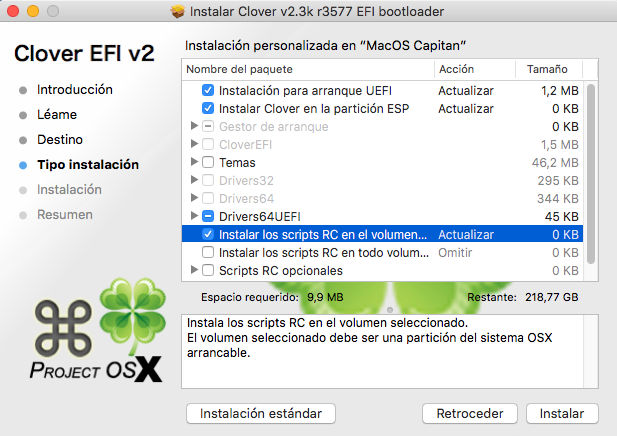
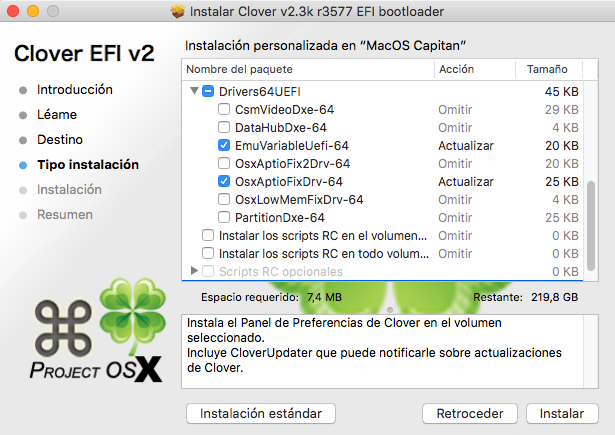
After our installation, the EFI partition will be mounted, let us in and replace some files within that partition, with the following:
EFI Post Install (18.5mb) (This will do all the hard work for you)Once we finish our second installation will proceed.
Install Kexts
We will need to install only two kext, these kext be indispensable, the first for the proper operation of the CPU and power management, the second for the proper functioning of our Audio after sleeping. (Included in Tools Folder/Kexts)
- Copy X99PlatformPlugin.kext and EAPDFix.kext in /Library/Extensions
- Open Terminal and type the following commands.
Install NVIDEA Web DriversCode:cd /Library/Extensions sudo chmod -R 755 X99PlatformPlugin.kext sudo chmod -R 755 EAPDFix.kext sudo chown -R root:wheel X99PlatformPlugin.kext sudo chown -R root:wheel EAPDFix.kext sudo kextcache -system-prelinked-kernel
For purposes of this guide, I am using a Gigabyte GTX980 G1, so you may need to make a small modification to the DSDT to fit your graph.
The Gigabyte GTX980 G1, has 6 ports as shown in the following image.
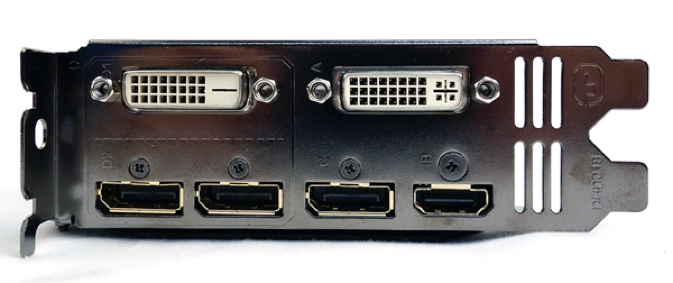
The DSDT (This DSDT I have provided is their pillar in this guide and in our operation) Is configured to work with these 6 ports, if your card has fewer ports must make adjustments to the DSDT (but this we will then not worry now).
Once installation is complete, we will ask you to restart your computer, we click restart. (Quiet you do not need to change anything in Clover).
When your computer restarts, we enter our UEFI BIOS and headed to Boot section and we will select our “MacOS El Capitan”, like first Boot disk.
¡let's go!!! Now is the magic beginning.
At this point in our Mac OSX El Capitan it is working perfectly: (You may something not work for you if you have any other devices connected that is not covered in this guide).
Tell me what you think, it has been easy installation? It had never been easier to have everything working without much effort and very quickly? If your answer is Yes, that pleased me greatly.
- USB ports 2.0/3.0.
- Sleep, SpeedStep, Turbo, etc.
- HDMI Audio.
- Onboard ALC1150 Audio.
- Graphics Acceleration.
¡This concludes the Setup!Final Adjustments
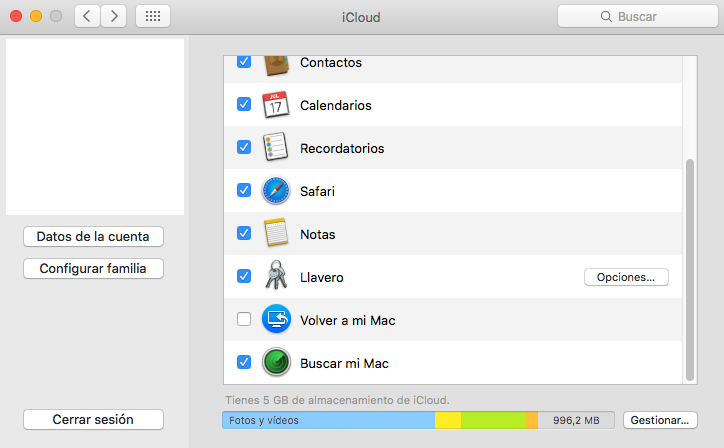
Final Adjustments - First Step (Enable iCloud)
Enable iMessage, FaceTime, AppStore, etc.
I recommend widely activate all options together from our control panel section of iCloud, but we must first do the following.
Good for this I will describe the method to successfully activate.
Hackintosh Method
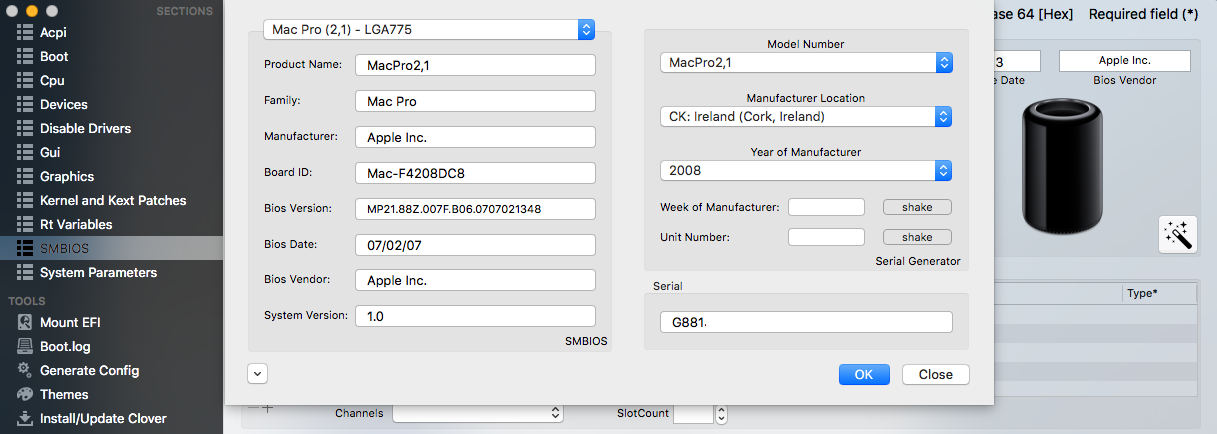
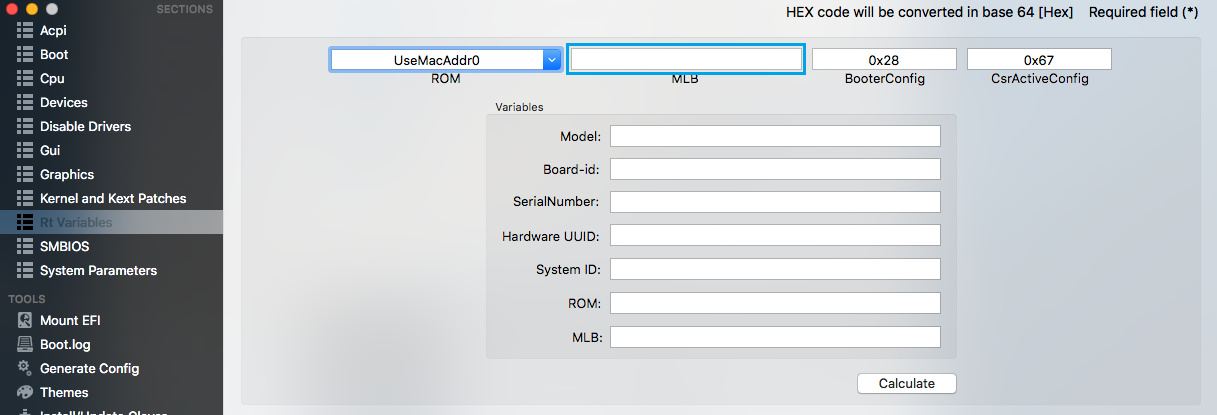
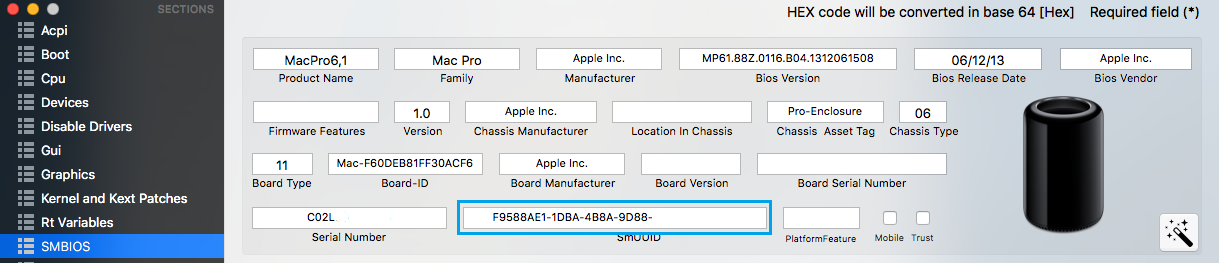
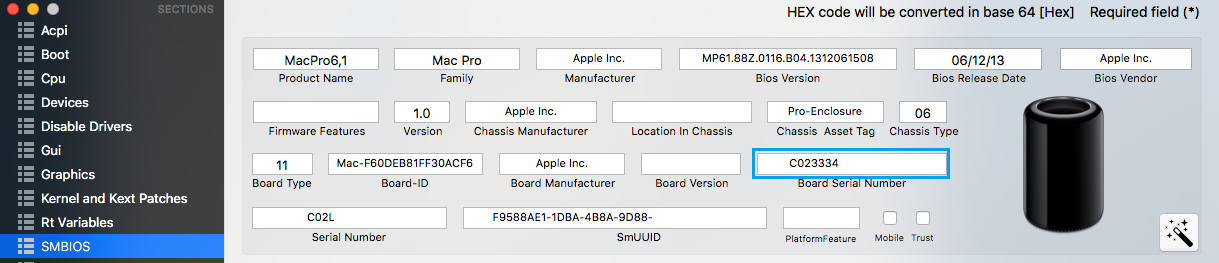
Let's open Clover Configurator and we will generate a valid serial number and is not registered with the Apple Servers.
Instructions
1- Visited the following address to verify that our serial is genuine, you must show the information and specifications relating to a MacPro 6.1.
2- Visited the following address to verify that our serial has not been registered on the servers of Apple, if we receive an error this will be perfect, this means that our serial is not being used and can use us (Stick it on your config.plist).
3- In our config.plist will remove data MLB if present.
4- Let's open Terminal and we will write the following: uuidgen
We repeat several times the command to generate several UUID
Copy and paste the last in our config.plist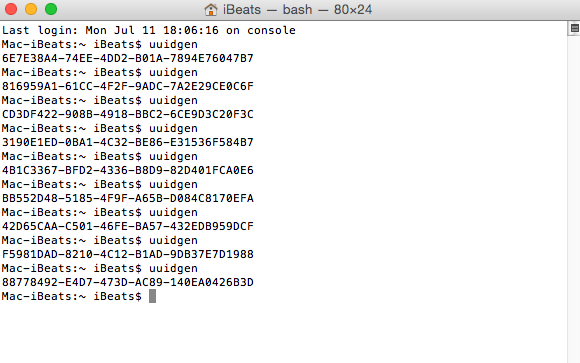
Save and reboot your computer.
5- We opened our Terminal again and we will drag the file simpleMLB.sh that we generate our SMBIOS, copy it and paste in our config.plist.
Save and reboot your computer again.
6- Let's run iMessageDebug we ask save data as iMessageDebug.txt, Save and restart again.
7- Let's run iMessageDebug again and compare the data generated with our iMessageDebug.txt, they should be coincident, if so, it is time to proceed to activate our iMessage.
Perfect now have FaceTime, iMessage, App Store, etc., running at 100%.
Final Adjustments – Second Step (ALC1150 Audio Installation)
Important Note: If you followed my guide step by step, the audio is already working with Native AppleHDA but not having Audio, you can re-install it by following these steps.
Well, we will revive our internal audio ALC1150 (Only if there is still no audio, as I mentioned above), if you had problems in the past and has been hard for you to do work or have had to resort to patching AppleHDA that they are lost with the update, quiet will activate the audio codec Toleda (credits him for this) so that our AppleHDA will remain native and oversteering audio to future updates.
- Run audio_cloverALC-110.command.
- Put your password.
- Confirm Realtek ALC1150 (y/n): y
- Clover Audio ID Injection (y/n): n
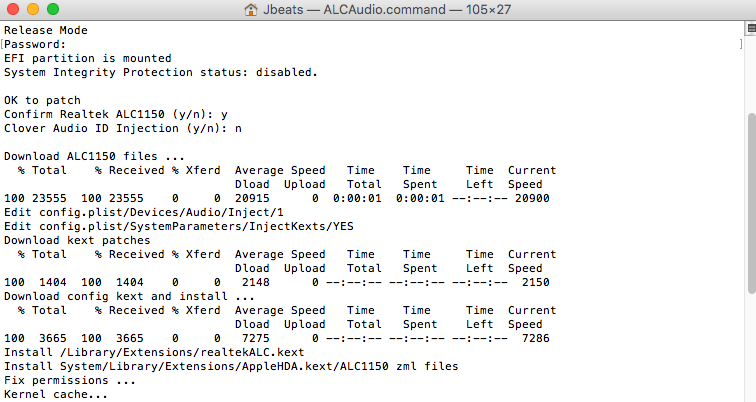
We hope to finish and restart, there is the audio ready to work, even after the Sleep.
Congratulations have completed installation.
Knowledge Base
Introduction
Now in this section I will explain in detail the procedures that I have used, as well as some valuable data that must be met in order to better understand the process of installation and operation of the various devices in your computer and more precisely in our Asus Rampage V Extreme.
The main objective of this is to solve future problems and provide you the opportunity to make their own modifications to fit your hardware or look for better ways to help us improve stability and functionality in search of better performance and performance.
Knowledge Base - Intel x99 Chipset Series
These chip sets belong to the Haswell-E platform, which is not supported natively by Apple since no model Mac with this kind of hardware and platform.
Thanks to developers as ReHabMan, Piker-Alpha, Toleda, the community and many others, today we can enjoy our PC Apple Mac OSX system installed almost as if it will be a true Mac.
The Intel C610 / X99 Chipset although as I mentioned not to be supported by Apple is very compatible, allowing a few changes and modifications have the full performance of our devices.
Knowledge Base - USB Ports
Many people have had problems with the configuration and operation of its USB ports, in our construction every one present in the Asus Rampage V Extreme ports are working as they have to.
There are Several ways to inject your ports and to be Recognized by El Capitan.
First Method (DSDT)
By using DSDT (Included and used in my guide).
Second Method (SSDT)
Using SSDT. (SSDT-R5EUSB)
Third Method (Inject)
By injecting a USBInject.kext our EFI(R5EUSBInject.kext)
Then I will show the distribution of each of the ports.
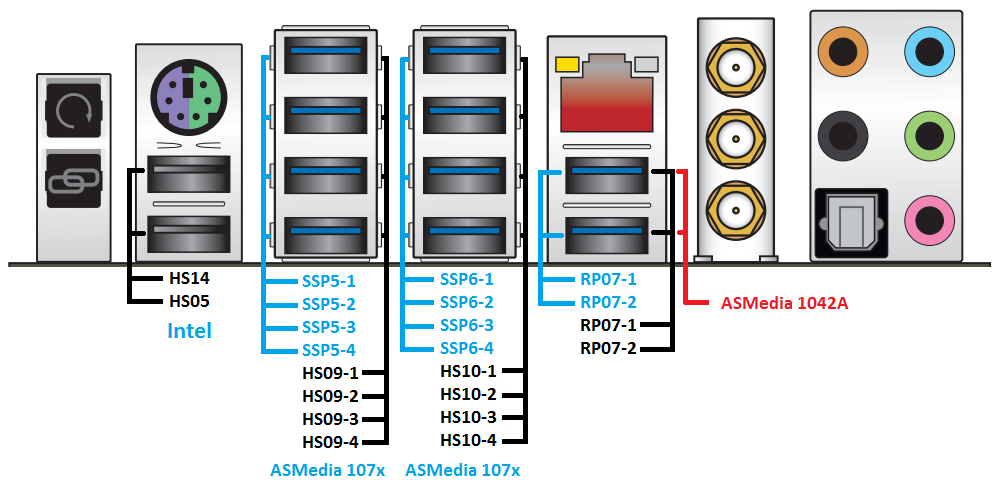
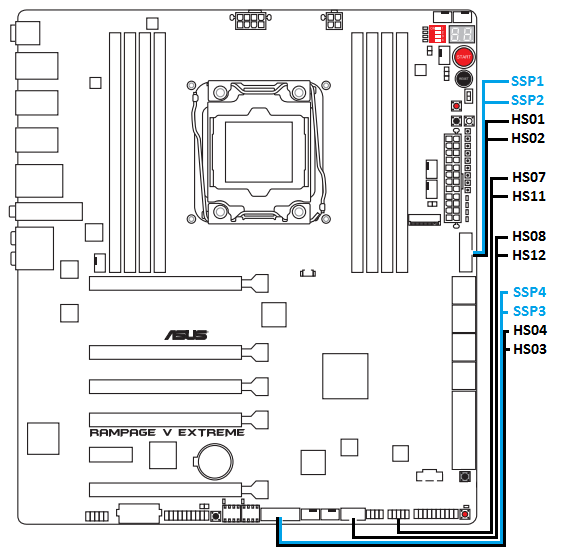
Why is it important to know our distribution ports? This does not allow our correct injection and also provides us with the cancellation of ports if needed.
Knowledge Base - Cancellation of Ports
Devices like Corsair Link and others connected to our USB ports, can cause your computer not reach the sleep and wake up immediately.
¿How to solve this?
Well, turn them off is not an option since many want and need them functional in our Windows partition, but how to achieve it then?
Simple, we can disable them in El Capitan and to do this I will describe several methods of doing:
First Method (BIOS)
Disable ports from the BIOS (But if we just say that we need in Windows), well the Asus Rampage V Extreme has two UEFI BIOS, so we could use one for Windows and one for Mac, so you only need to disable it in the BIOS we use for Mac.
Second Method (DSDT and SSDT)
Disable ports from our DSDT and SSDT, according to the method that we used to give them only delete those ports and ready.

We can override the desired port, adding /* to start the Device (USB Port) and */ at the end of the code of the device.
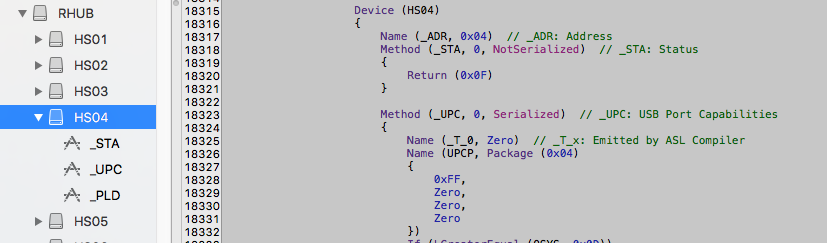
Completely erase the Device (USB Port) desired. (Recommended)
Third Method (uia_exclude)
This method is only valid; whether to inject the USB ports have made use of a USBInject.kext, as it will allow us to use the following arguments EFI Boot when our Mac OSX.
uia_exclude=A serious example, imagine that a person has connected your Corsair Link HS08 and HS12 in (see image above), ports all you have to do is place the following in the boot arguments config.plist
uia_exclude=HS07;HS11This method could present problems or not work if we use an external HUB to increase our USB 2.0 ports "The Rampage V Extreme has only Two: 1112 (HS07-HS11) 1314 (HS08-HS12)".
Knowledge Base - Overview USB ports in Device List
If we go to: About this Mac > System Report > USB, we will see that although all our USB 2.0 ports are working perfect, not shown in the list of USB 2.0, this is solved using:
Before After
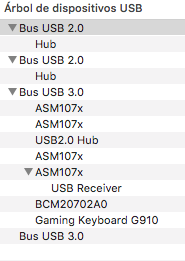
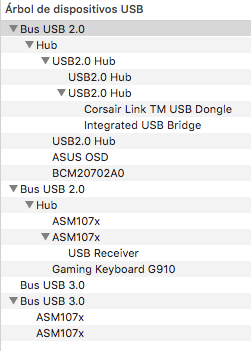
The only problem with using these kext, is that if we made any cancellation of ports, this would have no effect, since these kext what they do is redirect the USB 2.0 our "XHC" to EH01, so we should do a new declaration of annulment.
Knowledge Base - SATA Ports
X99 chipset supports 10 SATA ports, but this is only on paper, since to support 10 ports makes use of 2 different chip:
Intel(R) C610 series/X99 chipset 6-Port SATA AHCI Controller - 8086:8D02 (Control 6 ports)
Intel(R) C610 series/X99 chipset sSATA AHCI Controller - 8086:8D62 (Control 4 ports)
Then I show the scheme SATA ports


Knowledge Base - Overview Ports SATA Device List
If we go to: About this Mac > System Report > SATA/SATA Express, you may see that they are identified as Generic SATA Controller (In my guide this is set), to solve the aesthetic problem, just add a FacePCIID. (Look inside x99Chipset.kext).
Knowledge Base - NVMe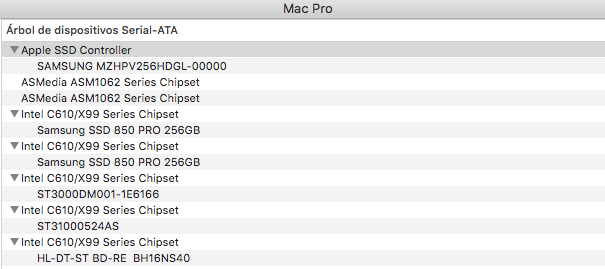
Currently the Rampage V Extreme has a port M.2 Gen 3, which supports devices NVMe.
In this guide I used a Samsung SM951 (AHCI Mode), This is supported native, but there is also a NVMe SM951 version, for which need to install HackrNVMeFamily-10.11.5.kext. (ReHabMan) to work, new Samsung 950 Pro NVMe and other M.2 NVMe also need this kext.
ReHabMan credit for this and much more.
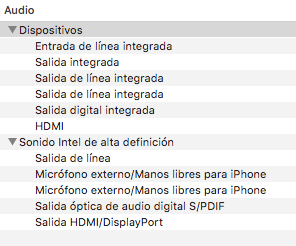
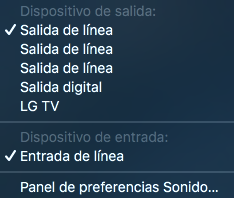
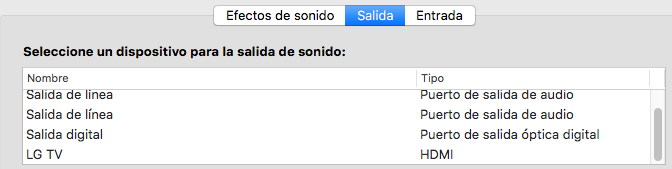
Knowledge Base - Sound Realtek ALC 1150
The Asus Rampage V Extreme has Chip ALC1150 which can be activated by patches and lines of command made by Toleda (Credits for this), but this chip is a problem when awakening as it loses the audio, though still this present, this is due to the EAPD that goes off when the Mac goes to sleep, to solve this problem there are two methods:
No Audio after Sleeping Solution
First Method (CodecCommander)
Using CodecCommander.kext, the use of this kext personally did not give me good results because sometimes it worked and sometimes not, when work ended audio then lost a few minutes.
Second Method (EAPDFix)
EAPD.kext use this kext solved problems No Audio after sleep, and has never failed, no matter how long this asleep, the audio is never lost.
Bluetooth.
Just add these two kext to EFI and ready (Included in Tools Folder).
BrcmFirmwareData.kextBluetooth
BrcmPatchRAM2.kext
Important note: We check that the firmware version is v14 C5810, otherwise, a lower version indicates that the firmware is not charging well and could cause problems or connectivity failure, may also take longer than due for devices and pair with them. (This could also affect WIFI).
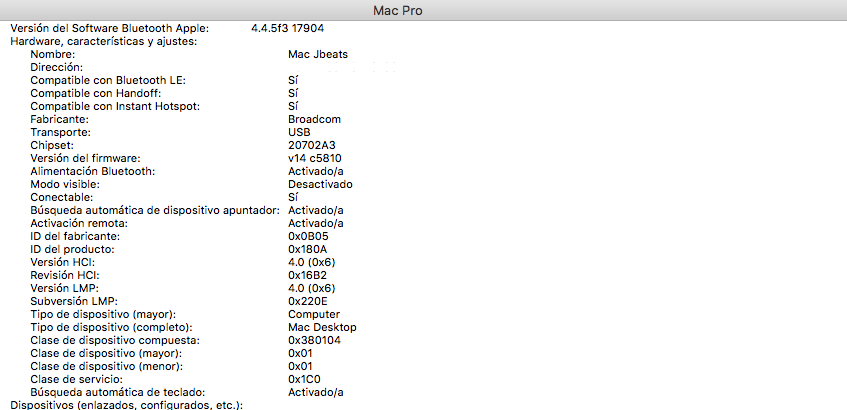
More information in https://github.com/RehabMan/OS-X-BrcmPatchRAM
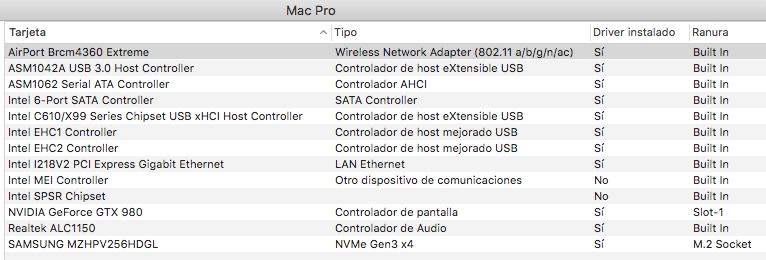
PCI Device
This really is not that important, but it gives us a feeling that we are facing a real Mac that recognizes our PCI natively.
Kexts
To make my installation, I have made use only two kext installed in /Library/Extensions, so my system is 100% Vanilla, and does not contemplate any issue that patch or installation in /System/ Library/Extensions.
X99PlatFormPlugin.kext function is to manage Power Management and CPU through XCPM, I will describe the steps for building this kext.
X99PlatformPlugin.kext
Native XCMP devices:
- Remove kext of IOPlatformPluginFamily.kext in S/L/E.
- Rename kext
- Go to Info.plist and change all numbers version to 9.1.1
- Go to the Resources folder and delete all plists except to use for frequency vectors. (Recommended: Mac-E43C1C25D4880AD6.plist)
- Rename the remaining plist Mac-F60DEB81FF30ACF6.plist if you are using MacPro6,1 as the model ID.
Mac-00BE6ED71E35EB86 - iMac13,1
Mac-031AEE4D24BFF0B1 - Macmini6,1
Mac-031B6874CF7F642A - iMac14,1 (Haswell / FrequencyVectors)
Mac-189A3D4F975D5FFC - MacBookPro11,1 (Haswell / FrequencyVectors)
Mac-27ADBB7B4CEE8E61 - iMac14,2 (Haswell / FrequencyVectors)
Mac-2E6FAB96566FE58C - MacBookAir5,2
Mac-35C1E88140C3E6CF - MacBookAir6,1 (Haswell / FrequencyVectors)
Mac-3CBD00234E554E41 - MacBookPro11,2 (Haswell / FrequencyVectors)
Mac-2BD1B31983FE1663 - MacBookPro11,3 (Haswell / FrequencyVectors)
Mac-4B7AC7E43945597E - MacBookPro9,1
Mac-66F35F19FE2A0D05 - MacBookAir5,1
Mac-6F01561E16C75D06 - MacBookPro9,2
Mac-77EB7D7DAF985301 - iMac14,3 (Haswell / FrequencyVectors)
Mac-7DF21CB3ED6977E5 - MacBookAir6,2 (Haswell / FrequencyVectors)
Mac-7DF2A3B5E5D671ED – Mac (Modelo 2012)
Mac-AFD8A9D944EA4843 - MacBookPro10,2
Mac-C3EC7CD22292981F - MacBookPro10,1
Mac-F60DEB81FF30ACF6 - MacPro6,1
Mac-F65AE981FFA204ED - Macmini6,2
Mac-FC02E91DDD3FA6A4 - iMac13,2
VoodooTSCSync.kext
This kext is only necessary with Haswell-E processors and from Yosemite 10.10.2 its use is not necessary to install Mac OS X, but yet is required for the computer to function properly after waking from sleep.
You must use a version of VoodooTSCSync.kext adjusted to the type of processor you have.
Remember to place it in EFI/Clover/Kexts/ (For 5820k and 5930k are included in EFI post Install, if you follow my guide, you do not need to add anything).
You can download the version for your processor at the following link.
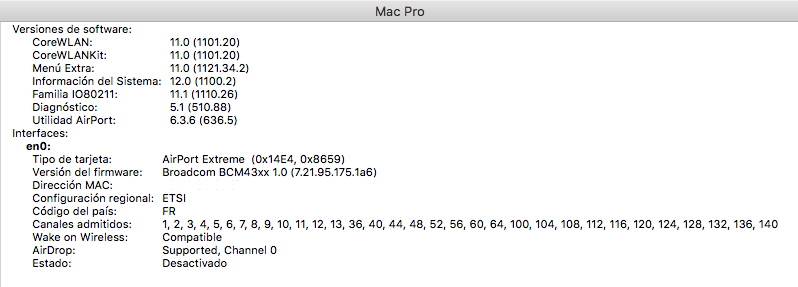
WIFI
The Broadcom card built into the R5E is recognized natively by El Capitan (In Yosemite also), so no need to install anything more to operate, but yet despite that supports 5Ghz, is not activated automatically by what we must do it ourselves..
Users mention that you have experienced problems with the use of the patch to activate the 5Ghz, I personally I see it works very well, it could present problems for interference near other devices that affect the quality of the signal, misconfiguration Bluetooth could also interfere Since Rampage V Extreme has WIFI and Bluetooth together.
Credits
This guide've done very hard, the product of much research, testing, bug fixes, setbacks and based on my own knowledge and techniques, but collecting all this information, it would not be possible without the great community, all those developers and users they share their knowledge and facilities.
In this section I want to mention and thank many of those people who directly or indirectly contributed to make this possible, many and perhaps forget to mention some.
Special Thanks:
Piker-Alpha (https://pikeralpha.wordpress.com/)
Mackie100Projects (http://mackie100projects.altervista.org/download-clover-configurator/)
ReHabMan (https://github.com/RehabMan)
Toleda (https://github.com/toleda)
Tonymacx86 (http://tonymacx86.com/)
InsanelyMac (http://www.insanelymac.com/)
dgsga (http://www.insanelymac.com/forum/user/11298-dgsga/) (x99PlatFormPlugin Construction Guide)
The Community and other Users.
Thanks for reading and pay attention to this guide which I made very hard and hoping to help many people, as well as facilitate the installation of Mac OS X, there is no need for practically nothing, since everything is covered in the files attached to the facility.
Let me comment on what they thought the guide and if I was useful.
GO INDEX
MAC OS X 10.11.6 UPDATE RELEASED, STEPS HERE
Changes Log
Version 1.0 (First)
Version 1.1 (Added info VoodooTSCSync.kext)
Version 1.2 (Update EFI Post Install, new DSDT add)
Hi, first thanks for your guide, very detailed, second i'm f*cked!!, i got an error everytime that i tried to install OS, i'm attaching the error, please can you help me?Index
Installation Guide El Capitan 10.11.5
Creating USB Installer
USB Installer - First Step (Formatting)Installation
USB Installer - Second Step
USB Installer - Third Step (Replacing files)
USB Installer - Fourth Step (Tools Folder)
Important noteFine Tuning
Installation - First Step (Formatting Hard Drive)
Installation- Second Step (Configure BIOS)
Installation - Third Step (Preparation)
Installation - Fourth Step (Installation)
Final Adjustments
Final Adjustments - First Step (Enable iCloud)Knowledge Base
Final Adjustments – Second Step (ALC1150 Audio Installation)
IntroductionCredits
Knowledge Base - Intel x99 Chipset Series
Knowledge Base (USBPorts)
Knowledge Base - Cancellation of Ports
Knowledge Base - Overview USB ports in Device List
Knowledge Base - SATA Ports
Knowledge Base - Overview Ports SATA Device List
Knowledge Base - NVMe
Knowledge Base - Sound Realtek ALC 1150
Bluetooth
PCI Device
Kexts
WIFI
Installation Guide El Capitan 10.11.5
Asus Rampage V Extreme
Version 1.2 English
Introduction
I wanted to make this alternative guide to help and provide much information as possible to all owners of the Asus Rampage V Extreme Motherboard under the Intel x99 Series Chipset platform and Haswell-E.
This guide is specifically aimed at Rampage V Extreme, but could provide inspiration for the development and installation in other Motherboards, although some files require modification and adaptation to work with your hardware, others do not need any changes.
It is 99.99% Vanilla, as it does not require patched kext for operation so it probably will be ready for a future update, remember that you should always make a backup in case something goes wrong. (I am not responsible for data loss.)
I hope that my guide is simple, intuitive and solve their problems, help you keep your system running fully and without any mistakes or complications, as well as provide installation and tuning it, you feel that this will be the easiest installation of its life, but there is much work behind all this hard work I've done research, hundreds of tests, bug fixes and contingencies, to achieve the end result that today I show in this Guide as I said it is thanks to the research and application of tools of big developers, without them much or none of this would be possible (see credits below).
Used Hardware
Then I will describe the hardware used to perform this installation.
UEFI BIOS: 3202
Motherboard: Asus Rampage V Extreme
CPU: Intel 5930k
RAM: 16GB Corsair Dominator 3000Ghz
Graphics: Gigabyte G1 GTX 980 Overclock
PSU: Corsair AX1500i
Hard Drive: x2 Samsung SSD 850 Pro
NVMe: x1 Samsung SM951 AHCI Mode
Cooler: Corsair GX110i
Case: Cosmos II
HUBs: x2 USB HUB Next
Mouse: Logitech G900 Chaos Spectrum
Keyboard: Logitech G910 Orion Spark
State and Functions
The following table shows the current status of components and functions are working.
Device Status
SpeedStep, Turbo, Sleep Working
Graphics Acceleration Working
HDMI Audio Working
WIFI (5Ghz) Working
Bluetooth (Airdrop, Continuity, etc.) Working
Realtek ALC1150 Audio Working
USB 3.0/2.0 Working
FaceTime / iMessage / AppStore Working
NVMe Working
Creating USB Installer
USB Installer - First Step (Formatting)
Let's create a USB installation with the image of Mac OSX El Capitan and for this, we will create a Vanilla USB with the image of the latest version of El Capitan, remember that the image of El Capitan must be located in Applications.
Recommend USB 3.0 since the time of creation and subsequent installation will be much faster.
Let's format our Pen drive 2.0 / 3.0 and we will do as follows.
- Open Disk Utility and search the Pen drive 2.0/3.0.
- We named USB and select Mac OS Extended format (Journaled).
- We press on options and give it to the first option (Table GUID).
I finished this open terminal and type the following.
Code:sudo /Applications/Install\ OS\ X\ El\ Capitan.app/Contents/Resources/createinstallmedia --volume /Volumes/USB --applicationpath /Applications/Install\ OS\ X\ El\ Capitan.app --nointeraction
Once the process is completed we will proceed with our second step.
USB Installer - Second Step
Let's download the latest version of EFI Clover and once the download is complete, proceed to install it on our USB now called "Install OS X El Capitan" and we will do as follows.
Once the process is completed we will proceed with our Step.
USB Installer - Third Step (Replacing files)
We will replace some files in the EFI partition, our Install OS X El Capitan and with this we finished and ready our USB installer for installation of El Capitan in our PC.
USB EFI Install (2.71mb)USB Installer - Fourth Step (Tools Folder)
Let's stick inside Install OS X El Capitan, a folder named Tools, which contains the tools and files needed for after installation. (Replace the files with newer versions if any).
¡With this we have done, the creation of USB Install OS X El Capitan.!
Installation
Important note:
To perform this installation, we recommend disconnecting any nonessential device for installation connected to your computer, Example: backup Hard Drives, External and internal Hubs, devices Corsair Link or the like, etc. These devices do not affect the installation, but I recommend doing so, then the installation is complete and that everything is working properly, proceed to connect each device and see that everything continues to work as it should. (Pay attention to the section below called knowledge base).
Installation - First Step (Formatting Hard Drive)
Let's format our installation disk preferably an SSD "HDD is not the best choice for an installation of Mac OSX" recommend an exclusive for our new facility SSD, as it will allow us to have fewer problems or other errors, and of course a Multi-boot several OS together.
Let's follow the steps for creating our SSD installation, which we will call "MacOS Capitan" is important to put this name so that everything works as planned.
Once we finished we proceed to the second step.
Installation- Second Step (Configure BIOS)
UEFI BIOS: Version used in this guide will be 3202
We will make the following adjustments in our UEFI BIOS.
- Restore factory settings.
- Disabled CSM.
- Change Secure Boot to Other System
- Select USBInstaller to Primary Boot
- Enhanced Intel SpeedStep Technology (EIST) Disable
- Turbo Mode: Enabled.
- CPU C-States: Enabled.
- C1 State: Enabled.
- Disabled Intel VT for Directed I/O (VT-d)
- Intel xHCI Mode [Smart Auto]
- EHCI Legacy Support [Auto]
- xHCI Hand-off [Enabled]
- EHCI Hand-off [Enabled]
- No need to Disable (Bluetooth, WIFI and ASMedia 3.0)
- Press F10 to Save and Start
Finished our adjustments in the BIOS we will proceed with the third step.
Installation - Third Step (Preparation)
Place the USB Install OS X El Capitan, one of our USB 2.0 / 3.0 ports "preferably 3.0" for faster installation, do not worry about placing it in a, which will be recognized without problems USB 3.0 port.
Installation - Fourth Step (Installation)
Installation - Fourth Step (Installation)
Install and follow the steps installer and GUI Screen.
¡Ready! With this we have completed the installation!
Fine Tuning
Fine Tuning - First Step (First Start)
After the installation will start again from our Install OS X El Capitan and when we are on the desk of El Capitan we will proceed with the following facilities in order, but first let's go to our Tools Folder within our Install OS X El Capitan and we will stick to our desk when copying is complete we will expel our install OS X El Capitan and store it in a safe place for future installations.
Install Clover EFI
Let's do as follows.
After our installation, the EFI partition will be mounted, let us in and replace some files within that partition, with the following:
EFI Post Install (18.5mb) (This will do all the hard work for you)Once we finish our second installation will proceed.
Install Kexts
We will need to install only two kext, these kext be indispensable, the first for the proper operation of the CPU and power management, the second for the proper functioning of our Audio after sleeping. (Included in Tools Folder/Kexts)
- Copy X99PlatformPlugin.kext and EAPDFix.kext in /Library/Extensions
- Open Terminal and type the following commands.
Install NVIDEA Web DriversCode:cd /Library/Extensions sudo chmod -R 755 X99PlatformPlugin.kext sudo chmod -R 755 EAPDFix.kext sudo chown -R root:wheel X99PlatformPlugin.kext sudo chown -R root:wheel EAPDFix.kext sudo kextcache -system-prelinked-kernel
For purposes of this guide, I am using a Gigabyte GTX980 G1, so you may need to make a small modification to the DSDT to fit your graph.
The Gigabyte GTX980 G1, has 6 ports as shown in the following image.
The DSDT (This DSDT I have provided is their pillar in this guide and in our operation) Is configured to work with these 6 ports, if your card has fewer ports must make adjustments to the DSDT (but this we will then not worry now).
Once installation is complete, we will ask you to restart your computer, we click restart. (Quiet you do not need to change anything in Clover).
When your computer restarts, we enter our UEFI BIOS and headed to Boot section and we will select our “MacOS El Capitan”, like first Boot disk.
¡let's go!!! Now is the magic beginning.
At this point in our Mac OSX El Capitan it is working perfectly: (You may something not work for you if you have any other devices connected that is not covered in this guide).
Tell me what you think, it has been easy installation? It had never been easier to have everything working without much effort and very quickly? If your answer is Yes, that pleased me greatly.
- USB ports 2.0/3.0.
- Sleep, SpeedStep, Turbo, etc.
- HDMI Audio.
- Onboard ALC1150 Audio.
- Graphics Acceleration.
¡This concludes the Setup!Final Adjustments
Final Adjustments - First Step (Enable iCloud)
Enable iMessage, FaceTime, AppStore, etc.
I recommend widely activate all options together from our control panel section of iCloud, but we must first do the following.
Good for this I will describe the method to successfully activate.
Hackintosh Method
Let's open Clover Configurator and we will generate a valid serial number and is not registered with the Apple Servers.
Instructions
1- Visited the following address to verify that our serial is genuine, you must show the information and specifications relating to a MacPro 6.1.
2- Visited the following address to verify that our serial has not been registered on the servers of Apple, if we receive an error this will be perfect, this means that our serial is not being used and can use us (Stick it on your config.plist).
3- In our config.plist will remove data MLB if present.
4- Let's open Terminal and we will write the following: uuidgen
We repeat several times the command to generate several UUID
Copy and paste the last in our config.plist
Save and reboot your computer.
5- We opened our Terminal again and we will drag the file simpleMLB.sh that we generate our SMBIOS, copy it and paste in our config.plist.
Save and reboot your computer again.
6- Let's run iMessageDebug we ask save data as iMessageDebug.txt, Save and restart again.
7- Let's run iMessageDebug again and compare the data generated with our iMessageDebug.txt, they should be coincident, if so, it is time to proceed to activate our iMessage.
Perfect now have FaceTime, iMessage, App Store, etc., running at 100%.
Final Adjustments – Second Step (ALC1150 Audio Installation)
Important Note: If you followed my guide step by step, the audio is already working with Native AppleHDA but not having Audio, you can re-install it by following these steps.
Well, we will revive our internal audio ALC1150 (Only if there is still no audio, as I mentioned above), if you had problems in the past and has been hard for you to do work or have had to resort to patching AppleHDA that they are lost with the update, quiet will activate the audio codec Toleda (credits him for this) so that our AppleHDA will remain native and oversteering audio to future updates.
- Run audio_cloverALC-110.command.
- Put your password.
- Confirm Realtek ALC1150 (y/n): y
- Clover Audio ID Injection (y/n): n
We hope to finish and restart, there is the audio ready to work, even after the Sleep.
Congratulations have completed installation.
Knowledge Base
Introduction
Now in this section I will explain in detail the procedures that I have used, as well as some valuable data that must be met in order to better understand the process of installation and operation of the various devices in your computer and more precisely in our Asus Rampage V Extreme.
The main objective of this is to solve future problems and provide you the opportunity to make their own modifications to fit your hardware or look for better ways to help us improve stability and functionality in search of better performance and performance.
Knowledge Base - Intel x99 Chipset Series
These chip sets belong to the Haswell-E platform, which is not supported natively by Apple since no model Mac with this kind of hardware and platform.
Thanks to developers as ReHabMan, Piker-Alpha, Toleda, the community and many others, today we can enjoy our PC Apple Mac OSX system installed almost as if it will be a true Mac.
The Intel C610 / X99 Chipset although as I mentioned not to be supported by Apple is very compatible, allowing a few changes and modifications have the full performance of our devices.
Knowledge Base - USB Ports
Many people have had problems with the configuration and operation of its USB ports, in our construction every one present in the Asus Rampage V Extreme ports are working as they have to.
There are Several ways to inject your ports and to be Recognized by El Capitan.
First Method (DSDT)
By using DSDT (Included and used in my guide).
Second Method (SSDT)
Using SSDT. (SSDT-R5EUSB)
Third Method (Inject)
By injecting a USBInject.kext our EFI(R5EUSBInject.kext)
Then I will show the distribution of each of the ports.
Why is it important to know our distribution ports? This does not allow our correct injection and also provides us with the cancellation of ports if needed.
Knowledge Base - Cancellation of Ports
Devices like Corsair Link and others connected to our USB ports, can cause your computer not reach the sleep and wake up immediately.
¿How to solve this?
Well, turn them off is not an option since many want and need them functional in our Windows partition, but how to achieve it then?
Simple, we can disable them in El Capitan and to do this I will describe several methods of doing:
First Method (BIOS)
Disable ports from the BIOS (But if we just say that we need in Windows), well the Asus Rampage V Extreme has two UEFI BIOS, so we could use one for Windows and one for Mac, so you only need to disable it in the BIOS we use for Mac.
Second Method (DSDT and SSDT)
Disable ports from our DSDT and SSDT, according to the method that we used to give them only delete those ports and ready.
We can override the desired port, adding /* to start the Device (USB Port) and */ at the end of the code of the device.
Completely erase the Device (USB Port) desired. (Recommended)
Third Method (uia_exclude)
This method is only valid; whether to inject the USB ports have made use of a USBInject.kext, as it will allow us to use the following arguments EFI Boot when our Mac OSX.
uia_exclude=A serious example, imagine that a person has connected your Corsair Link HS08 and HS12 in (see image above), ports all you have to do is place the following in the boot arguments config.plist
uia_exclude=HS07;HS11This method could present problems or not work if we use an external HUB to increase our USB 2.0 ports "The Rampage V Extreme has only Two: 1112 (HS07-HS11) 1314 (HS08-HS12)".
Knowledge Base - Overview USB ports in Device List
If we go to: About this Mac > System Report > USB, we will see that although all our USB 2.0 ports are working perfect, not shown in the list of USB 2.0, this is solved using:
Before After
The only problem with using these kext, is that if we made any cancellation of ports, this would have no effect, since these kext what they do is redirect the USB 2.0 our "XHC" to EH01, so we should do a new declaration of annulment.
Knowledge Base - SATA Ports
X99 chipset supports 10 SATA ports, but this is only on paper, since to support 10 ports makes use of 2 different chip:
Intel(R) C610 series/X99 chipset 6-Port SATA AHCI Controller - 8086:8D02 (Control 6 ports)
Intel(R) C610 series/X99 chipset sSATA AHCI Controller - 8086:8D62 (Control 4 ports)
Then I show the scheme SATA ports
Knowledge Base - Overview Ports SATA Device List
If we go to: About this Mac > System Report > SATA/SATA Express, you may see that they are identified as Generic SATA Controller (In my guide this is set), to solve the aesthetic problem, just add a FacePCIID. (Look inside x99Chipset.kext).
Knowledge Base - NVMe
Currently the Rampage V Extreme has a port M.2 Gen 3, which supports devices NVMe.
In this guide I used a Samsung SM951 (AHCI Mode), This is supported native, but there is also a NVMe SM951 version, for which need to install HackrNVMeFamily-10.11.5.kext. (ReHabMan) to work, new Samsung 950 Pro NVMe and other M.2 NVMe also need this kext.
ReHabMan credit for this and much more.
Knowledge Base - Sound Realtek ALC 1150
The Asus Rampage V Extreme has Chip ALC1150 which can be activated by patches and lines of command made by Toleda (Credits for this), but this chip is a problem when awakening as it loses the audio, though still this present, this is due to the EAPD that goes off when the Mac goes to sleep, to solve this problem there are two methods:
No Audio after Sleeping Solution
First Method (CodecCommander)
Using CodecCommander.kext, the use of this kext personally did not give me good results because sometimes it worked and sometimes not, when work ended audio then lost a few minutes.
Second Method (EAPDFix)
EAPD.kext use this kext solved problems No Audio after sleep, and has never failed, no matter how long this asleep, the audio is never lost.
Bluetooth.
Just add these two kext to EFI and ready (Included in Tools Folder).
BrcmFirmwareData.kextBluetooth
BrcmPatchRAM2.kext
Important note: We check that the firmware version is v14 C5810, otherwise, a lower version indicates that the firmware is not charging well and could cause problems or connectivity failure, may also take longer than due for devices and pair with them. (This could also affect WIFI).
More information in https://github.com/RehabMan/OS-X-BrcmPatchRAM
PCI Device
This really is not that important, but it gives us a feeling that we are facing a real Mac that recognizes our PCI natively.
Kexts
To make my installation, I have made use only two kext installed in /Library/Extensions, so my system is 100% Vanilla, and does not contemplate any issue that patch or installation in /System/ Library/Extensions.
X99PlatFormPlugin.kext function is to manage Power Management and CPU through XCPM, I will describe the steps for building this kext.
X99PlatformPlugin.kext
Native XCMP devices:
- Remove kext of IOPlatformPluginFamily.kext in S/L/E.
- Rename kext
- Go to Info.plist and change all numbers version to 9.1.1
- Go to the Resources folder and delete all plists except to use for frequency vectors. (Recommended: Mac-E43C1C25D4880AD6.plist)
- Rename the remaining plist Mac-F60DEB81FF30ACF6.plist if you are using MacPro6,1 as the model ID.
Mac-00BE6ED71E35EB86 - iMac13,1
Mac-031AEE4D24BFF0B1 - Macmini6,1
Mac-031B6874CF7F642A - iMac14,1 (Haswell / FrequencyVectors)
Mac-189A3D4F975D5FFC - MacBookPro11,1 (Haswell / FrequencyVectors)
Mac-27ADBB7B4CEE8E61 - iMac14,2 (Haswell / FrequencyVectors)
Mac-2E6FAB96566FE58C - MacBookAir5,2
Mac-35C1E88140C3E6CF - MacBookAir6,1 (Haswell / FrequencyVectors)
Mac-3CBD00234E554E41 - MacBookPro11,2 (Haswell / FrequencyVectors)
Mac-2BD1B31983FE1663 - MacBookPro11,3 (Haswell / FrequencyVectors)
Mac-4B7AC7E43945597E - MacBookPro9,1
Mac-66F35F19FE2A0D05 - MacBookAir5,1
Mac-6F01561E16C75D06 - MacBookPro9,2
Mac-77EB7D7DAF985301 - iMac14,3 (Haswell / FrequencyVectors)
Mac-7DF21CB3ED6977E5 - MacBookAir6,2 (Haswell / FrequencyVectors)
Mac-7DF2A3B5E5D671ED – Mac (Modelo 2012)
Mac-AFD8A9D944EA4843 - MacBookPro10,2
Mac-C3EC7CD22292981F - MacBookPro10,1
Mac-F60DEB81FF30ACF6 - MacPro6,1
Mac-F65AE981FFA204ED - Macmini6,2
Mac-FC02E91DDD3FA6A4 - iMac13,2
VoodooTSCSync.kext
This kext is only necessary with Haswell-E processors and from Yosemite 10.10.2 its use is not necessary to install Mac OS X, but yet is required for the computer to function properly after waking from sleep.
You must use a version of VoodooTSCSync.kext adjusted to the type of processor you have.
Remember to place it in EFI/Clover/Kexts/ (For 5820k and 5930k are included in EFI post Install, if you follow my guide, you do not need to add anything).
You can download the version for your processor at the following link.
WIFI
The Broadcom card built into the R5E is recognized natively by El Capitan (In Yosemite also), so no need to install anything more to operate, but yet despite that supports 5Ghz, is not activated automatically by what we must do it ourselves..
Users mention that you have experienced problems with the use of the patch to activate the 5Ghz, I personally I see it works very well, it could present problems for interference near other devices that affect the quality of the signal, misconfiguration Bluetooth could also interfere Since Rampage V Extreme has WIFI and Bluetooth together.
Credits
This guide've done very hard, the product of much research, testing, bug fixes, setbacks and based on my own knowledge and techniques, but collecting all this information, it would not be possible without the great community, all those developers and users they share their knowledge and facilities.
In this section I want to mention and thank many of those people who directly or indirectly contributed to make this possible, many and perhaps forget to mention some.
Special Thanks:
Piker-Alpha (https://pikeralpha.wordpress.com/)
Mackie100Projects (http://mackie100projects.altervista.org/download-clover-configurator/)
ReHabMan (https://github.com/RehabMan)
Toleda (https://github.com/toleda)
Tonymacx86 (http://tonymacx86.com/)
InsanelyMac (http://www.insanelymac.com/)
dgsga (http://www.insanelymac.com/forum/user/11298-dgsga/) (x99PlatFormPlugin Construction Guide)
The Community and other Users.
Thanks for reading and pay attention to this guide which I made very hard and hoping to help many people, as well as facilitate the installation of Mac OS X, there is no need for practically nothing, since everything is covered in the files attached to the facility.
Let me comment on what they thought the guide and if I was useful.
GO INDEX
MAC OS X 10.11.6 UPDATE RELEASED, STEPS HERE
Changes Log
Version 1.0 (First)
Version 1.1 (Added info VoodooTSCSync.kext)
Version 1.2 (Update EFI Post Install, new DSDT add)
Hello! I UPDATE TO SIERRA AND ALL WORKING FINE! ASUS RAMPAGE 5 + ALL SUPPORTED CPU + nvidia 980 + ! (sleep works!)
Guys, need you instruction for sierra update and my dsdt, ssdt, clover config and kernel file?
I can help with instruction.
I have only one thing - on captain my CPU score was 27000 - now it is 23000
- iCloud, iMessage, FaceTime +
- Cpu sleep & wake +
- Fake cpu id - OFF!
- Cpu turboboost +
- Cpu speedstep +
- Nvidia Web +
- Nvidia wake +
- All USB2.0\3.0 and MIDI +
- USB wake +
- PS\2 work & wake +
- AppleHDA +
- AppleHDA wake +
- HDMI audio +
- Bluetooth & Wifi 5 GHZ (Airdrop, Airport Extreeme, Airplay, Handoff, instant Hotspot) +
- Corsair Link usb port disable +
I done all from piker alfa's instructions, but score still low (5930k)
Maybe it is happens because I update bios...
Hi Absolutelight,
Did you had patched the kernel after Sierra installation?
Did you had solved the low geekbench score issue?
Can you please share your EFI folder, or at least write down a list of kexts and boot arguments?
I would like to have your dsdt and ssdt!
Thank you.
EDIT: @Xavi16 any news about your updated guide?
I would like to update to Sierra because of the latest update of Logic, that I use to work together with Pro Tools.
Thank you also to you.
my bluetooth is not working i tried each stepI understand what the root of your problem, when an image of MacOS USB is created, you should always create a partition called EFI, it is this partition that Clover is installed, I mean that is where you have to copy the files attached to my guide, so your USB Installer does not boot, why not find the EFI partition.
The EFI partition in our USB, is automatically created when we format our USB.
To see the EFI partition, we ride with Clover configurator or EFI Mounter