
shilohh
Moderator
- Joined
- Jan 1, 2012
- Messages
- 1,752
- Motherboard
- Asus Prime Z490-A
- CPU
- i9-10850K
- Graphics
- RX 5700 XT
- Mac
- Mobile Phone
Updates:
01/27/2021 Updated Files with a new GPU SSDT.
Components:
ASUS PRIME Z490-A LGA 1200 (Intel 10th Gen) Intel Z490 SATA 6Gb/s ATX Intel Motherboard
 www.newegg.com
Intel Core i9-10850K Comet Lake 10-Core 3.6 GHz LGA 1200 125W Desktop Processor (BX8070110850K)
 www.newegg.com
Noctua NH-D15 SSO2 D-Type Premium CPU Cooler, NF-A15 x 2 PWM Fans
 www.newegg.com
CORSAIR Vengeance LPX 64GB SDRAM DDR4 3200 Desktop Memory (CMK64GX4M2E3200C16)
 www.newegg.com
Western Digital BLACK SN750 NVMe M.2 2280 1TB PCI-E 3.0 x4 SSD (WDS100T3X0C)
 www.newegg.com
Sapphire Radeon Pulse RX 5700 XT 8GB GDDR6 PCIe 4.0 Graphics Card (11293-01-20G)
https://www.amazon.com/dp/B07WC7683C/?tag=tonymacx86com-20
YOUBO PC Hackintosh WiFi Card BCM94360CD 802.11a/g/n/ac 1750Mbps
https://www.amazon.com/gp/product/B082X8MBMD/?tag=tonymacx86com-20
ASUS USB-BT400 USB Bluetooth Dongle Receiver
https://www.amazon.com/gp/product/B00DJ83070/?tag=tonymacx86com-20
EVGA SuperNOVA 750 G5, 80 Plus Gold 750W, Fully Modular Power Supply (220-G5-0750-X1)
 www.newegg.com
Fractal Design Meshify C Black ATX High-Airflow Compact Tempered Glass Mid Tower Computer Case
 www.newegg.com
SanDisk 16GB Ultra Luxe USB 3.1 Flash Drive, Speed Up to 150MB/s (SDCZ74-016G-G46)
 www.newegg.com
Comments:
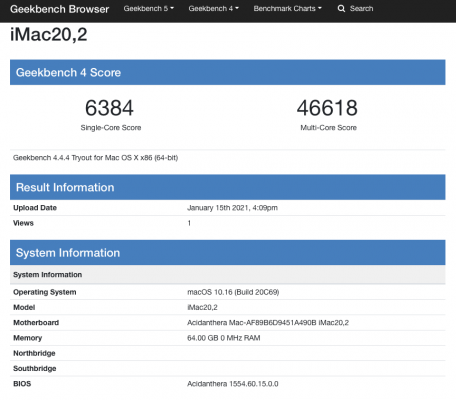
With Apple making their own CPUs, it seems like this might be the last powerhouse Intel Mac to emulate, the iMac20,2. This machine is impressive! It demolishes my X79 builds at over 2x the speed in benchmarks, for a fraction of the cost. I think I pulled the trigger just in time. Stock of the RX 5700 XT GPUs has run out with certified vendors and grey market pirates are selling whats left at INSANE markups. You may be able to find a reasonable deal on a used one. Hopefully more will be shipped to certified vendors and eventually we can get them for MSRP. Or hopefully well see support from apple for new generations of AMD GPUs. The Youbo WiFi card has a Bluetooth chip that is active when you connect a small cable to the card from a internal USB2 header. When I did this, it caused instant wake from sleep. I'm not sure if this was caused by the internal headers (they seem to be connected via a hub) or the card itself. My solution was to just disconect the cable and use a USB2 dongle (Asus USB-BT400) for Bluetooth. I don't mind blocking one of the back panel ports permanently and letting it live there as there are too many ports for macOS anyway.
Benchmarks:


Create a bootable macOS USB installer
On a computer currently running macOS:
1) Download macOS Big Sur or later on a computer running macOS (App Store.app), if you have access to one. If not, you can find other guides around the internet that can guide you though doing this in Windows or Linux.
2) Format at 16GB or larger USB flash drive to "Mac OS Extended (Journaled)" with "GUID Partition Map" and the name "USB".
3) Create USB installer (Terminal.app).
4) Install the OpenCore bootloader to the USB Installer.

 github.com


5) Generate and add missing PlatformInfo/Generic entries to the new config.plist
 github.com
Prepare the Asus Prime Z490A for installation of macOS.
1) Update BIOS (I'm on 901)
Found in the manual @: 3.4 ASUS EZ Flash 3:
2) Setup BIOS
First boot after update:
Note: "Unlocked (F3)" is for overclocking. This will give higher voltages which may be out of Intel's spec. You may not want to use this unless you plan to set voltages lower manually. My overclock uses much lower voltages than Optimized Defaults in this mode. Choose the option you are comfortable with, based on your own research. I won't go into overclocking in this guide.
I've created custom SSDTs. One for the motherboard and one for each device installed in a PCI-E slot. These are in the files for the Internal Boot Drive. The USB Installer has the SSDT's needed for this board that are distributed by the devs of OpenCore (if you'd like to compare or see the differences in IORegistry when booting from the USB). For more info, open zSSDT-ASUS-Z490 Explained.dsl in MaciASL.app and read the green notes.
ACPI:
Kexts:
Drivers:
Tools:
config.plist:
USB Mapping:


01/27/2021 Updated Files with a new GPU SSDT.
Shiloh's Build for Tristan
ASUS Prime Z490-A - Intel Core i9-10850K - CORSAIR Vengeance LPX 64GB - Sapphire Radeon Pulse RX 5700 XT

ASUS Prime Z490-A - Intel Core i9-10850K - CORSAIR Vengeance LPX 64GB - Sapphire Radeon Pulse RX 5700 XT
Components:
ASUS PRIME Z490-A LGA 1200 (Intel 10th Gen) Intel Z490 SATA 6Gb/s ATX Intel Motherboard
ASUS PRIME Z490-A Intel Z490 ATX Intel Motherboard - Newegg.com
Buy ASUS PRIME Z490-A LGA 1200 (Intel 10th Gen) Intel Z490 SATA 6Gb/s ATX Intel Motherboard (14 DrMOS Power Stages, Dual M.2, Intel 2.5Gb Ethernet, USB 3.2 Front Panel Type-C, Thunderbolt 3 Support, Aura Sync RGB) with fast shipping and top-rated customer service. Once you know, you Newegg!
Intel Core i9-10850K Comet Lake 10-Core 3.6 GHz LGA 1200 125W Desktop Processor (BX8070110850K)
Intel Core i9-10850K 3.6 GHz Desktop CPU Processor - Newegg.com
Buy Intel Core i9-10850K Comet Lake 10-Core 3.6 GHz LGA 1200 125W Desktop Processor Intel UHD Graphics 630 - BX8070110850K with fast shipping and top-rated customer service. Once you know, you Newegg!
Noctua NH-D15 SSO2 D-Type Premium CPU Cooler, NF-A15 x 2 PWM Fans
Noctua D-Type Premium CPU Cooler, x 2 PWM Fans - Newegg.com
Buy Noctua NH-D15, Premium CPU Cooler with 2x NF-A15 PWM 140mm Fans (Brown) with fast shipping and top-rated customer service. Once you know, you Newegg!
CORSAIR Vengeance LPX 64GB SDRAM DDR4 3200 Desktop Memory (CMK64GX4M2E3200C16)
CORSAIR Vengeance LPX 64GB (2 x 32GB) 288-Pin PC RAM DDR4 3200 (PC4 25600) Desktop Memory Model CMK64GX4M2E3200C16 - Newegg.com
Buy CORSAIR Vengeance LPX 64GB (2 x 32GB) 288-Pin PC RAM DDR4 3200 (PC4 25600) Desktop Memory Model CMK64GX4M2E3200C16 with fast shipping and top-rated customer service. Once you know, you Newegg!
Western Digital BLACK SN750 NVMe M.2 2280 1TB PCI-E 3.0 x4 SSD (WDS100T3X0C)
Western Digital WD BLACK SN750 NVMe M.2 2280 1TB SSD - Newegg.com
Buy Western Digital WD BLACK SN750 NVMe M.2 2280 1TB PCI-Express 3.0 x4 64-layer 3D NAND Internal Solid State Drive (SSD) WDS100T3X0C with fast shipping and top-rated customer service. Once you know, you Newegg!
Sapphire Radeon Pulse RX 5700 XT 8GB GDDR6 PCIe 4.0 Graphics Card (11293-01-20G)
https://www.amazon.com/dp/B07WC7683C/?tag=tonymacx86com-20
YOUBO PC Hackintosh WiFi Card BCM94360CD 802.11a/g/n/ac 1750Mbps
https://www.amazon.com/gp/product/B082X8MBMD/?tag=tonymacx86com-20
ASUS USB-BT400 USB Bluetooth Dongle Receiver
https://www.amazon.com/gp/product/B00DJ83070/?tag=tonymacx86com-20
EVGA SuperNOVA 750 G5, 80 Plus Gold 750W, Fully Modular Power Supply (220-G5-0750-X1)
EVGA SuperNOVA 750 G5, 750W Modular, Power Supply - Newegg.com
Buy EVGA SuperNOVA 750 G5, 80 Plus Gold 750W, Fully Modular, ECO Mode with Fdb Fan, 100% Japanese Capacitors, 10 Year Warranty, Compact 150mm Size, Power Supply 220-G5-0750-X1 with fast shipping and top-rated customer service. Once you know, you Newegg!
Fractal Design Meshify C Black ATX High-Airflow Compact Tempered Glass Mid Tower Computer Case
Fractal Design Meshify C Black ATX Mid Computer Case - Newegg.com
Buy Fractal Design Meshify C Black ATX High-Airflow Compact Light Tint Tempered Glass Mid Tower Computer Case with fast shipping and top-rated customer service. Once you know, you Newegg!
SanDisk 16GB Ultra Luxe USB 3.1 Flash Drive, Speed Up to 150MB/s (SDCZ74-016G-G46)
SanDisk 16GB Ultra Luxe USB 3.1 Flash Drive, Speed Up to 150MB/s (SDCZ74-016G-G46) - Newegg.com
Buy SanDisk 16GB Ultra Luxe USB 3.1 Flash Drive, Speed Up to 150MB/s (SDCZ74-016G-G46) with fast shipping and top-rated customer service. Once you know, you Newegg!
Comments:
With Apple making their own CPUs, it seems like this might be the last powerhouse Intel Mac to emulate, the iMac20,2. This machine is impressive! It demolishes my X79 builds at over 2x the speed in benchmarks, for a fraction of the cost. I think I pulled the trigger just in time. Stock of the RX 5700 XT GPUs has run out with certified vendors and grey market pirates are selling whats left at INSANE markups. You may be able to find a reasonable deal on a used one. Hopefully more will be shipped to certified vendors and eventually we can get them for MSRP. Or hopefully well see support from apple for new generations of AMD GPUs. The Youbo WiFi card has a Bluetooth chip that is active when you connect a small cable to the card from a internal USB2 header. When I did this, it caused instant wake from sleep. I'm not sure if this was caused by the internal headers (they seem to be connected via a hub) or the card itself. My solution was to just disconect the cable and use a USB2 dongle (Asus USB-BT400) for Bluetooth. I don't mind blocking one of the back panel ports permanently and letting it live there as there are too many ports for macOS anyway.
Benchmarks:
Create a bootable macOS USB installer
On a computer currently running macOS:
1) Download macOS Big Sur or later on a computer running macOS (App Store.app), if you have access to one. If not, you can find other guides around the internet that can guide you though doing this in Windows or Linux.
2) Format at 16GB or larger USB flash drive to "Mac OS Extended (Journaled)" with "GUID Partition Map" and the name "USB".
1. Open Disk Utility.app and choose your USB flash drive on the left sidebar.
2. Choose Erase on the right side of the top bar.
3. Change "Untitled" to "USB" in the Name field.
4. Select "Mac OS Extended (Journaled)" in the Format field.
5. Choose "GUID Partition Map" in the Scheme field.
6. Click Erase.
3) Create USB installer (Terminal.app).
1. Open Terminal.app and paste in the following command for macOS Big Sur:
sudo /Applications/Install\ macOS\ Big\ Sur.app/Contents/Resources/createinstallmedia --volume /Volumes/USB
2. Press Enter and allow it to complete 100%.
4) Install the OpenCore bootloader to the USB Installer.
1. Download OpenCore from:
Releases · acidanthera/OpenCorePkg
OpenCore bootloader. Contribute to acidanthera/OpenCorePkg development by creating an account on GitHub.
github.com
2. Click the link to the release version to download.
3. Mount the the EFI partition of the USB installer using my Mount Any EFI.app or any other method you may prefer.
4. Copy the EFI folder from the dowloaded OpenCore package's X64 folder to the root of your USB Installer's EFI partition.
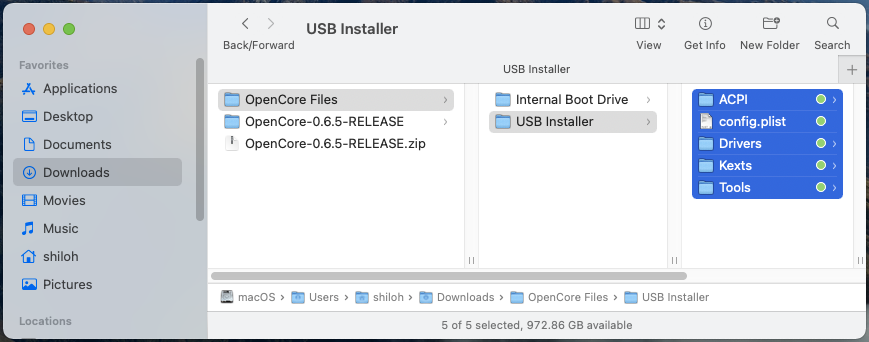
5. Replace the ACPI, Drivers, Kexts and Tools folders, and the config.plist in the new OC folder with the ones from my files in the "USB Installer" folder.
5) Generate and add missing PlatformInfo/Generic entries to the new config.plist
1. Download GenSMBIOS from:
GitHub - corpnewt/GenSMBIOS: Py script that uses acidanthera's macserial to generate SMBIOS and optionally saves them to a plist.
Py script that uses acidanthera's macserial to generate SMBIOS and optionally saves them to a plist. - corpnewt/GenSMBIOS
github.com
2. Double click GenSMBIOS.command.
3. Type: "3" and press Return.
4. Type: "iMac20,2 1" and press Return.
5. Open the new config.plist in a plist editor of your choice (I use PlistEdit Pro) or TextEdit.app.
6. Copy the generated "Serial:" to the empty String of "SystemSerialNumber".
7. Copy the generated "Board Serial:" to the empty String of "MLB".
8. Copy the generated "SmUUID:" to the empty String of "SystemUUID" and save the changes.
TextEdit Example:
<key>PlatformInfo</key>
<dict>
<key>Automatic</key>
<true/>
<key>CustomMemory</key>
<false/>
<key>Generic</key>
<dict>
<key>AdviseWindows</key>
<false/>
<key>MLB</key>
<string>C020205004N0000CB</string>
<key>ProcessorType</key>
<integer>0</integer>
<key>ROM</key>
<data>
ESIzRFVm
</data>
<key>SpoofVendor</key>
<true/>
<key>SystemMemoryStatus</key>
<string>Auto</string>
<key>SystemProductName</key>
<string>iMac20,2</string>
<key>SystemSerialNumber</key>
<string>C02CQ00Z046M</string>
<key>SystemUUID</key>
<string>2162C8AC-F5A2-443D-8EEB-71596030D41D</string>
</dict>
Note: This Serial probably won't be valid which potentially poses a problem for some iServices.
If you want to use valid info at this point, follow this guide:
I tried about 100 of the generated serials before giving up because I don't care enough about iServices.
Prepare the Asus Prime Z490A for installation of macOS.
1) Update BIOS (I'm on 901)
Found in the manual @: 3.4 ASUS EZ Flash 3:
1. Insert the USB flash disk that contains the latest BIOS file to the USB port.
2. Enter the Advanced Mode of the BIOS setup program. Go to the Tool menu to select ASUS EZ Flash 3 Utility and press <Enter>.
3. Press <Tab> to switch to the Drive field.
4. Press the Up/Down arrow keys to find the USB flash disk that contains the latest BIOS, and then press <Enter>.
5. Press <Tab> to switch to the Folder field.
6. Press the Up/Down arrow keys to find the BIOS file, and then press <Enter> to perform the BIOS update process.
2) Setup BIOS
First boot after update:
Note: "Unlocked (F3)" is for overclocking. This will give higher voltages which may be out of Intel's spec. You may not want to use this unless you plan to set voltages lower manually. My overclock uses much lower voltages than Optimized Defaults in this mode. Choose the option you are comfortable with, based on your own research. I won't go into overclocking in this guide.
Adjust settings in Advanced Mode (press F7):
Advanced\CPU Configuration:
Intel (VMX) Virtualization Technology = Enabled
Advanced\System Agent Configuration:
VT-d = Disabled
Above 4G Decoding = Enabled
Advanced\System Agent Configuration\Graphics Configuration:
Primary Display = Auto
iGPU Multi-Monitor = Enabled
DVMT Pre-Allocated = 64M
RC6(Render Standby) = Disabled
Advanced\Onboard Device Configuration:
USB power delivery in Soft Off state (S5) = Enabled (For charging USB devices while in sleep)
M.2_1 Configuration = PCIE (For fastest speed with my NVME SSD)
M.2_2 Configuration = Auto (Disables SATA 5&6 if set to x4. You may want this if you have two M.2 SSDs installed)
Advanced\Onboard Device Configuration\Serial Port Configuration:
Serial Port = Off
Boot\CSM (compatibility support module):
Lunch CSM = Disabled
Boot\Secure Boot:
OS Type = Other OS
Boot\Boot Configuration:
Fast Boot = Disabled (I set this to Enabled after install)
Boot Logo Display = Full Screen (Post Delay Time = 0) or = Disabled (Optional)
POST Report = 1 sec (Optional)
Wait For 'F1' If Error = Disabled (Optional)
Tool\Asus Armory Crate:
Download & Install ARMORY CRATE app = Disabled (You may want this Enabled if you boot Windows)
Navigate to Exit, choose "Save Changes & Reset".
Install macOS to the internal SSD
1) Boot from USB Installer1. With the computer powered off, plug in the USB installer.
2. Start the computer holding down the "F8" key on your keyboard. This will bring you to the boot override interface. Choose the device name of the USB Installer to boot from.
3. Open Disk Utility and partition your internal SSD to APFS.
4. Install macOS to your internal SSD. Don't be alarmed if it takes a while and reboots itself several times before bringing you to the setup screen.
Note: I'd recommend skipping connecting to the internet during the setup process and configurthe network settings after you've reached the desktop.
2) Install OpenCore to your internal SSD1. Download the OpenCore or use the same package you already downloaded for the USB Installer.
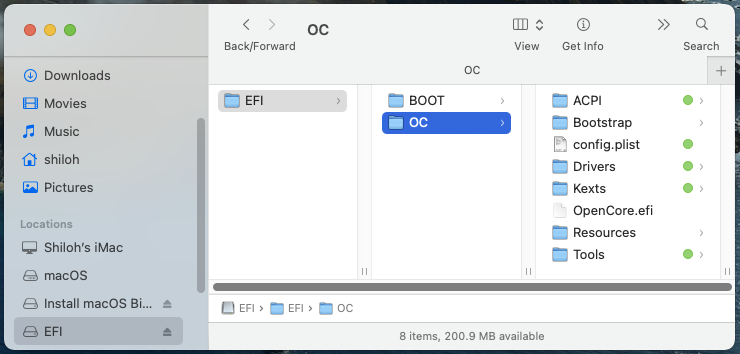
3. Mount the the EFI partition of the Internal SSD using my Mount OS EFI.app or any other method.
4. Copy the "EFI" folder from the OpenCore "package's X64" folder to your Internal SSD's EFI partition.
5. Replace the ACPI, Drivers, Kexts and Tools folders, and the config.plist in the new OC folder with the ones from my files in the "Internal Boot Drive" folder.
6. As we did for the USB installer, Open the new config.plist in a plist editor of your choice or TextEdit.app.
7. Copy your Serial to "SystemSerialNumber" (Use the same one that you added to the USB Installer's config).
8. Copy your Board Serial to "MLB" (Use the same one that you added to the USB Installer's config).
9. Copy your SmUUID to "SystemUUID" (Use the same one that you added to the USB Installer's config) and save the changes.
10. Eject the USB Installer and unplug it.
11. Open System Preferences and go to Startup Disk. Unlock and select your Internal SSD. Click Restart.
Explanation of my files for OpenCoreI've created custom SSDTs. One for the motherboard and one for each device installed in a PCI-E slot. These are in the files for the Internal Boot Drive. The USB Installer has the SSDT's needed for this board that are distributed by the devs of OpenCore (if you'd like to compare or see the differences in IORegistry when booting from the USB). For more info, open zSSDT-ASUS-Z490 Explained.dsl in MaciASL.app and read the green notes.
ACPI:
SSDT-ASUS-Z490.aml for the motherboard and CPU (fixes, removes and adds devices).
SSDT-X1_1-ARPT.aml for the wifi card in PCI-E X1 slot 1.
SSDT-X16_1-GPU.aml for the GPU in PCI-E X16 slot 1 (Renames PEGP to GFX0 and adds HDAU for audio which could also be handled purely by the WhateverGreen.kext but I prefer this).
Kexts:
Lilu.kext REQUIRED for patching functions of other Kexts.
VirtualSMC.kext REQUIRED for System Management Controller (Required to boot macOS).
SMCProcessor.kext for CPU measurement and reporting (iStat Menus).
SMCSuperIO.kext for motherboard components measurement and reporting (iStat Menus).
AppleALC.kext REQUIRED for onboard audio.
FakePCIID.kext REQUIRED for onboard ethernet.
FakePCIID_Intel_I225-V.kext (Injector for FakePCIID) REQUIRED for onboard ethernet.
NVMeFix.kext for better function of non-apple NVME SSDs with macOS.
USBMap.kext REQUIRED for disabling some USB ports in order to comply with macOS's 15 port limit (You may wish to edit /Volumes/EFI/EFI/OC/Kexts/USBMap.kext/Contents/Info.plist to use your USB ports differently than I do). The USB Installer doesn't include this file.
Drivers:
HfsPlus.efi for reading and writing to HFS+ drives.
Tools:
OpenShell.efi for troubleshooting.
config.plist:
OpenCore's configuration file. I use different settings in the config.plist for the USB Installer and the Internal SSD. I do this so that I can boot from the USB installer if something goes wrong or for troubleshooting.
Differences in the USB Installer config:
DeviceProperties:
layout-id = 07000000 for onboard audio (because the USB doesn't include my custom SSDT)
device-id = F2150000 for ethernet (because the USB doesn't include my custom SSDT)
boot-args:
-v (verbose) for troubleshooting.
alcid=7 for onboard audio (because the USB doesn't include my custom SSDT)
Kernel/Quirks:
XhciPortLimit Enabled to allow for USB Port Mapping
Relevant settings in the config.plist:ACPI/Add: if you want to add a ACPI (DSDT/SSDT) file, the file must be present in the "ACPI" folder and have a enabled entry here in the config.plist. You can disable a file by changing it's entry to disabled here. To remove a ACPI file forever, delete it from the folder and delete its entry in the config.
ACPI/Patch: This is where you can find and replace code in the motherboard's OEM ACPI files. Example: I would use this instead of disabling a device and adding a new one in a new SSDT if a device has functional, refenced code in other devices or methods in the tables. By disabling the device and adding a new one with a new name, all the referenced code would be broken. Instead we could use this find and replace to change the name in every instance in the tables. I currently have it set to find GFX0 (47465830 as Hex) and replace it with IGPU (49475055 as Hex). Note: WhateverGreen.kext would do this on its own if this entry was disabled. It can also be used to Change HDAS to HDEF (macOS's default name for the onboard audio device) I do this in the SSDT. Alternativly, AppleALC.kext would do it on it's own if nether of these were present.
DeviceProperties: We use this to add device properties to devices that either don't have a property or have one that we want to change. Like changing a Device ID to get a kext to load to a device that is similar to but not identical to one found in a Mac. I've used it to add acpi-wake-type 01 to the USB3 device (for complete wake from sleep with one keyboard press) and AAPL,ig-platform-id to the Integrated GPU. If you wanted to use the IGPU as the primary display output you would change AAPL,ig-platform-id to the appropriate value for the platform.
Kernel/Add: In order to load our kexts, the file must be present in the "Kexts" folder and have a enabled entry here in the config.plist. To stop one of these kexts from loading, we can change the value in the entry to disabled or delete the file or entry or both.
Kernel/Quirks/XhciPortLimit: We use this to patch macOS's USB injector kexts to allow all our USB ports to load while mapping out the ports we want to be active and what ports we want to disable so that we can conform to the 15 port limit. The developers have have said that leaving this enabled long term is not a good solution to the 15 port limit.
Kernel/Quirks/DisableRtcChecksum: We enable this to keep RTC from writing to memory regions that are used for other things and causing POSTs to safe mode. I also have an entry for this at rtc-blacklist (5859).
Misc/Boot/Timeout: This is where we set how long the Picker (opencore's GUI for choosing which drive to boot from) will stay visible and give you the choice of drives to boot from. Once the time value has elapsed it will automatically boot from the Startup Disk that is stored in NVRAM. I have this set to 1 (1 second) for faster automatic boot from my startup disk. If I want to boot from a different disk, I just hold down the control key while starting or resetting and the picker stays visible until I make a choice. If you consistently boot from different drives, you may want to change this to something higher.
NVRAM/Add/7C436110*/boot-args: This is where we add and remove boot args. Each arg should be separated by a single space. I have agdmod=pikera here. This is a arg for the WhateverGreen.kext that performs PikeRAlpha's plist patch to the AppleGraphicsDisplayPolicy.kex's info.plist, finding board-id and replacing with board-ix. This keeps AGDP from matching our board ID and loading code for Mac OEM hardware that cause a dead display output at boot.
NVRAM/Add/7C436110*/csr-active-config: This is where we set System Integrity Protection. I have it disabled. If you want it fully enbled, change the value from E7030000 to 00000000 or look into other values.
Platforminfo/Generic: This is where we enter the data for the OEM Mac system that we want to emulate. Sytem, Serials, ect.
UEFI/Drivers: Similar to Kexts and ACPI, UEFI drivers must have a file present in the folder and a entry here in order to load.
USB Mapping:
macOS limits the number USB ports to no more than 15. USB3 ports actually have 2 ports each, one for High Speed (USB2 backwards compatibility) and another for Super Speed (USB3). If you connect a USB2 device it will load to the HS port but if you connect a USB3 device to the same physical port, it will load to the SS port. If you don't disable some USB ports to conform to the 15 port limit, macOS will just exclude any ports after 15 and these may be ports that you want to use more than others. We disable some ports to make sure that the ones we really want are available. OpenCore has the "XhciPortLimit" Quirk at Kernel/Quirks in the config.plist which can be used for enabling all ports, however, the developers of OpenCore advise that the most stable long term solution is to disable the least desirable ports via a injector kext (USBMap.kext) to comply with the 15 port limit.
In my map, my goal was to leave as many of the external physical ports functioning as I could. I've disabled SS10 as my Bluetooth dongle lives there and loads to HS10. HS09 is disabled and I can use this physical port for USB3 devices only. HS04 (USB Type C's USB2 port) is disabled and I can use the Type C port for USB3 devices only. HS06 (the internal USB2 headers USB_E12 & USB_E34) is disabled as I wont use the headers. HS07, HS08, SS07 and SS08 (U32G1_78) are the header for front panel USB3 and are connected to my case's front panel. These are the ports I use the most and they stay enabled. The USB3.2 header (USB3.2_5) I assume is HS05 and SS05. Because I didn't have a cable or device to match the header, I didn't actually observe that devices load to these ports in IORegistry but they have been diasbled. HS12 and HS13 (the top black ports have only USB2 functionality) are enabled as I leave my wired keyboad and mouse plugged in these two.
The USB Installer's config.plist has the XhciPortLimit quirk active and and does not have the USBMap.kext. If you want to create your own port map, plug in the USB installer and use F8 to to boot from it. The XhciPortLimit quirk allows all your ports to show up in IORegistry and you can then pug and unplug USB devices to see where they load. Once you have a map, edit the USBMap.kext's info.plist. The entries are at IOKitPersonalities/iMac20,2-XHC/IOProviderMergeProperties/ports. To disable a port, delete it's entry. To enable a port, you will need to add an entry for it (you could copy and paste one of the others and change it's values).
Example: To add HS04, duplicate HS03 and rename it to HS04, then change 03000000 to 04000000. Be very careful not to make formatting errors if you use TextEdit to do this. The safest and easiest way is to use a plist editor.
Note:
Included in USBMap.kext info.plist to enable:
HS01, HS02, HS03, HS07, HS08, HS10, HS12, HS13, SS01, SS02, SS03, SS04, SS07, SS08, SS09
Excluded (disabled):
HS04, HS05, HS06, HS09, HS11, HS14, USR1, USR2, SS05, SS06, SS10
Attachments
-
 Screen Shot 2021-01-13 at 1.41.52 PM.png81.3 KB · Views: 461
 -
 Screen Shot 2021-01-13 at 2.00.07 PM.png89.5 KB · Views: 377
 -
 Screen Shot 2021-01-13 at 2.06.17 PM.png107.5 KB · Views: 389
 -
 Screen Shot 2020-12-13 at 3.00.24 AM.png106.3 KB · Views: 546
 -
 Screen Shot 2021-01-15 at 4.10.29 PM.png89.1 KB · Views: 410
 -
 Screen Shot 2021-01-15 at 4.13.51 PM.png84.1 KB · Views: 468
 -
OpenCore Files.zip4.4 MB · Views: 1,758
Last edited: