Contribute
Register

Asus P6X58D-Premium Motherboard

Status
Not open for further replies.
I was referring to Clover installation not to Unibeast 6.2.
In any case see attachment......
OK so how i will make it work?
1. Make the usb with unibeast 6.2
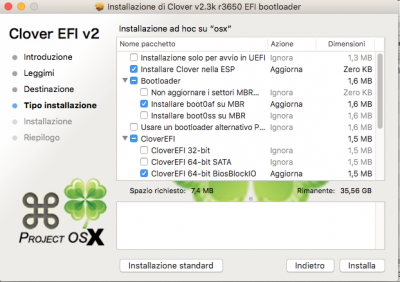
2. run clover install and check the options you have in pic and save them in usb?
3. unplug other hdds and dvd/cds and install?

sorry for the trouble but i dont have the knowlege !!!
 
Dear matsovagos ,
I would suggest to use command line to create your USB.
Follow this guide to do it .GUIDE
Once Done you can download clover bootloader and finalize your USB stick with the setting you will find in the attachment.
Insert DSDT , Insert Kext in 10.11 and replace config.plist.

Now your USB stick is fully compliant with your mobo.

Good day
 

Attachments

  • Schermata 2016-07-27 alle 12.01.28.png
    Schermata 2016-07-27 alle 12.01.28.png
    150 KB · Views: 319
I was referring to Clover installation not to Unibeast 6.2.
In any case see attachment......

Ok so i managed to install it correctly???!!! No sound no matter what kexts i tried and when i reconect the cd/dvd the system restarts before reaching the clover boot screen!
(the cd/dvd is connected to the other controller at first port)
 
Okey I got it working!

1. USB Stick MBR Format
2. Unibeast 6.0.1
3. Secound USB Stick with Clover 3270
4. I used the Config for X58 Mainboards Tonymac linked here: http://www.tonymacx86.com/attachmen...s-x-el-capitan-x58a-ud3r-config.plist-x58.zip Here is the Thread:
http://www.tonymacx86.com/el-capita...-os-x-el-capitan-x58a-ud3r-2.html#post1111697
5. Kext for Network link Roberto said!
6. Used the DSDT.aml for the -E Version of the MOBO

The only problems are now
- Sleep
- Sound
- USB 3.0

Working on that right now ... :)


Edit:
- Sound works out of the box!
- Sleep works

Still got the Problem with the usb 3.0 ports not working (Bios detects everything that is connected to the USB 3.0 Ports).

Could someone help me with the usb 3.0 issue?
I want to work with some usb drives
 
Sorry I can't understand the manual guide because it is in Italian, can someone help me bootable usb. I don't understand how to create the usb with unibeast and clover at the same time.
 
For the installation with the P6X58D you can't just use unibeast out of the box. I'm trying to follow the instructions of @robertolagreca that got it to work. I have made the USB with unibeast then I use clover to setup the "biosblockio" part but my keyboard and mouse don't respond in clover.
 
I would like to thank Robertolagreca and everyone else who contributed to getting P6X58D Premium up and running El Capitan. To get it running on my rig, I had to edit the DSDT.aml and config.plist files provided by Robertolagreca to get things working on my side.

The following are changes I made while the steps I took is listed further down.
Please note, all the information I'm providing is not my own. As I stated earlier, I read this thread and follow people's instructions and suggestions. Thanks again, fellow members.


To get into El Capitan Installation (Using 10.11.6 Build 15G31), I had to edit Robertolagreca's config.plist
EDITING config.plist

  • Because I'm using GTX 970, I had to uncheck inject Nvidia, here's how
    • Open up Clover Configurator
      • Under Graphics, unchecked Inject Nvidia
    • Under Boot, check nv_disable=1 and Verbose (-v)
  • Other post-install changes
    • I have 1800Mhz RAM, I checked the following:
      • Under Boot > XMPDection=YES, and darkwake=10
      • Under Devices > Audio change drop-down menu from Yes to 1

To get audio working, I had to edit Robertolagreca's DSDT.aml
EDITING DSDT.aml

  • To get audio working, I modified Robertolagreca's DSDT.aml file using MaciASL
    • Search for HDEF
    • Find its layout-id
    • Change the current value 0x79, 0x03, 0x00, 0x00 to 0x01, 0x00, 0x00, 0x00
    • Installed AppleALC.kext into partition volume EFI > CLOVER > kexts > Other
    • I'm using AppleALC.kext because I keep getting an installer: upgrade failed using Multibeast 8.2.3 trying to install ALC889


To get App Store to accept your login
  • Open EFIStudio
    • Select Ethernet
    • Click Add Device
    • Editor Window popups
      • Click on write to com.apple.Boot.plist
    • Quit EFIStudio
  • Open System Preferences > Network
    • Remove all your network interfaces
  • Navigate to /Library/Preferences/SystemConfiguration
    • Delete NetworkInterfaces.plist
  • Restart
  • Add Ethernet (en0) then any other interfaces you have


STEPS TO GET THINGS RUNNING
on 10.11.6 El Capitan running on P6X58D Premium with GTX 970 and Intel Xeon X5670

These steps assume this isn't your first time and you have all the necessary files and programs

  1. Format USB using OS X Extended (Journaled)
  2. Download latest copy of El Capitan (I used version 10.11.6)
  3. Open Terminal and paste the following:
    1. NOTE: Before pasting, rename [USB DEVICE NAME] to whatever name you used for your USB and remove the brackets
    2. sudo /Applications/Install\ OS\ X\ El\ Capitan.app/Contents/Resources/createinstallmedia --volume /Volumes/[USB DEVICE NAME] --applicationpath /Applications/Install\ OS\ X\ El\ Capitan.app --nointeraction
    3. Be patience because it'll take a while
  4. Open Clover (I used version v2.3k_r3763)
    1. Install to USB with the following settings checked:
      • Install Clover on ESP
      • Bootloader > Install boot0af in MBR
      • CloverEFI > CloverEFI 64-bits BiosBlockIO (Allows Clover to see the 2 Marvell SATA6 ports)
  5. Open Clover Configurator
    1. Mount EFI Partition
  6. Navigate to partition volume EFI
    1. Paste config.plist into folder CLOVER (overwrite default one or back it up)
    2. Paste DSDT.aml into folder CLOVER > ACPI > patched
    3. Paste FakeSMC.kext into folder CLOVER > kexts > Other
      1. Some people suggest deleting or removing all 10.X folders, but it wasn't necessary in my case
  7. Restart and boot to USB
  8. Format your HDD/SDD if necessary
  9. Double check boot flags are correct (based on config.plist settings)
    • IF not, make any necessary changes
  10. Follow installation process
  11. Machine will restart once files are copied
  12. Boot using USB again to continue installation
  13. Installation will take a while and may pause at the end, but be patience and it should automatically restart
  14. Boot using USB one more time
    1. This time select your HDD/SDD partition
  15. At this point, you should be able to go through the welcome screens and get to the desktop
    • From here on you can:
    • Replicate your Clover installation you did on your USB to your HDD/SDD
    • Install latest Nvidia Web Drivers for El Capitan 10.11.6

This should get your machine up and running. Enjoy!
 
Last edited:
Status
Not open for further replies.
Back
Top