
- Joined
- Jan 28, 2012
- Messages
- 37
- Motherboard
- Gigabyte GA-Z77N-WIFI
- CPU
- Intel Core i7-3770T
- Graphics
- ASUS EAH6670/DIS/1GD5, Radeon HD 6670, 1GB GDDR5
- Mac
- Classic Mac
- Mobile Phone
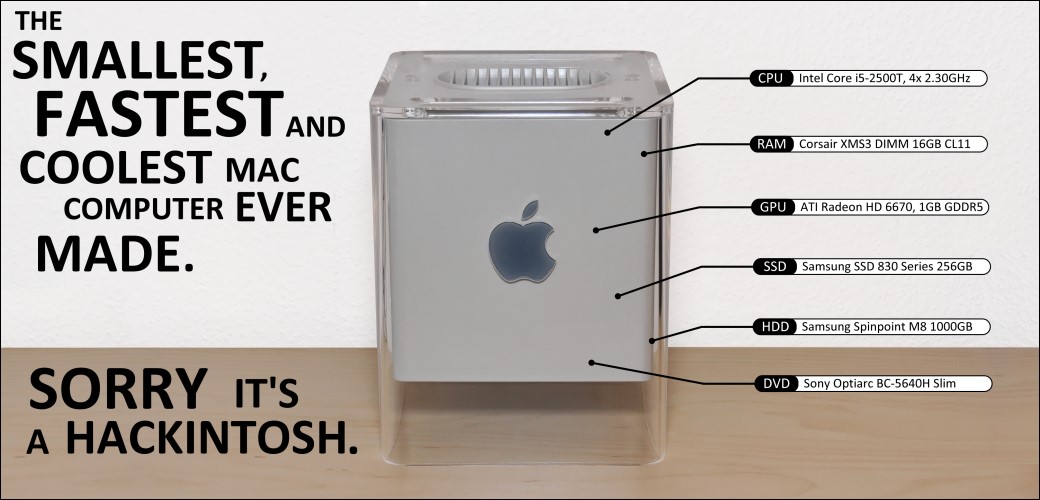
Apple Cube 2.0 - Core i5 2500T - GA-H67N-USB3-B3 - 16GB RAM - 256GB SSD - 2TB RAID - ATI R6670
Components
Intel Core i5-2500T
http://ark.intel.com/products/52212/Intel-Core-i5-2500T-Processor-%286M-Cache-up-to-3_30-GHz%29
Gigabyte GA-H67N-USB3-B3
http://www.amazon.com/gp/product/B004TJWI7Q/
Corsair XMS3 DIMM Kit 16GB PC3-12800U CL11
http://www.amazon.com/dp/B007VQPMBS/
Samsung SSD 830 Series 256GB
http://www.amazon.com/dp/B0077CR66A/
Samsung Spinpoint M8 1000GB, SATA II
http://www.amazon.com/dp/B0053YLTBC/
MSI R6670-MD1GD5, Radeon HD 6670, 1GB GDDR5
http://www.amazon.com/dp/B004X6AOVM/
Sony Optiarc BC-5640H
http://www.amazon.com/dp/B004V1RS6I/
Scythe Quiet Drive 2.5" HDD Silencer
http://www.amazon.com/dp/B001E2IA3C/
PicoPSU-160-XT
http://www.amazon.com/dp/B005TWE6B8/
Prolimatech Samuel 17
[amazon-de]http://www.amazon.de/dp/B003OPW3W6/[/amazon-de]
be quiet! Silent Wings PWM, 92x92x25mm
[amazon-de]http://www.amazon.de/dp/B002FBD6I0/[/amazon-de]
Belkin Bluetooth-Adapter, USB 2.0
http://www.ebay.de/itm/PCIe-PCI-E-E...91?pt=LH_DefaultDomain_77&hash=item3a72926a07
Fractal Design FD silent 50x50x10mm
[amazon-de]http://www.amazon.de/dp/B004VD0UJ8/[/amazon-de]
Noiseblocker BlackSilent Fan XM1 - 40mm
http://www.amazon.com/dp/B002DG1QUM/
Apple OS X Lion @ Mac Apps Store
http://itunes.apple.com/us/app/os-x-lion/id444303913?mt=12
Already Owned
Apple Cinema Display 27"
http://www.amazon.com/dp/B0043GCBU4/
Apple Wirless Keyboard
http://www.amazon.com/dp/B005DLDO4U/
Apple Magic Mouse
http://www.amazon.com/dp/B002TLTGM6/
Philips SPA2310/00
[amazon-de]http://www.amazon.de/dp/B000KKPABO[/amazon-de]
Comments:
Not many computers were showcased in the “Museum of Modern Art” in New York. The Apple Cube from Jonathan Ive is shown there. But not only there. It’s also on my desk at home but not with parts from 2001.
Step 1: Disassembling: I used a 10 years old "Apple Cube" as case for this mod. It took a day to remove all the original components without destroying something. After that I had some old 450MHz, 20GB HDD components and labelled envelops with screws and small parts I want to reuse.
Step 2: Cleaning and polishing: I got the Cube from eBay and the Plexiglas is telling a story about the previous owner. A lot of scratches all over the case. Not good! So I bought "Xerapol" which is a plastic polishing compound that should help. And it did. After hours of polishing it looks brand new.
Step 3: Building acryl glass frames and baseplates: After that I made a Plexiglas frame for the DVD drive that centers it under the hole in the case. The graphics card also got a baseplate with a PCIe riser card for the ATI R6670. The SSD was screwed on the DVD frame on top of the HDD case of the 2 Samsung 2.5" HDDs which are running in RAID 0.
Step 4: Cutting holes: The "Dremel" rotary tool was my best friend during that time. I made holes for the mainboard and graphics cards connections with it. This tool is also great for the Plexiglas work. Even the CPU cooler (Prolimatech Samuel 17) needs to be shortened a little bit.
Step 5: 24pin cable for PSU: The Cube gets a PicoPSU with 160W that is connected with an extension cable. All the stuff that you can buy has a length of 30cm or 50cm which is actually too long for such a small case. So I bought an "ATX Power" male and female connector and build it exactly for the required length and radius of curvature. But the most important was the gluing of the single cables. See the photos for more details.
Step 6: Mainboard: The Mini-ITX board with 170x170mm perfectly fits in the Cube case. Some conductive parts of the case need to be isolated before the board can be placed into the case. First I tried to take the "EKL Alpenföhn Panorama" cpu cooler but the height was too much for that small case. I wanted to keep the original holing mechanism so the available space for the cooler is just a few centimeters. The only available smaller cooler was the "Prolimatech Samuel 17" which is really great. The space between the both parts of the holding mechanism (after sawing it up) is exactly 92mm. Perfect for a "be quiet! Silent Wings PWM 92mm" fan.
Step 7: Power supply: The best power supply for such a small case is the PicoPSU as I already mentioned. It could not be installed directly on the 24pin connector because the 12V and 5V cables are on the wrong side. That's why I had to build my own cable. I cutted all 12V and 5V cables for the drive, SSD and HDDs so they fit perfectly and soldered them together.
Step 8: Cooling for the 6670: The original passive cooler on the ATI Readeon HD 6670 is great and very small. But the plastic case for the 55mm fans is too big for the small Cube. They are too loud also ?. So I build a plexiglas frame of a 10x10mm stick with two other 50mm fans from “Fractal design”. This solution is much thinner and not so noisy.
Step 9: Touch Sensor: I found a manual for using the original touch sensor with a normal mainboard. But it only works for pretty old mainboard (I tested it with a Socket A board and an AMD 3000+). So I needed another solution. I found a company that produce small touch sensors for bathrooms which works with an electric field. The sensor is supplied with the "5V standby" voltage of the PSU. It works in the same way as the original Cube does. It is started when the hand or an objects gets in the detection area. The field is enough to get through the 1cm Plexiglas. I had to shield the electrical field with a lot of material because the sensor is located near the 16GB RAM.
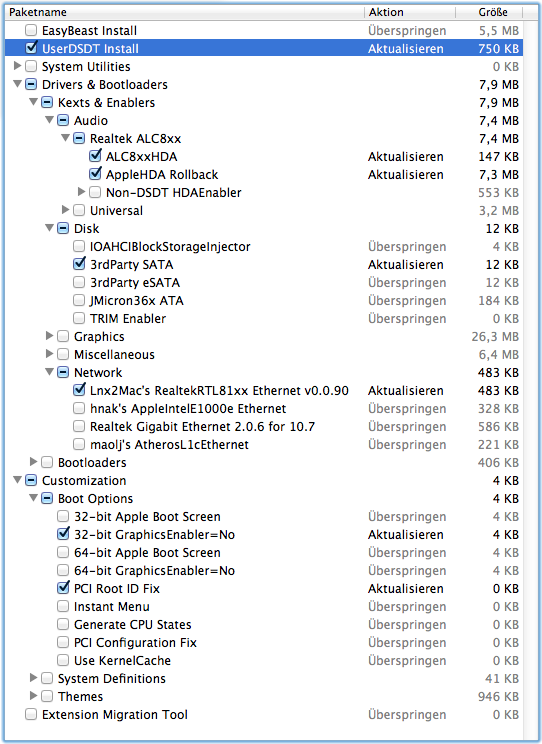
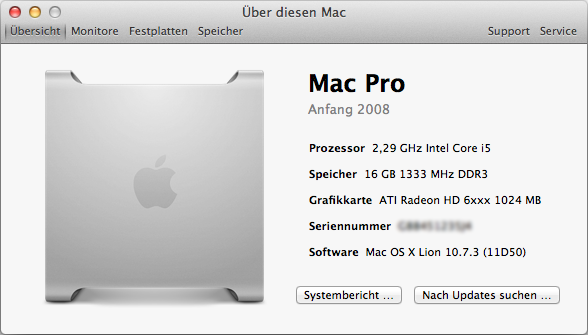
Step 10: Installing MacOS X: First I flashed the BIOS “F7” for my GA-H67N-USB3-B3 board. After that, I took the great “Mac OS X Lion” manual from tonymacx86 & MacMan to build a bootable USB stick with Lion from the AppStore. I used the BIOS setting from the Snow Leopard "iBoot + MultiBeast" manual. After the installation process I downloaded the DSDT F7 for my board and run MultiBeast with the following settings. And everything works fine.
Photos
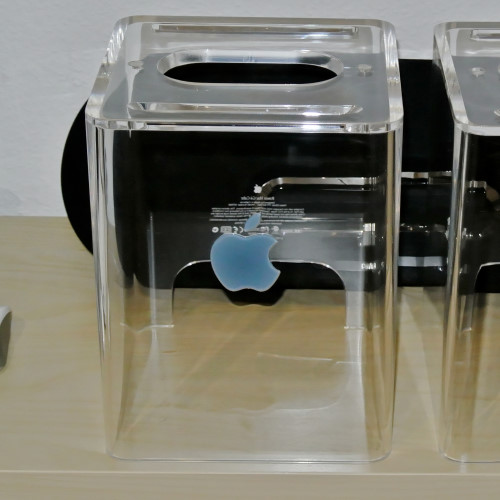
After a few hours of polishing it looks brand new.
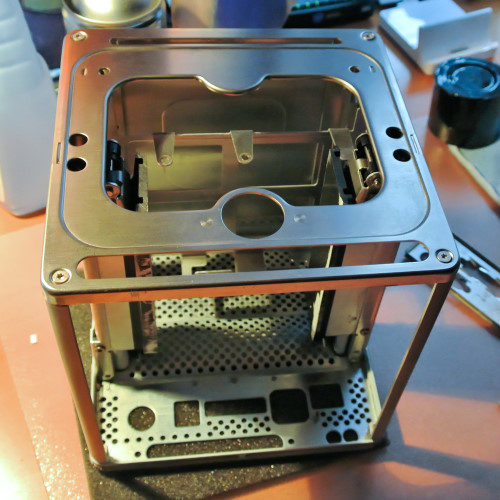
Apple Cube without original components

The passive cooler after sawing and filing. The holding mechanism can still be used.
The ATI R6670 graphics cards is screwed on a Plexiglas plate
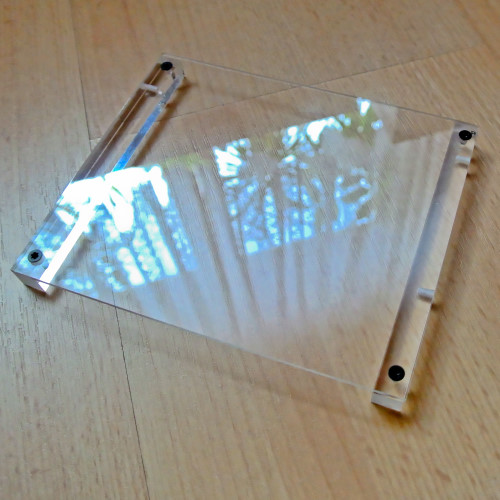
Plexiglas frame for the DVD slot in drive
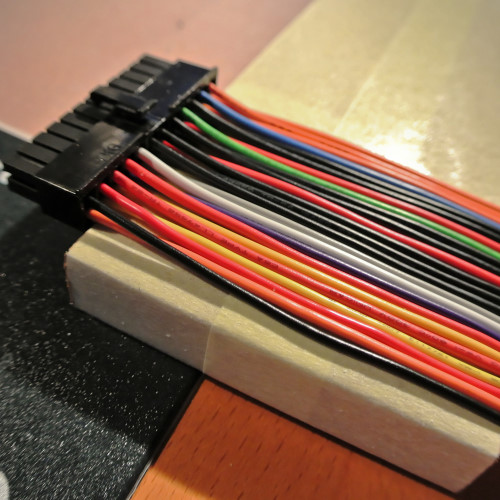
Preparation of ATX male connector for gluing of the single cables

Two 2.5" Samsung HDDs in one Scythe Quiet Drive 2.5" HDD cooler
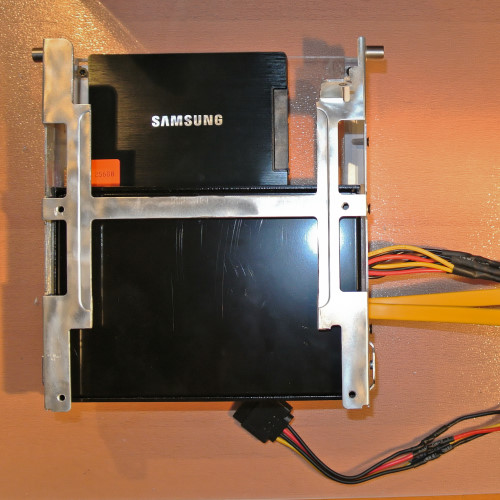
Assembly of SSD, HDD housing and DVD-frame
PicoPSU with 20cm extension cable, ATX connector and touch sensor

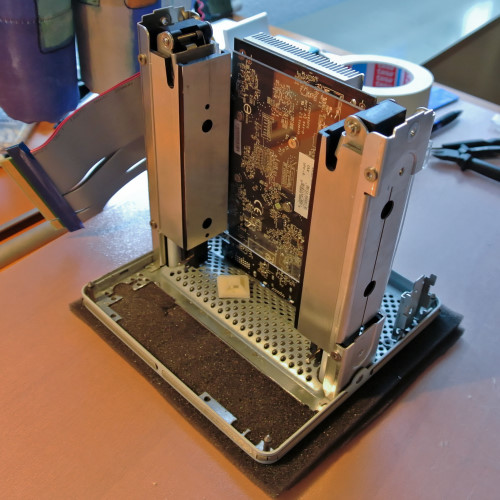
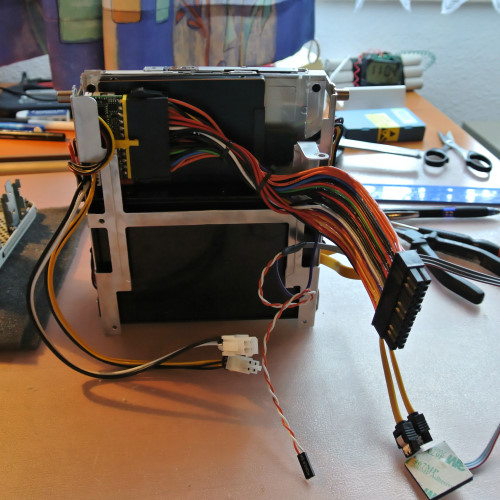
Mini-ITX board, ATI R6670, HDD and drive inside the small case
After weeks and a lot of work,….

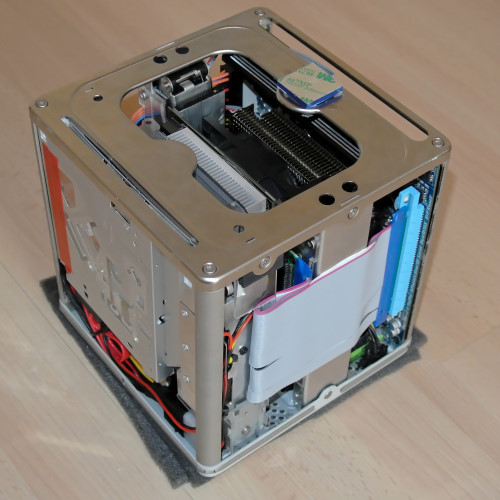
… my “Apple Cube 2.0” project was finished.
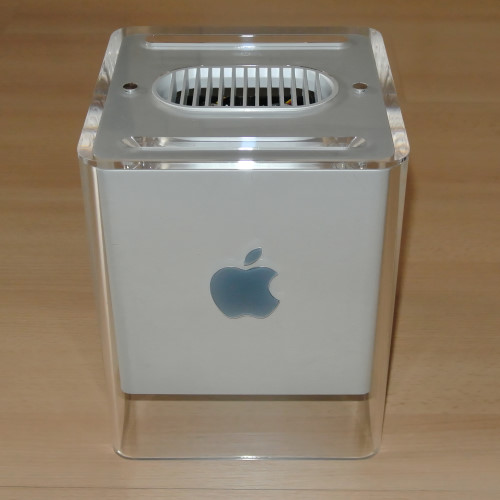
You don’t see that brand new components are working inside this nice case.
What works?
- LAN, Audio
- Graphics card (up to 2560x1440)
- Sleep
- Shutdown (I had problems with USB3.0 which is disabled now)
- AppStore
- Starting with Touchsensor
- DVD input as usual Cube
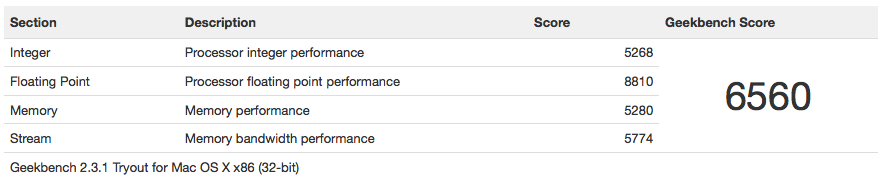
Benchmark
Temperatures
CPU Temperature: 50 – 60°C
HDD Temperature: 30 – 45 °C
GPU Temperature: N/A. Any app to read it out?
The Cube is very quiet. When the two 40mm case fans are running faster the temps are lower (about 5-10°C). Keep in mind that the case is reaaally small ;-)
EDIT (30.04.2012): Benchmark, Temperatures added
Components
Intel Core i5-2500T
http://ark.intel.com/products/52212/Intel-Core-i5-2500T-Processor-%286M-Cache-up-to-3_30-GHz%29
Gigabyte GA-H67N-USB3-B3
http://www.amazon.com/gp/product/B004TJWI7Q/
Corsair XMS3 DIMM Kit 16GB PC3-12800U CL11
http://www.amazon.com/dp/B007VQPMBS/
Samsung SSD 830 Series 256GB
http://www.amazon.com/dp/B0077CR66A/
Samsung Spinpoint M8 1000GB, SATA II
http://www.amazon.com/dp/B0053YLTBC/
MSI R6670-MD1GD5, Radeon HD 6670, 1GB GDDR5
http://www.amazon.com/dp/B004X6AOVM/
Sony Optiarc BC-5640H
http://www.amazon.com/dp/B004V1RS6I/
Scythe Quiet Drive 2.5" HDD Silencer
http://www.amazon.com/dp/B001E2IA3C/
PicoPSU-160-XT
http://www.amazon.com/dp/B005TWE6B8/
Prolimatech Samuel 17
[amazon-de]http://www.amazon.de/dp/B003OPW3W6/[/amazon-de]
be quiet! Silent Wings PWM, 92x92x25mm
[amazon-de]http://www.amazon.de/dp/B002FBD6I0/[/amazon-de]
Belkin Bluetooth-Adapter, USB 2.0
http://www.ebay.de/itm/PCIe-PCI-E-E...91?pt=LH_DefaultDomain_77&hash=item3a72926a07
Fractal Design FD silent 50x50x10mm
[amazon-de]http://www.amazon.de/dp/B004VD0UJ8/[/amazon-de]
Noiseblocker BlackSilent Fan XM1 - 40mm
http://www.amazon.com/dp/B002DG1QUM/
Apple OS X Lion @ Mac Apps Store
http://itunes.apple.com/us/app/os-x-lion/id444303913?mt=12
Already Owned
Apple Cinema Display 27"
http://www.amazon.com/dp/B0043GCBU4/
Apple Wirless Keyboard
http://www.amazon.com/dp/B005DLDO4U/
Apple Magic Mouse
http://www.amazon.com/dp/B002TLTGM6/
Philips SPA2310/00
[amazon-de]http://www.amazon.de/dp/B000KKPABO[/amazon-de]
Comments:
Not many computers were showcased in the “Museum of Modern Art” in New York. The Apple Cube from Jonathan Ive is shown there. But not only there. It’s also on my desk at home but not with parts from 2001.
Step 1: Disassembling: I used a 10 years old "Apple Cube" as case for this mod. It took a day to remove all the original components without destroying something. After that I had some old 450MHz, 20GB HDD components and labelled envelops with screws and small parts I want to reuse.
Step 2: Cleaning and polishing: I got the Cube from eBay and the Plexiglas is telling a story about the previous owner. A lot of scratches all over the case. Not good!
So I bought "Xerapol" which is a plastic polishing compound that should help. And it did. After hours of polishing it looks brand new.Step 3: Building acryl glass frames and baseplates: After that I made a Plexiglas frame for the DVD drive that centers it under the hole in the case. The graphics card also got a baseplate with a PCIe riser card for the ATI R6670. The SSD was screwed on the DVD frame on top of the HDD case of the 2 Samsung 2.5" HDDs which are running in RAID 0.
Step 4: Cutting holes: The "Dremel" rotary tool was my best friend during that time. I made holes for the mainboard and graphics cards connections with it. This tool is also great for the Plexiglas work. Even the CPU cooler (Prolimatech Samuel 17) needs to be shortened a little bit.
Step 5: 24pin cable for PSU: The Cube gets a PicoPSU with 160W that is connected with an extension cable. All the stuff that you can buy has a length of 30cm or 50cm which is actually too long for such a small case. So I bought an "ATX Power" male and female connector and build it exactly for the required length and radius of curvature. But the most important was the gluing of the single cables. See the photos for more details.
Step 6: Mainboard: The Mini-ITX board with 170x170mm perfectly fits in the Cube case. Some conductive parts of the case need to be isolated before the board can be placed into the case. First I tried to take the "EKL Alpenföhn Panorama" cpu cooler but the height was too much for that small case. I wanted to keep the original holing mechanism so the available space for the cooler is just a few centimeters. The only available smaller cooler was the "Prolimatech Samuel 17" which is really great. The space between the both parts of the holding mechanism (after sawing it up) is exactly 92mm. Perfect for a "be quiet! Silent Wings PWM 92mm" fan.
Step 7: Power supply: The best power supply for such a small case is the PicoPSU as I already mentioned. It could not be installed directly on the 24pin connector because the 12V and 5V cables are on the wrong side. That's why I had to build my own cable. I cutted all 12V and 5V cables for the drive, SSD and HDDs so they fit perfectly and soldered them together.
Step 8: Cooling for the 6670: The original passive cooler on the ATI Readeon HD 6670 is great and very small. But the plastic case for the 55mm fans is too big for the small Cube. They are too loud also ?. So I build a plexiglas frame of a 10x10mm stick with two other 50mm fans from “Fractal design”. This solution is much thinner and not so noisy.
Step 9: Touch Sensor: I found a manual for using the original touch sensor with a normal mainboard. But it only works for pretty old mainboard (I tested it with a Socket A board and an AMD 3000+). So I needed another solution. I found a company that produce small touch sensors for bathrooms which works with an electric field. The sensor is supplied with the "5V standby" voltage of the PSU. It works in the same way as the original Cube does. It is started when the hand or an objects gets in the detection area. The field is enough to get through the 1cm Plexiglas. I had to shield the electrical field with a lot of material because the sensor is located near the 16GB RAM.
Step 10: Installing MacOS X: First I flashed the BIOS “F7” for my GA-H67N-USB3-B3 board. After that, I took the great “Mac OS X Lion” manual from tonymacx86 & MacMan to build a bootable USB stick with Lion from the AppStore. I used the BIOS setting from the Snow Leopard "iBoot + MultiBeast" manual. After the installation process I downloaded the DSDT F7 for my board and run MultiBeast with the following settings. And everything works fine.
Photos
After a few hours of polishing it looks brand new.
Apple Cube without original components
The passive cooler after sawing and filing. The holding mechanism can still be used.
The ATI R6670 graphics cards is screwed on a Plexiglas plate
Plexiglas frame for the DVD slot in drive
Preparation of ATX male connector for gluing of the single cables
Two 2.5" Samsung HDDs in one Scythe Quiet Drive 2.5" HDD cooler
Assembly of SSD, HDD housing and DVD-frame
PicoPSU with 20cm extension cable, ATX connector and touch sensor
Mini-ITX board, ATI R6670, HDD and drive inside the small case
After weeks and a lot of work,….
… my “Apple Cube 2.0” project was finished.
You don’t see that brand new components are working inside this nice case.
What works?
- LAN, Audio
- Graphics card (up to 2560x1440)
- Sleep
- Shutdown (I had problems with USB3.0 which is disabled now)
- AppStore
- Starting with Touchsensor
- DVD input as usual Cube
Benchmark
Temperatures
CPU Temperature: 50 – 60°C
HDD Temperature: 30 – 45 °C
GPU Temperature: N/A. Any app to read it out?
The Cube is very quiet. When the two 40mm case fans are running faster the temps are lower (about 5-10°C). Keep in mind that the case is reaaally small ;-)
EDIT (30.04.2012): Benchmark, Temperatures added


