Contribute
Register

An iDiot's Guide To Lilu and its Plug-ins

@Mrgeque,

No Problem ..... Glad it's working now ....


Yes thats completely normal .... By default MacOS scales HI-DPI screens to 1920x1080 to make the UI easer to read.
You can change the scaling size in System Prefs -> Displays :-

View attachment 400110
I have 4K screen on my 15" HP Spectre X360 laptop, and this is by far the best setting to use, Apps such as photoshop .. etc will still treat the display as 4K though so you still have lots of pixels to play with.

If you want to set the MacOS UI size by resolution then Option (⌥) click on "Scaled" to toggle the UI resolution selection between scaled and supported screen resolutions.

View attachment 400111
However 4K on an internal laptop screen is almost impossible to use unless you have superman's eye's :)

Cheers
Jay
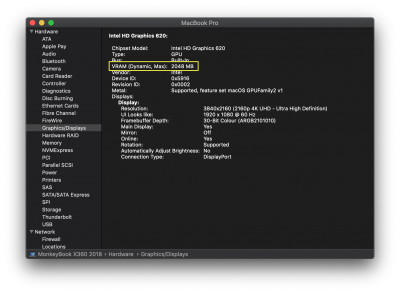
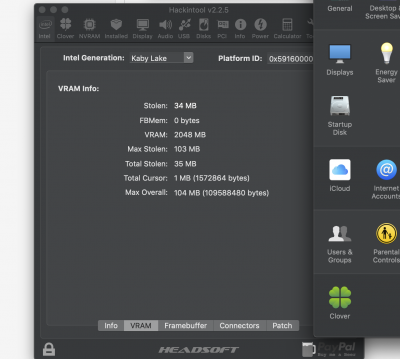
thanks @jaymonkey for your response, your insight, your help and whatever else I forgot to mention. last question; although I can boot my internal screen with 2048 mb vram, when I open Hackintool and click on vram it show fbmem at 0 bytes, is that an issue with the Hackintool? is it possible to have the 2048mb vram and 0 bytes fbmem? or should I not worry since IORegisteryExplorer shows fbmem as <00 00 90 00>?
 

Attachments

  • Screen Shot 2019-04-17 at 10.39.18 AM.png
    Screen Shot 2019-04-17 at 10.39.18 AM.png
    579.6 KB · Views: 195
last question; although I can boot my internal screen with 2048 mb vram, when I open Hackintool and click on vram it show fbmem at 0 bytes, is that an issue with the Hackintool? is it possible to have the 2048mb vram and 0 bytes fbmem? or should I not worry since IORegisteryExplorer shows fbmem as <00 00 90 00>?


@Mrgeque,

FBMem is different to VRAM .. don't get the two confused ... almost all Intel IGPU's don't use any FBMem (0 Bytes), the few that do only use a very small amount (normally around 21MB).

As long as System Information -> Graphics/Displays shows 2048 MB VRAM then the patch is working.

Screenshot 2019-04-17 at 22.11.28.png
MacOS allocates IGPU VRAM dynamically as its needed based on VRAM load, the figure listed in Sys Info shows the maximum available ... by default MacOS caps it at 1.5GB the patch increases the cap to 2GB which can help IGPU's driving 4K displays.

Cheers
Jay
 
Last edited:
@Mrgeque,

FBMem is different to VRAM .. don't get the two confused ... almost all Intel IGPU's don't use any FBMem (0 Bytes), those that do only use a very small amount (normally around 21MB).

As long as System Information -> Graphics/Displays shows 2048 MB VRAM then the patch is working.

View attachment 400160
MacOS allocates IGPU VRAM dynamically as its needed based on VRAM load, the figure listed in Sys Info shows the maximum available ... by default MacOS caps it at 1.5GB the patch increases the cap to 2GB which can help IGPU's driving 4K displays.

Cheers
Jay
THANKS @jaymonkey. thanks to your help, my HacBookPro4K is complete!!! by far you've proven to be knowledgeable, patient, and willing to help. I was so frustrated in the beginning even was suspended for 1 day, But thanks to your HELP I really mean HELP, I was able to work it out. Since I am new to this, its VERY USEFUL and helpful to have things explained in detail. You really looked out for me bro. and I really wanted to say THANKS:thumbup:
 
THANKS @jaymonkey. thanks to your help, my HacBookPro4K is complete!!! by far you've proven to be knowledgeable, patient, and willing to help. I was so frustrated in the beginning even was suspended for 1 day, But thanks to your HELP I really mean HELP, I was able to work it out. Since I am new to this, its VERY USEFUL and helpful to have things explained in detail. You really looked out for me bro. and I really wanted to say THANKS:thumbup:


@Mrgeque,

No problem thats what we do here at TMx86 .. we believe that its far better to explain things through guides and help so that you learn how to do things yourself rather then just doing the fix for you where you learn nothing.

Cheers
Jay
 
@Mrgeque,

No problem thats what we do here at TMx86 .. we believe that its far better to explain things through guides and help so that you learn how to do things yourself rather then just doing the fix for you where you learn nothing.

Cheers
Jay
reading some guides is almost like a foreign language to a noob. but your detailed descriptions not only fix the problem, but it helped me to learn something new. honestly, thanks bro @jaymonkey
 
When using shikigva=1 or shikigva=57 MacOS should automatically select the most appropriate hardware renderer to use based on the detected/configured hardware, in most instances this will be the Intel IGPU and you should not need to do anything else.
Thank you Jay for this useful thread
Please I don't understand this part ; Can you explain it please ?
In my case everything just working great ; I am connecting 4k monitor via RX 580 displayport and Hardware acceleration is working
My intel HD 530 showing vram 2048 and everything seems shown correcty in Hackintool
 
Last edited by a moderator:
Thank you Jay for this useful thread ... Please I don't understand this part ; Can you explain it please ? .... In my case everything just working great ; I am connecting 4k monitor via RX 580 displayport and Hardware acceleration is working ... My intel HD 530 showing vram 2048 and everything seems shown correcty in Hackintool
I need to get around to updating that part of the guide ... more recently MacOS and WEG will now favour a AMD GPU for DRM over a IGPU which is probably why things are working well for you ... so no need to play with any shiki settings.

Glad everything is working well for you.

Cheers
Jay
 
Hi ! I’m really a noob in hackintosh and I’ve been struggling with my post-installations. I’m trying to fix audio with rehabman’s guide but I don’t know what codec to use and how to properly do it so I desasemblied my Hp envy 13-ab022nf to know what motherboard is in it so I can know what codec to use but I don’t know where to look...
here is a picture of my laptop
Thanks for your help!
 

Attachments

  • EAB9D650-DABF-4D6C-992B-5FEDC8186BA6.jpeg
    EAB9D650-DABF-4D6C-992B-5FEDC8186BA6.jpeg
    3.4 MB · Views: 186
Hi ! I’m really a noob in hackintosh and I’ve been struggling with my post-installations. I’m trying to fix audio with rehabman’s guide but I don’t know what codec to use and how to properly do it so I desasemblied my Hp envy 13-ab022nf to know what motherboard is in it so I can know what codec to use but I don’t know where to look...


@yaminebens,

There is no need to disassemble your laptop to find out what codec it has ....

The traditional way to find out what codec you have is to do a codec dump from linux.
You can use any linux distro you like (I use) Linux Mint ...

Create a bootable linux live USB and once at the Linux desktop open a terminal session, execute the command :-

Code:
cd ~ / Desktop && mkdir CodecDump && for c in / proc / asound / card * / codec # *; do f = "$ {c / \ / * card / card}"; cat "$ c"> CodecDump / $ {f // \ // -}. txt; done && zip -r CodecDump.zip CodecDump


Just copy and paste the entire command in to the linux terminal and hit enter.

It will create a folder on the desktop called CodecDump and within that folder will be a few .txt files, copy the folder to a device you can read in MacOS. Then quit linux and boot back into MacOS.

Once in macOS open the .txt files you created in Linux ... at the very top of each file will be the codec type. Depending on your system you may have more than one codec usually there is one for the on board codec and one for the HDMI codec.

Once you know what type of codec you have you can use the AppleALC section of the guide in post #1 to check that AppleALC supports your codec and if it does how to install and configure it.

Alternatively you can use Clover to do a codec dump as long as you have Clover r4887 or later installed and you have the efi driver AudioDxe-64.efi installed in /EFI/Clover/drivers64UEFI .. in this case you can just press F8 at the Clover menu, then boot to MacOS, mount your EFI Partition and look in /EFI/Clover/Misc for the codec dump txt files .. the name of the codec will be in the file name.

Cheers
Jay
 
Last edited:
@yaminebens,

There is no need to disassemble your laptop to find out what codec it has ....

The traditional way to find out what codec you have is to do a codec dump from linux.
You can use any linux distro you like (I use) Linux Mint ...

Create a bootable linux live USB and once at the Linux desktop open a terminal session, execute the command :-

Code:
cd ~ / Desktop && mkdir CodecDump && for c in / proc / asound / card * / codec # *; do f = "$ {c / \ / * card / card}"; cat "$ c"> CodecDump / $ {f // \ // -}. txt; done && zip -r CodecDump.zip CodecDump


Just copy and paste the entire command in to the linux terminal and hit enter.

It will create a folder on the desktop called CodecDump and within that folder will be a few .txt files, copy the folder to a device you can read in MacOS. Then quit linux and boot back into MacOS.

Once in macOS open the .txt files you created in Linux ... at the very top of each file will be the codec type. Depending on your system you may have more than one codec usually there is one for the on board codec and one for the HDMI codec.

Once you know what type of codec you have you can use the AppleALC section of the guide in post #1 to check that AppleALC supports your codec and if it does how to install and configure it.

Alternatively you can use Clover to do a codec dump as long as you have Clover r4887 or later installed and you have the efi driver AudioDxe-64.efi installed in /EFI/Clover/drivers64UEFI .. in this case you can just press F8 at the Clover menu, then boot to MacOS, mount your EFI Partition and look in /EFI/Clover/Misc for the codec dump txt files .. the name of the codec will be in the file name.

Cheers
Jay
You’re a day saver !! Thank you so much, I’ll try it and update on my success I hope lol
One more question, I can’t get the battery indicator to work, I’ve tried every YouTube tutorial but none had work for me. The best I could get is 0%... I’m lost...

Thanks for your time
 
Back
Top