
P1LGRIM
Moderator
- Joined
- Mar 2, 2012
- Messages
- 26,461
- Motherboard
- Lenovo ThinkStation p700
- CPU
- 2x E5-2620 V3
- Graphics
- RX 560
- Mac
- Classic Mac
- Mobile Phone

It is acknowledged that it will not work in all cases but should hopefully assist many people if only by giving an understanding of the processes involved to enable iMessage.
This is not intended as a help thread, requests for help will be deemed off-topic and removed.
For help with iMessage refer to the comprehensive How to Fix iMessage Guide thread.
**************************************************************************
The TLDR checklist :
An Apple ID
Functional NVRAM - Native or emulated
A functioning Ethernet connection defined as en0 and Builtin
Internet access
A unique and correctly formatted Serial Number
A correctly formatted Board Serial Number (MLB)
A correctly formatted ROM value - Usually the MAC address of your Ethernet connection
A correctly formatted SmUUID
**************************************************************************
Links to all of the referenced files are at the end of this first post.
Despite them being at the end of the instructions, now is a good time to download them.
If you have tried and failed previously then there are some steps to take before you start again.
Open Safari and log in to iCloud.com
Click on Find iPhone
Click the down arrow next to All Devices
If there are spurious devices in the list from previous failed attempts click each one and Remove from Account.
You should also remove any unwanted devices from your Apple ID through the link on the iCloud page,
or by directly logging in to your Apple ID page.
Sign Out of iCloud.com
Note for Catalina : Click on > System Preferences. Click on Apple ID ( iCloud icon as an option is no longer available in macOS Catalina) Click on Overview on the left panel. Click on 'Signout' at the bottom to log out of your Apple ID and iCloud.
Close Safari
Open System Preferences - iCloud : Click Sign Out
Disconnect from the network then Restart
Open a Finder window and click on your User Name then in a blank area right click and select
Show View Options and from the resulting window select Show Library Folder.
Open the newly revealed Library folder and select Caches
From the Caches folder delete all files and folders beginning with :
- com.apple.iCloudHelper
- com.apple.imfoundation.IMRemoteURLConnectionAgent
- com.apple.Message
- com.apple.iChat.
- com.apple.icloud.
- com.apple.ids.service
- com.apple.imagent.
- com.apple.imessage.
- com.apple.imservice.
**************************************************************************
Start here
It has been said that you must have a credit card registered with your AppleID in order to use iMessage,
I can neither confirm or deny this as I have never tried it without.
Edit : Replies to this guide have confirmed that a registered credit card is not required.

You must have a working Ethernet connection which is defined as BuiltIn and en0.
An easy way to determine this is with the DPCIManager app.
Note: Since publication some users have reported that DPCIManager is detected as Malware because of the way that it probes your system in order to determine your hardware configuration. The warning is a false positive and may be ignored.
It is possible to connect with a Wireless adaptor but you must have working Ethernet which is BuiltIn and en0 too.
This is the most basic fundamental and the one that is overlooked most by laptop users although it is equally valid for desktop users too. The exception to this is when you have a machine that does not have Ethernet, in this case it is acceptable (with the appropriate SMBIOS) to have the Wireless adaptor as en0 but it must be identified as BuiltIn too.
If your Ethernet interface is identified as anything other than en0 you may need to reset your network configuration files.
Open Finder and browse to /Library/Preferences/SystemConfiguration/ then delete these two files :
- NetworkInterfaces.plist
- preferences.plist
You may then have to add your Ethernet connection in System Preferences -> Network.
The next requirement is a correctly configured SMBIOS.
In the interests of simplicity the examples shown will use the Clover Configurator app but it should be noted that this is not the only (or best) way to achieve the required result.
What is certain is that if you are not familiar with the construction of xml files you should never edit your config.plist file with a text editor as this can corrupt the formatting. A corrupt config.plist is the same as having no config.plist at all.
You should already have determined the optimum System Definition for your hardware.
If you subsequently change your System Definition you must run through the procedure detailed in this guide again.
Before starting to configure for iMessage you should ensure that your config.plist is otherwise correctly set up for your specific hardware.
The following examples refer only to changes required to your existing config.plist.
It is not suggested that anything not shown in the examples should be removed from your own config.plist unless specifically mentioned.
If you haven't already done so, install Clover Configurator to your /Applications folder.

From the /Applications folder run Clover Configurator
Mount the EFI partition
Then File - Open - /EFI/CLOVER/config.plist

In the left pane select Rt Variables
From the ROM dropdown list select UseMacAddr0
Make sure that the MLB box is empty
Set BooterConfig to 0x28
Set CsrActiveConfig to 0x67

In the left pane select SMBIOS
Click the Up/Down selector.

Choose your intended System Definition from the list.
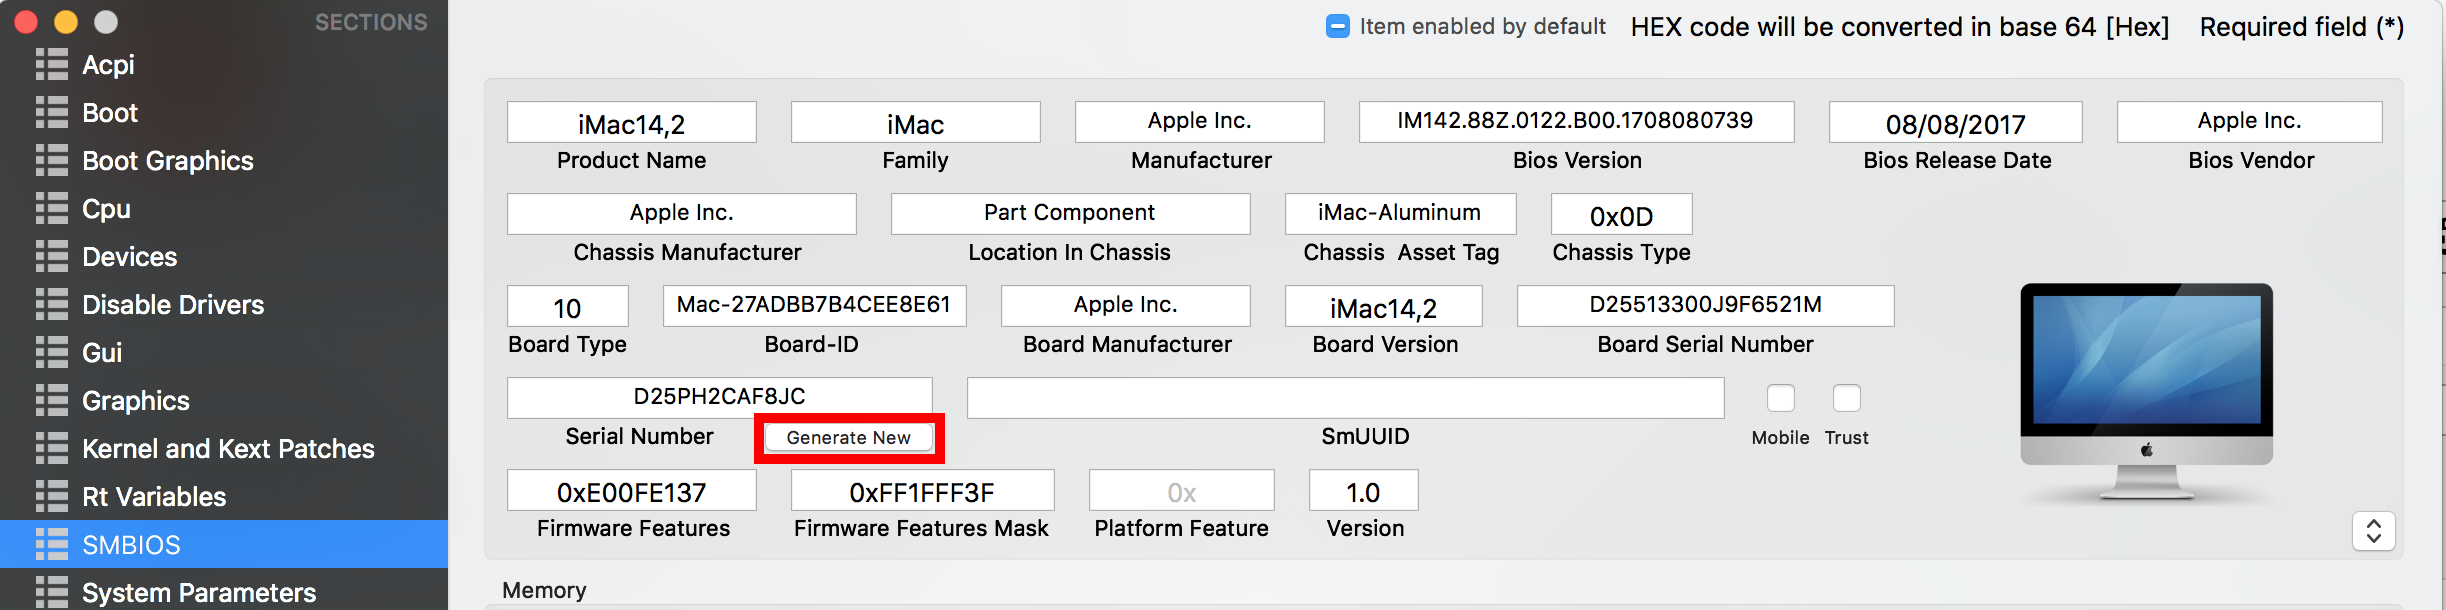
Click the Generate New button several times to generate a Serial Number and Board Serial Number.
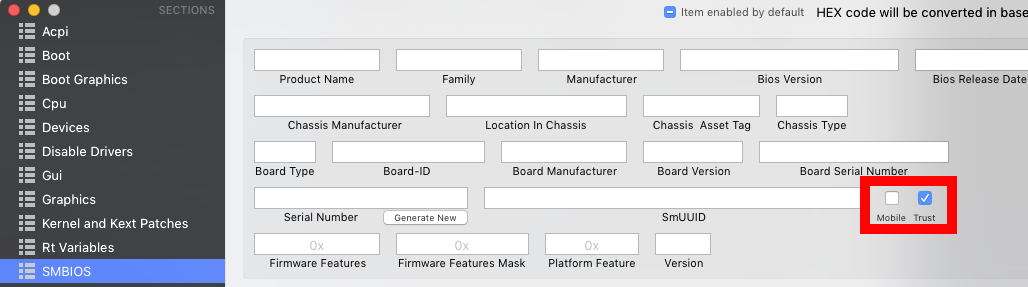
At this point I recommend that you select Trust.
Mobile appears to be selected by default and you should deselect it if you do not have a Laptop.
Note : If you are using the very latest system definition before it is possible to verify on everymac.com
try on appleserialnumberinfo.com instead.
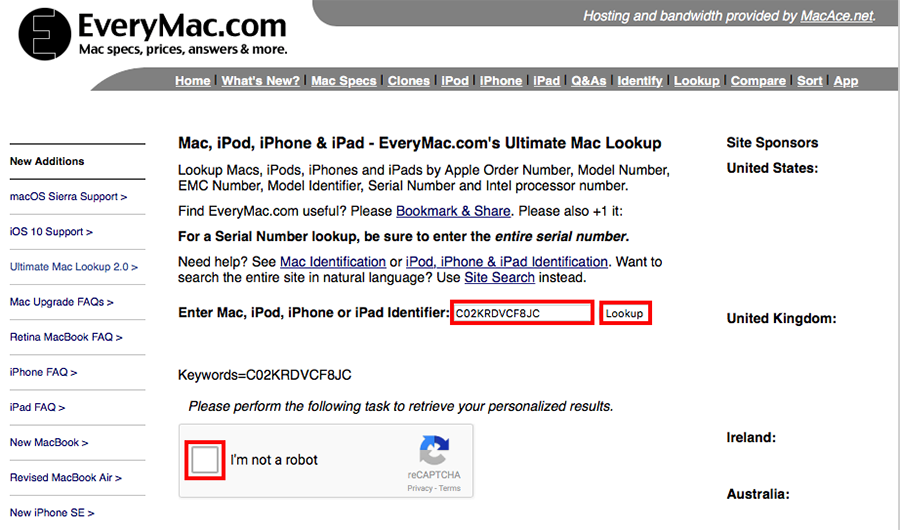
Copy the Serial Number and check it on http://www.everymac.com/ultimate-mac-lookup/
Paste the Serial Number into the box and click Lookup
Prove that you are not a robot
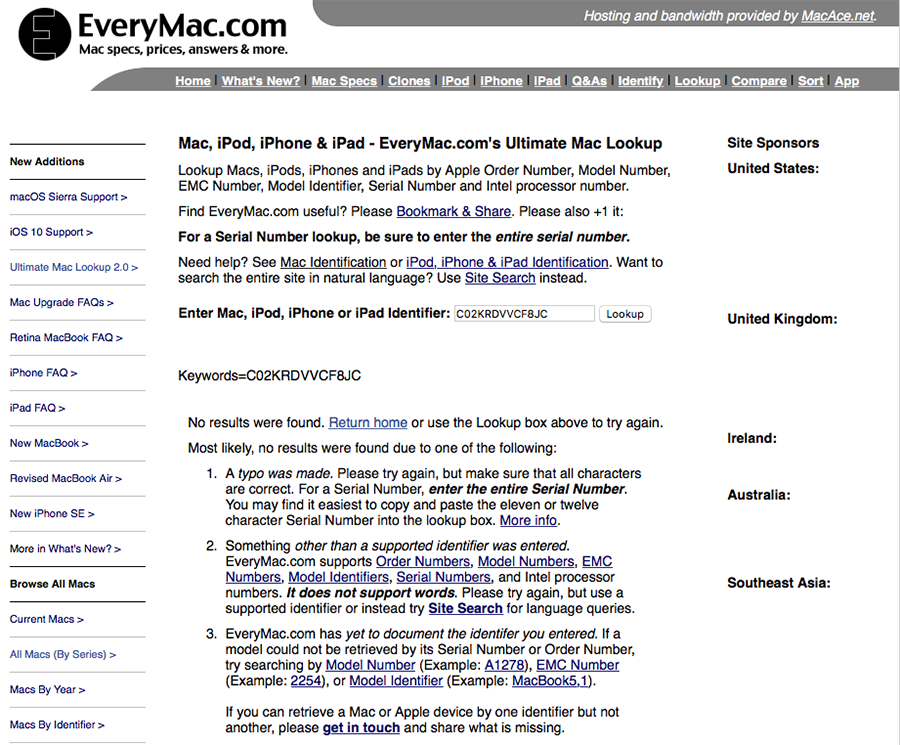
If you see this response your serial number is invalid - Go back to Clover Configurator and generate another one.
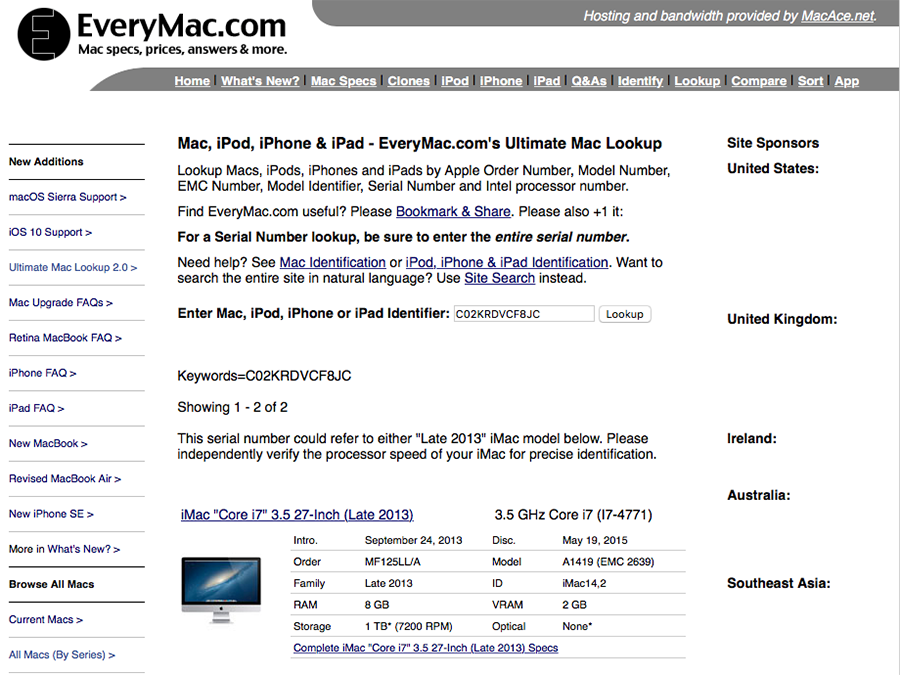
If you see a response similar to this it means that you have generated a serial number in a recognisable format and it is ok to proceed to the next stage.
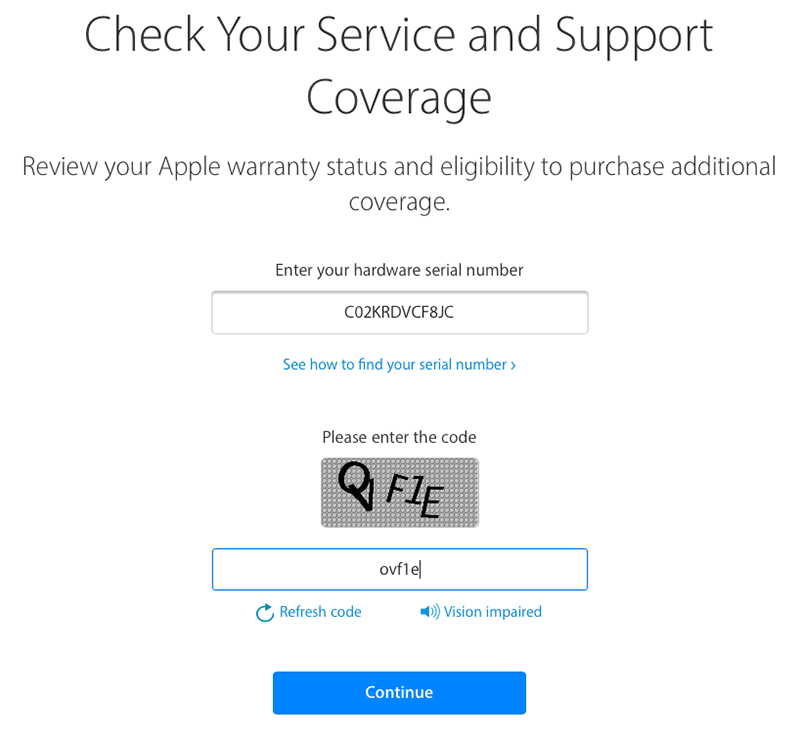
Open the https://checkcoverage.apple.com site and paste your Serial Number into the box
Enter the required code and click Continue

This is the part of the process which confuses people the most so pay particular attention :
If you see the message "Your Service and Support Coverage" and a picture of a computer
then you have generated the Serial Number of a computer that is already recorded in Apple's database.
Do not use this Serial Number - Go back to Clover Configurator and generate a new one.
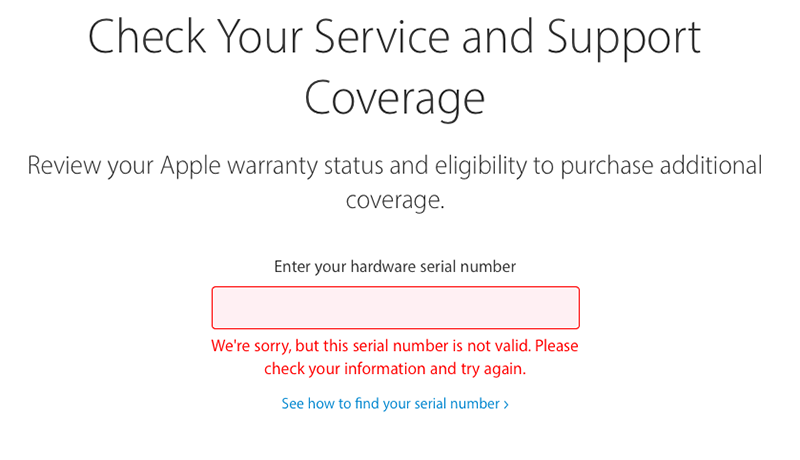
If you see the message "We're sorry, but this serial number is not valid. Please check your information and try again" and the Serial Number has passed verification at everymac.com then it is OK to use this Serial Number for your config.plist.
This is so important that it is worth repeating :
You need a Serial Number that everymac.com confirms is in the correct format and that Apple says is not valid.
It does not mean that it is not a valid Serial Number - It means that it is not already registered.
Quit Safari


Clover Configurator is now able to generate SmUUID numbers for you :

Click the Generate New button as many times as you like until you have an SmUUID number that meets with your approval.
In Clover Configurator select File - Save
Quit Clover Configurator.
Restart
Open a Finder window, browse to the location where you downloaded iMessageDebug and run it.
Press y and Return to save a copy called iMessageDebug.txt.
Restart
Open a Finder window and browse to the location where you downloaded iMessageDebug and run it.
Compare the output with the saved copy.
If the two copies are the same you may reconnect to the network and proceed to set up iMessage.
The last line in the output of iMessageDebug is subject to change but does not appear to be a cause for concern.
It is important that your system should have support for NVRAM. If your system does not have native support for NVRAM then you should emulate it by the installation of EmuVariableUefi-64 and RC Scripts with the Clover installer. This seems to particularly apply to those with Gigabyte 100/200/300 series motherboards but others are similarly afflicted. Instructions for testing NVRAM are here.

Most people only need :
ApfsDriverLoader-64.efi (or apfs.efi)
AptioMemoryFix-64.efi
FSInject-64.efi
HFSPlus.efi (or vboxhfs-64-efi)
so make sure that you have these four at least.
**************************************************************************
The examples shown are for the Clover boot loader that has been installed in UEFI mode.
If you have installed Clover in Legacy mode then the procedure is the same except that your config.plist
is located in the /EFI/CLOVER folder on your System disk.
This is not intended as a help thread, requests for help will be deemed off-topic and removed.
For help with iMessage refer to the comprehensive How to Fix iMessage Guide thread.
**************************************************************************
Clover Configurator - iMessageDebugv2 - DPCIManager
Last edited:
")