- Joined
- May 16, 2010
- Messages
- 272
- Motherboard
- Gigabyte Z370-HD3
- CPU
- i5-8600K
- Graphics
- RX 580
- Mac
- Mobile Phone
[Success] Agrajag's Z97M-D3H i5-4690K Build
Components
GIGABYTE GA-Z97M-D3H LGA 1150 Z97 Micro ATX Intel Motherboard
http://www.amazon.com/GIGABYTE-GA-Z97M-D3H-CrossFireX-Motherboard-Gigabyte/dp/B00KG5SZZ6
Intel Core i5-4690K Haswell Refresh LGA 1150 Quad-Core Processor
http://www.amazon.com/Intel-Core-i5-4690K-Processor-BX80646I54690K/dp/B00KPRWB9G
Mushkin Essentials 8GB 2X4GB DDR3-1600 PC3-12800 11-11-11-28 Desktop Memory
Crucial MX100 256GB SSD SATA 6Gb/s 2.5" Internal Drive
http://www.amazon.com/Crucial-MX100-adapter-Internal-CT256MX100SSD1/dp/B00KFAGCWK
Arctic Freezer 7 Pro (Rev. 2) CPU Cooler
http://www.amazon.com/ARCTIC-Freezer-Pro-Rev-Multicompatible/dp/B002G392ZI
Already Owned
Asus GeForce GTX 650Ti 1GB GDDR5 Video Card
http://www.amazon.com/Graphics-NVIDIA-Surround-Technology-GTX650TI-O-1GD5/dp/B00A16SDA2
LG GH22NS50 SATA DVD/CD Drive
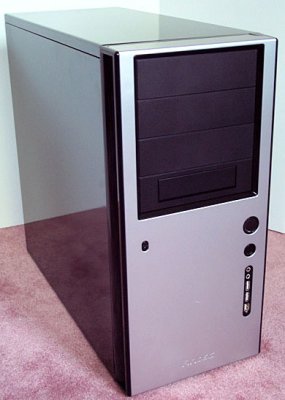
Antec Sonata Solo (Version 1) ATX Mini-Tower Case
http://www.amazon.com/Antec-Sonata-Quiet-Tower-without/dp/B000GQMHAY
OCZ Fatal1ty 550W Modular Power Supply
http://www.amazon.com/FirePower-Fatal1ty-Modular-FTY550W-formerly/dp/B00FIYI42Y
Dell Ultrasharp U2412M 24-inch (1920x1200) Monitor
http://www.amazon.com/Dell-UltraSharp-24-Inch-LED-lit-Monitor/dp/B005JN9310
Sun Type 6 USB Keyboard
http://www.amazon.com/Sun-UNIX-Type-6-Keyboard-320-1273/dp/B000MMZW36
Apple Magic Trackpad
http://www.amazon.com/Apple-MC380LL-A-Magic-Trackpad/dp/B003XIJ3MW
Rocketfish Bluetooth USB Adapter
Comments
I have built quite a few hacks- basically a new one every 2nd generation of boards (P35, P55, Z77), so it seemed time to try a new build. The Z97M motherboard has really everything I needed, and the Gigabyte boards have always been easy to use in a hack as long as you pick the right one. This time I decomissioned my P55M-UD2 build, so re-used the case, power supply and optical drive, as well as the externals. The ATX mini-tower case is pretty quiet, and though it is quite a bit larger than needed, it does make fiddling with the internals not so cramped.
The major innovation was to build the system based on an SSD main drive as a means to increase performance. Even after 2 generations of CPUs, raw CPU power is really only maybe 5% better than my existing i5-3570K build. Using an SSD is possible now as much of my storage is now hived off onto the Synology NAS (basically all video plus archived large files such as my OS X installers back to Lion). The Z77 system still has the GTX 660 graphics, as my son likes video games.
The motherboard I used is in the Buyers Guide but there seem to be quite a few messages from people having problems with the Z97 boards. To see for myself, I decided to start with a fresh build, so started from scratch using UniBeast 4.0.2, MultiBeast 6.5.0 and Mavericks. I built the UniBeast installer on an 8GB USB stick on my existing hack.
I left out the GTX 650Ti for the initial install and booted first using the internal graphics via DVI. On the first boot I hit <DEL> and adjusted the BIOS settings (F4 BIOS came on the mobo), setting the USB EHCI and XHCI to "Auto" (not sure if this matters) and disabling VT-d. I had not seem much written about what BIOS settings were best for these Z97 boards, so I did not fuss too much with it.
Following the Installation Guide and booting from the USB worked first time, and I used Disk Utility to reformat the SSD which then allowed me to install Mavericks.
Rebooting led to a bit of a problem as the USB Drive was not found automatically- I had to hit <F12> to get the boot drive selector that let me get going, so I could run MultiBeast to install the drivers. I got an error on first trying to install the drivers, since the kexts are not "signed". This fix was to exit MultiBeast, and under System Preferences–>Security & Privacy, change the setting to "Allow apps downloaded from:" to "Anywhere". Then installing the drivers with MultiBeast went smoothly.
MultiBeast Configuration for Mavericks
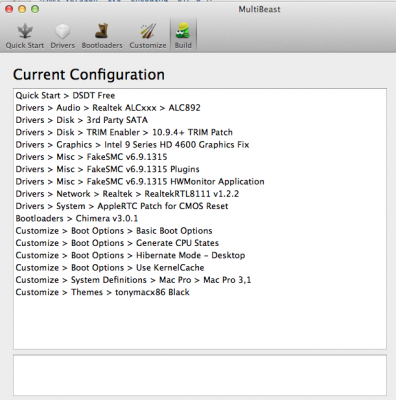
After rebooting and pulling the USB stick out, I got the infamous "Boot0" error. The fix was just the usual one as mentioned in the main thread here: (Boot0 Error Official Guide)- I used the Unibeast + Terminal command method, which worked first time around. After rebooting yet again, all was well.
Current boot.plist Settings
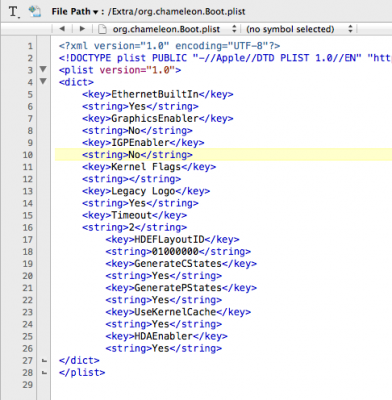
As soon as the system seemed to be booting reliably I updated Mavericks to the current version (10.9.5) using the Software Update. It rebooted fine, and after re-installing the audio driver using MultiBeats (ALC892) and another reboot, all seemed well. At this point I put back in the GTX 650Ti graphics card, and boot into the BIOS to disable the internal graphics (might want to change this if I want to enable AirPlay) and set the PCI graphics as primary.
The system seems to wake from sleep fine- quite quickly really (a few seconds), only occasionally needing to turn the monitor off and on again to re-establish video (get snow display sometimes). Boot times are super quick. The only real pain is that after a reboot, the Bluetooth USB seems to not be ready for some time (possibly 30s or so) after reaching the Desktop. So far I can't see why it takes so long for that to get going and the Console logs haven't led anywhere yet.
Since this is intended to be the next working system for me, I will probably install Yosemite as soon as the release version is available. I don't have much "real work" stuff installed, so can still muck around with this system before I need to make sure it is long-term stable.
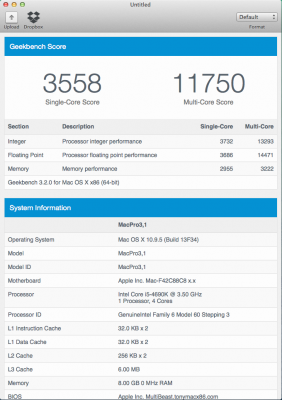
The benchmarks are nothing to be too excited about- not much beyond my older i5 3570K build. I have not yet tried OC'ing the system yet- hopefully that will give some more gains without other issues.
GeekBench 3 (32 bit)
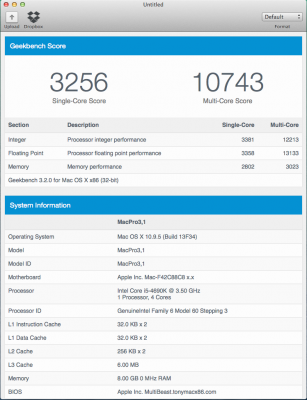
GeekBench 3 (64 bit)
In summary, I found this Z97 system and install to be pretty straightforward using the MultiBeast/Chimera methods. Basically everything needed works well (wired LAN networking, Sound, Bluetooth, Video, Wake from sleep).
Agrajag's Z97 Build: i5-4690K - GA-Z97M-D3H - 8GB RAM - GTX 650 Ti
Components
GIGABYTE GA-Z97M-D3H LGA 1150 Z97 Micro ATX Intel Motherboard
http://www.amazon.com/GIGABYTE-GA-Z97M-D3H-CrossFireX-Motherboard-Gigabyte/dp/B00KG5SZZ6
Intel Core i5-4690K Haswell Refresh LGA 1150 Quad-Core Processor
http://www.amazon.com/Intel-Core-i5-4690K-Processor-BX80646I54690K/dp/B00KPRWB9G
Mushkin Essentials 8GB 2X4GB DDR3-1600 PC3-12800 11-11-11-28 Desktop Memory
Crucial MX100 256GB SSD SATA 6Gb/s 2.5" Internal Drive
http://www.amazon.com/Crucial-MX100-adapter-Internal-CT256MX100SSD1/dp/B00KFAGCWK
Arctic Freezer 7 Pro (Rev. 2) CPU Cooler
http://www.amazon.com/ARCTIC-Freezer-Pro-Rev-Multicompatible/dp/B002G392ZI
Already Owned
Asus GeForce GTX 650Ti 1GB GDDR5 Video Card
http://www.amazon.com/Graphics-NVIDIA-Surround-Technology-GTX650TI-O-1GD5/dp/B00A16SDA2
LG GH22NS50 SATA DVD/CD Drive
Antec Sonata Solo (Version 1) ATX Mini-Tower Case
http://www.amazon.com/Antec-Sonata-Quiet-Tower-without/dp/B000GQMHAY
OCZ Fatal1ty 550W Modular Power Supply
http://www.amazon.com/FirePower-Fatal1ty-Modular-FTY550W-formerly/dp/B00FIYI42Y
Dell Ultrasharp U2412M 24-inch (1920x1200) Monitor
http://www.amazon.com/Dell-UltraSharp-24-Inch-LED-lit-Monitor/dp/B005JN9310
Sun Type 6 USB Keyboard
http://www.amazon.com/Sun-UNIX-Type-6-Keyboard-320-1273/dp/B000MMZW36
Apple Magic Trackpad
http://www.amazon.com/Apple-MC380LL-A-Magic-Trackpad/dp/B003XIJ3MW
Rocketfish Bluetooth USB Adapter
Comments
I have built quite a few hacks- basically a new one every 2nd generation of boards (P35, P55, Z77), so it seemed time to try a new build. The Z97M motherboard has really everything I needed, and the Gigabyte boards have always been easy to use in a hack as long as you pick the right one. This time I decomissioned my P55M-UD2 build, so re-used the case, power supply and optical drive, as well as the externals. The ATX mini-tower case is pretty quiet, and though it is quite a bit larger than needed, it does make fiddling with the internals not so cramped.
The major innovation was to build the system based on an SSD main drive as a means to increase performance. Even after 2 generations of CPUs, raw CPU power is really only maybe 5% better than my existing i5-3570K build. Using an SSD is possible now as much of my storage is now hived off onto the Synology NAS (basically all video plus archived large files such as my OS X installers back to Lion). The Z77 system still has the GTX 660 graphics, as my son likes video games.
The motherboard I used is in the Buyers Guide but there seem to be quite a few messages from people having problems with the Z97 boards. To see for myself, I decided to start with a fresh build, so started from scratch using UniBeast 4.0.2, MultiBeast 6.5.0 and Mavericks. I built the UniBeast installer on an 8GB USB stick on my existing hack.
I left out the GTX 650Ti for the initial install and booted first using the internal graphics via DVI. On the first boot I hit <DEL> and adjusted the BIOS settings (F4 BIOS came on the mobo), setting the USB EHCI and XHCI to "Auto" (not sure if this matters) and disabling VT-d. I had not seem much written about what BIOS settings were best for these Z97 boards, so I did not fuss too much with it.
Following the Installation Guide and booting from the USB worked first time, and I used Disk Utility to reformat the SSD which then allowed me to install Mavericks.
Rebooting led to a bit of a problem as the USB Drive was not found automatically- I had to hit <F12> to get the boot drive selector that let me get going, so I could run MultiBeast to install the drivers. I got an error on first trying to install the drivers, since the kexts are not "signed". This fix was to exit MultiBeast, and under System Preferences–>Security & Privacy, change the setting to "Allow apps downloaded from:" to "Anywhere". Then installing the drivers with MultiBeast went smoothly.
MultiBeast Configuration for Mavericks

After rebooting and pulling the USB stick out, I got the infamous "Boot0" error. The fix was just the usual one as mentioned in the main thread here: (Boot0 Error Official Guide)- I used the Unibeast + Terminal command method, which worked first time around. After rebooting yet again, all was well.
Current boot.plist Settings

As soon as the system seemed to be booting reliably I updated Mavericks to the current version (10.9.5) using the Software Update. It rebooted fine, and after re-installing the audio driver using MultiBeats (ALC892) and another reboot, all seemed well. At this point I put back in the GTX 650Ti graphics card, and boot into the BIOS to disable the internal graphics (might want to change this if I want to enable AirPlay) and set the PCI graphics as primary.
The system seems to wake from sleep fine- quite quickly really (a few seconds), only occasionally needing to turn the monitor off and on again to re-establish video (get snow display sometimes). Boot times are super quick. The only real pain is that after a reboot, the Bluetooth USB seems to not be ready for some time (possibly 30s or so) after reaching the Desktop. So far I can't see why it takes so long for that to get going and the Console logs haven't led anywhere yet.
Since this is intended to be the next working system for me, I will probably install Yosemite as soon as the release version is available. I don't have much "real work" stuff installed, so can still muck around with this system before I need to make sure it is long-term stable.
The benchmarks are nothing to be too excited about- not much beyond my older i5 3570K build. I have not yet tried OC'ing the system yet- hopefully that will give some more gains without other issues.
GeekBench 3 (32 bit)

GeekBench 3 (64 bit)

In summary, I found this Z97 system and install to be pretty straightforward using the MultiBeast/Chimera methods. Basically everything needed works well (wired LAN networking, Sound, Bluetooth, Video, Wake from sleep).

