If the prospect of reading through complex guidance to configure your USB ports gives you the heebie-jeebies then this guide is for you.
We’ve pared it to the bone, researched the facts and tried to present them in a way that makes this complex subject easier to understand for someone just starting-out.
We’ve added plenty of illustrations so you can see what we're talking about. These are from a working machine and relevant to most modern builds.
Before the main part of this tutorial, let’s fill-in some background.
When macOS boots on a PC it sets-up the hardware as well as it can, with absolutely no knowledge of the platform we are actually using. The interface that connects the USB sockets on a PC motherboard to everything else is called a
controller and it comes in a several varieties, but macOS only supports a couple, so let’s begin there.
You’ve probably heard of
XHC, it’s an acronym for "e
Xtensible
Host
Controller" and is the most recent version. It’s also one Apple uses. In most PC BIOSs it’s referred to as
XHCI and can be Enabled or Disabled from the BIOS menus. When we convert a PC into a Mac we have to make sure this hardware is presented to macOS in a form it recognises and can operate with.
This
XHC controller might appear as something else and if it does we need to
rename it so the system recognises it correctly. Similarly, older
EHCI controllers may need
renaming too and for this there are a few alternatives. Don’t worry though, we’ll list them below and show you how to do the job easily.
With that out of the way we then need to tell macOS what
type of port each one is. Remember there are two main types - USB 3.0/3.1 or USB 2.0. Where is each located? On the back-panel or on the motherboard as a header?
In their wisdom Apple have imposed a 15-port maximum for the number of USB ports macOS will operate with, so if our PC has more we will need to either hide or exclude some during the boot process.
Finally, when this has been done we have to put everything into a configuration file
Clover can use to set things up when our PC boots.
The advantages of bothering to create an SSDT for your USB ports are many-fold:
They will be recognised properly by the system and operate at the correct speed. Power-management will be enabled and any devices plugged-in will mount and eject properly. What’s more you will minimise the risk of system crashes and data loss. As a bonus, knowing you have mastered this once daunting prospect will give you a warm, fuzzy feeling inside.
The old ‘cheat’ of removing the 15-port limit with a patch, and letting USB run free is not advisable for long term use. Doing so makes macOS see USB ports outside of it’s built-in ‘bounds’, potentially disastrous for system stability. However the patch is needed initially while we get things configured.
You'll be glad to know this process is a one-off and won’t need repeating while using the the same motherboard.
Okay, let’s get going:
Here are the files you will need to download:
IORegistryExplorer - The system hardware inspector:
https://www.tonymacx86.com/threads/guide-how-to-make-a-copy-of-ioreg.58368/post-374543
MaciASL - A ‘compiler’ that creates the definition file we need. There are two versions commonly available:
Rehabman's Version RM-1.31:
https://bitbucket.org/RehabMan/os-x-maciasl-patchmatic/downloads/
or
The older, original Version 1.4:
https://sourceforge.net/projects/maciasl/
Clover Configurator - A visual editor for our
config.plist file:
In the Tonymacx86 Download section
KextBeast - A utility to install a kext in the correct location and in the correct way:
In the Tonymacx86 Download section
USBInjectAll.kext - The necessary kext or driver to make all our motherboard USB ports available:
https://bitbucket.org/RehabMan/os-x-usb-inject-all/downloads/
More necessary kexts if an EHCI controller is present:
FakePCIID.kext &
FakePCIID_XHCIMux.kext
https://bitbucket.org/RehabMan/os-x-fake-pci-id/downloads/
SSDT-USB-Template.dsl - The template we are going to use to include details of our USB ports and how
Clover should set them up:
https://www.tonymacx86.com/attachments/ssdt-usb-template-dsl.163422/
Step 1 - let’s make all our USB ports available to work with:
Install
USBInjectAll.kext in your
Library/Extensions folder using
KextBeast.
Install the
Port-Limit Removal Patch in your
config.plist using
MultiBeast (Under the ‘Drivers’ tab and ‘USB’ section). For later versions of macOS including
Mojave remember to use the
latest version of
MultiBeast 11.
There has also been a new port-limit removal patch created for
Mojave 10.14.4 and it
can be found here.
** EDIT 1: This latest Mojave patch is now included in MultiBeast 11.2.1.
** EDIT 2: It has come to my attention that the latest High Sierra port-limit removal patch
will not work for version 10.13.6 WITH the *2019-002* April 2019 Security Update (17G6030).
Useful Fact No. 1
As hinted at in the introduction, we have two ways to ensure macOS only sees 15 ports at most:
Option 1) We can choose
only to configure the ports we intend to use in our USB_SSDT - the chosen method for this tutorial - or
Option 2) Configure them
all but
exclude certain ones during startup with ‘-uia’ boot-commands.
As a beginner choosing the best method isn’t easy. More research might help you understand the advantages of one over the other and there are links at the end of this tutorial.
However, in truth,
either method is preferred over doing
nothing. We chose
Option 1) as it is easiest to get started with.
Step 2 - Check if we need to do that rename thing:
Run the
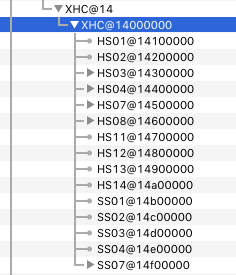
IORegistryExplorer utility and scroll down the left hand column about three-quarters of the way looking for a heading -
XHC, EHC, EUSB or maybe
USBE. It’s easy to spot because underneath it will be a set of HS**@ labels followed by numbers. Yours will probably look slightly different to the image below, and depends on your motherboard, but don’t worry, that’s one of the reasons we’re doing this job in the first place. This shows
all ports made visible by the Port-Limit Removal Patch:
Useful Fact No. 2
The HS ports you see are USB 2.0 ones and SS ports are USB 3.0/3.1. At the time of writing the majority of Intel chipsets in use support
USB 3.1 up to
Gen 1, the
1st Generation of this advanced port. Any
USB 3.1 Gen 2 ports you have will be catered-for by a third-party chip which is not covered by this guide.
However, if you have a sparkly-new Z390 motherboard, the latest at the time of writing, you will find your USB 3.1 Gen 2 ports are indeed included.
Step 3 - Renaming:
If the heading we’ve highlighted above is anything other than
XHC we will need to
rename it. We can do this using
Clover Configurator by adding a ‘patch’ to our
config.plist. We do this by selecting
‘Mount EFI’ in the left-hand column under the
‘Tools’ menu to open it for editing. Then we get creative.
Here’s a screenshot showing all the steps we talk about:
Once your
config.plist is loaded choose the top-left option
Acpi .
For
XHC1 to XHC renaming press the ‘
+’ button at the bottom-right of the
DSDT Patches panel add an entry:
Comment: “Change XHC1 to XHC_” Find*: “58484331” Replace: “5848435f”
Take a look:
Then
Save,
Exit and
Reboot.
For those older controllers we mentioned, and
EHCI is the most common, you can see some pre-made options in the
Clover Configurator pull down patches menu to save you the hassle of editing them manually. You will need to add
two EH renames -
EHC1 and
EHC2.
In addition
EHCI controllers need two extra kexts. Install them with KextBeast -
FakePCIID.kext &
FakePCIID_XHCIMux.kext . This is because as an older controller it needs help communicating with the latest macOS.
Useful Fact No. 3
Because each USB 3.0 port can accept both USB 3.0
and USB 2.0 devices, we need to set aside two
virtual ports for each
physical port - an HS** and an SS**. So if your motherboard has 5x USB 3.0 ports we actually need to configure 10x ports, five of each. When you add these to any USB 2.0-only ports you might have, it's easy to see how the total might exceed that arbitrary limit of 15.
Step 4 - The Boring part
This part is not difficult, just a wee-bit repetitive. We need to check each
physical port using a USB flash-drive to check where it appears on our
IOregistryExplorer ‘tree’. Some people will tell you it needs to be done twice, once with a USB 2.0 drive and again with a USB 3.0, however we can make this easier for you. There is a common link between the two types and I’ll explain what it is below.
Open
IORegistryExplorer again and scroll down to the
XHC or
EH01/2 section we looked at (and possibly
renamed) earlier, insert the flash-drive and watch what happens.
Hopefully you will see it appear somewhere on the ‘tree’. Make a note of the HS/SS label it appears under and where it is on your PC. Wait a few seconds for the system to settle down, Spotlight will be indexing the drive and you don’t want to corrupt it, then Eject the drive and repeat the process for your remaining USB ports.
Once the job is done you will have a ‘map’ of all your ports and their labels. Here is ours for example:
Impressed? No, thought not. It’s a bit rough, but we weren’t expecting anyone else to see it …
Okay, Let's try and be more professional instead. How about these -
The back-panel:
The Motherboard:
Our motherboard has a total of 22-ports and all available ones are labelled. The keen-eyed among you will notice that the HS10/SS10 port is not present. We’re still looking for it. If you find it under your office chair please let us have it back…
Now at this point the decision we made earlier becomes more relevant. Remember for this guide we are keeping it short and going for Option 1), the limited configuration.
Take a look at this later version of the above graphic. We’ve made
some decisions on which ports to keep and which to ignore:
If you count the total you’ll see there are
still 18. So we need to remove another 3. After careful thought it was decided to configure the USB-C port as
only SS or USB 3.0, and the two ports underneath the PS/2 socket, where our keyboard is permanently plugged-in, as HS-only USB 2.0 ports.
The new total reaches 15. Job done.
Step 5 - Completing The Template
We now need to transfer all our data into a compiled
template Clover can use to set-up our ports every time the system boots.
Load the
MaciASL utility, go to the ‘Preferences’ menu and choose the ‘iASL’ option to check that saving as ACPI Specification 6.2a is the one highlighted (5.1 if you downloaded the earlier version):
Next Open the
SSDT-USB-Template.dsl file you downloaded right back at the beginning and it will look like this:
To make sure your PC hardware is correctly identified open your Apple menu ( ) select ‘About this Mac’ and then click on the ‘System Report’ button. Once open go to the ‘USB’ section on the left and check the
PCI Vendor and
PCI Device IDs
In our case they are
0x8086 and
0xa2af :
Check
your IDs are mirrored in the template under where it says
“// XHC Overrides “. (Don’t worry about the 100-Series text, that’s just a comment - see below). As you can see in the following graphic, we need to
change the template to match our IDs -
From:
To:
For the rest of the template, we need to copy and paste the HS and SS sections to give us more ports to play with. Two isn’t going to go far. We’d suggest 9x HS followed by 6x SS as a good starting point.
Once pasted in place increment their numbers so each one looks something like this:
"HS01", Package() // USB3 port bottom next to sound, port <01 00 00 00>
{
"UsbConnector", 3,
"port", Buffer() { 0x01, 0, 0, 0 },
},
"HS02", Package() // USB3 port top next to sound, port <02 00 00 00>
{
"UsbConnector", 3,
"port", Buffer() { 0x02, 0, 0, 0 },
},
It’s worth noting anything that appears on a line after an
‘//‘ is treated as a ‘comment’. This can be useful to help you remember something. See what I did in the example above?
Useful Fact No. 4
A physical USB 3.0/3.1 port has more contacts inside it than a USB 2.0 port so we should tell the system what kind each one is or it won’t function properly.
For a USB 2.0 port (usually black) we need to set:
“UsbConnector”, 0,
For a USB 3.0 port (usually blue) we need to set:
“UsbConnector”, 3, - even if we mostly use it for a USB 2.0 device.
For a Motherboard USB 2.0 port used for a BlueTooth card we need:
“UsbConnector”, 255, - this is to stop the BT device waking your PC from sleep unnecessarily.
There are others but for now this will get you going.
Now…
… we set the port address, by default the template shows:
“port”, Buffer() { 0x1, 0, 0, 0 }, - that
‘0x1’ bit at the end is the address.
You can get the
actual address from the port record in when you plug-in the device.
Look in the right-hand column for: Property “port”, Type “Data”, fourth from the bottom.
Useful Fact No. 5
As promised above I should explain HS and SS ports are related. In computer-speak the address of an SS port starts beyond the last HS ports address. For the mainstream Intel chipsets - H or Z170/270/370 etc. this is usually 16-addresses further on.
So a
physical USB port with an HS address of
‘0x01, 0, 0, 0’ will have an equivalent SS port at
‘0x11, 0, 0, 0’ . This may look odd but is because computers prefer
base-16 or
hexadecimal numbers to decimal ones and 16 is 10 in hexadecimal. That little
‘0x’ is what gives it away.
For the less well specified B150/B250/B360 chipsets the maximum number of USB2 ports is 2x less so the SS ports will start at earlier addresses.
Don't worry, there are other chipsets too and yours may be different but the guide still applies.
When...
... the main part of our template is complete
we need to confirm the
highest port number we will be using. This is the last SS port on your list. Go back to the top of the template and enter it’s address in the
“port-count, Buffer() {“ field.
Step 6 - The Final Furlong:
Save your template and then compile it.
In
MaciASL go to the ‘Tools’ menu and choose
‘Compile’. If there are no errors, go to the ‘File Save As’ menu and change the File Format type to ‘ACPI Machine Language Binary’.
Save it. Our suggestion for a name is:
SSDT_USB.aml .
Step 7 - Crossing The Finishing-Line
This is your completed definition file and it should now be placed your
EFI/CLOVER/ACPI/patched folder.
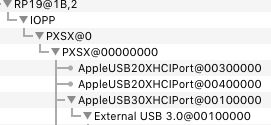
Reboot your system and run
IORegistryExplorer to check if all your ports are now showing correctly.
Here’s ours:
Incidentally those little triangles denote plugged-in devices. Here the keyboard is in ‘HS05’ and the Bluetooth adapter is in ‘HS14’.
Troubleshooting
If you get any problems such as no keyboard or mouse boot back into your system using your UniBeast installer flash-drive to get there. Mount your main EFI partition and remove the SSDT. Reboot as normal again and double-check your template for errors.
When you are happy all is working well you can
delete the Port-Limit Removal Patch from your
config.plist, BUT leave
USBInjectAll.kext in place.
Give yourself a pat on the back!
---------
Please note:
This guide is intended for
Beginners and not meant to be an in-depth help-thread for builders with difficult to fathom problems. Nor is it intended for people who have used
other guides to get to the problem stage. If you
are having serious issues please think about starting a new problem thread so that the many experts out there will notice it and be able to help
 ----------
There’s a lot more to this subject and if you want to dig deeper check out the expert’s guides:
@RehabMan - Main Guide
https://www.tonymacx86.com/threads/guide-creating-a-custom-ssdt-for-usbinjectall-kext.211311/
@MacMan - a Kextless Guide
https://www.tonymacx86.com/threads/...custom-ssdt-for-xhci-usb-port-control.253981/
@ammulder - Skylake Guide still very accessible and relevant
https://www.tonymacx86.com/threads/10-11-0-10-11-3-skylake-starter-guide.179221/
@RehabMan - ACPI and renaming guide
https://www.tonymacx86.com/threads/guide-10-11-usb-changes-and-solutions.173616/
Footnote:
I would like to thank
@tonymacx86,
@MacMan,
@RehabMan,
@ammulder and all the other moderators and contributors to this site for giving us their time, expertise and enthusiasm and helping to make the whole Hackintosh / CustoMac scene a possibility. Also I have to thank
@trs96 for help and guidance over and above the call of duty. Much Appreciated

")