- Joined
- May 27, 2010
- Messages
- 2,364
- Motherboard
- Dell Optiplex 9030 All in One
- CPU
- i5-4690K
- Graphics
- HD 4600
- Mac
- Classic Mac
- Mobile Phone
To avoid cluttering or hijacking the thread over in the Powermac G4 Cube section I thought I would put up findings about this psu here.
The PSU in question is the X7-ATX-500 that I first mentioned here.
I ordered it as did NeilHart and Neil has carried out his own testing which sadly it failed. Here are my experiences as an initial impression that I will be expanding on when I get the chance for a more thorough look over a longer time period.
Mine arrived today, it took 12 days to arrive in the UK from China and this is the first look at it inside the box.
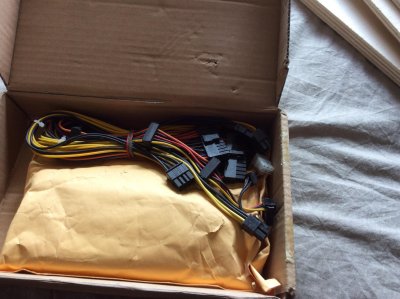
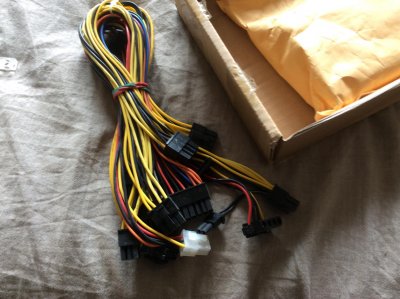
There is a single 24 to 20/24pin ATX lead, a 6 pin to 3 x Sata power + 1 x Molex lead, an 8 pin to 8 pin EPS power lead and 2 PCI-e cables which are each 8 to 6 + 2 pin types.
There are no instructions in the package at all, so you need to look at the website descriptions and work it out from there.
Here are the front and the rear views:
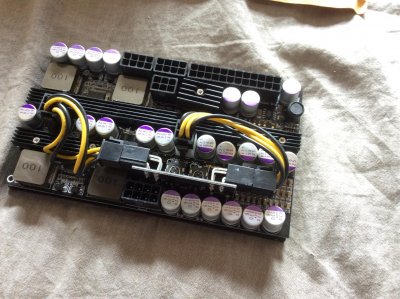
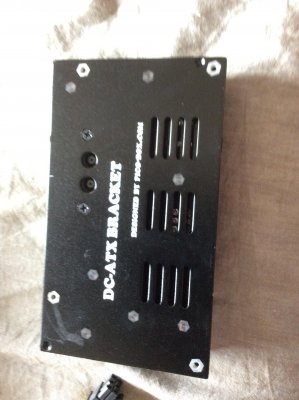
There are two 7.54/5 input connections of the type used by some Dell and HP laptops and this allows two adapters of 19 or 19.5 volts ideally to be used in master/slave configuration for the claimed high power needs.
Unfortunately for me my adapter has an over sized plastic housing adjacent the electrical output end and the two input sockets are too close together to allow both to be plugged in at the same time. So, until I have made up a new cable to connect directly to the onboard electronics of the PSU my testing is limited to using a single power brick.
Anyway, on to my results so far.
My system is an Asus Maximus VI Impact with i5 Devils Canyon CPU and 16GB of Corsair Vengeance 2400MHz RAM. I have been setting it up this week just on the standard cooler for the moment until it is ready for insertion into a rig. Up until now I have been using a Silverstone 850W modular PSU, so before swapping to the PicoBox item I took a quick photo of the voltages with that from the UEFI monitor:
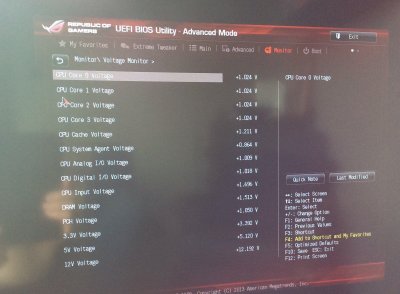
If you look at the enlarged picture you'll see the voltages registered are all nicely in regulation.
And here is the same screen after switching to the PicoBox:
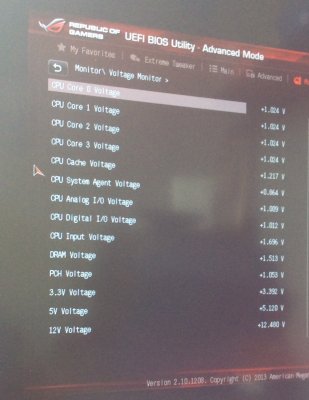
The only real difference in regulation here (at idle of course) is in the 12v line which for the Silverstone modular supply is at 12.192v and in the PicoBox item it is at 12.48v. Apart from that the lines are virtually identical from one PSU to the other. I do not know if these readings though are BEFORE the extra regulation that is carried out by the Asus Maximus Impact daughter board or after so that is something to think about.
In any case, all voltages are easily within the 5% allowed by the ATX standards - see here for an explanation.
I have not independently tested the direct outputs of the rails with a volt meter, but will take a look at that to see if they give the same readings as NeilHart found.
The good news is that the unit booted up nicely - once I actually connected the EPS output to the correct on board socket. As mentioned earlier there are no instructions for this board, but initially I connected the EPS board connection to a graphic card output of the PSU and from there it did not boot, after then reading the markings on the PCB (doh!) I got it right and it did indeed boot.
There is a slight wheezy noise from the PicoBox unit but I found that this was very faint and then disappeared once the Mobo was actually at desktop, but I will keep an ear open for it!
I did do a quick geekbench test and nothing bad happened and the results were practically identical to what were obtained by the Asus mobo when powered by the Silverstone 850W PSU.
So, there we have it, so far so good. I do not know if this can be recommended for anyone else to buy just yet - as it seems that quality control might be variable if Neil received a dud.
I will come back to this in the coming days and let you know what I think once i have tried it with 2 power bricks and done some overclocking and attached a GPU.
The PSU in question is the X7-ATX-500 that I first mentioned here.
I ordered it as did NeilHart and Neil has carried out his own testing which sadly it failed. Here are my experiences as an initial impression that I will be expanding on when I get the chance for a more thorough look over a longer time period.
Mine arrived today, it took 12 days to arrive in the UK from China and this is the first look at it inside the box.


There is a single 24 to 20/24pin ATX lead, a 6 pin to 3 x Sata power + 1 x Molex lead, an 8 pin to 8 pin EPS power lead and 2 PCI-e cables which are each 8 to 6 + 2 pin types.
There are no instructions in the package at all, so you need to look at the website descriptions and work it out from there.
Here are the front and the rear views:


There are two 7.54/5 input connections of the type used by some Dell and HP laptops and this allows two adapters of 19 or 19.5 volts ideally to be used in master/slave configuration for the claimed high power needs.
Unfortunately for me my adapter has an over sized plastic housing adjacent the electrical output end and the two input sockets are too close together to allow both to be plugged in at the same time. So, until I have made up a new cable to connect directly to the onboard electronics of the PSU my testing is limited to using a single power brick.
Anyway, on to my results so far.
My system is an Asus Maximus VI Impact with i5 Devils Canyon CPU and 16GB of Corsair Vengeance 2400MHz RAM. I have been setting it up this week just on the standard cooler for the moment until it is ready for insertion into a rig. Up until now I have been using a Silverstone 850W modular PSU, so before swapping to the PicoBox item I took a quick photo of the voltages with that from the UEFI monitor:

If you look at the enlarged picture you'll see the voltages registered are all nicely in regulation.
And here is the same screen after switching to the PicoBox:

The only real difference in regulation here (at idle of course) is in the 12v line which for the Silverstone modular supply is at 12.192v and in the PicoBox item it is at 12.48v. Apart from that the lines are virtually identical from one PSU to the other. I do not know if these readings though are BEFORE the extra regulation that is carried out by the Asus Maximus Impact daughter board or after so that is something to think about.
In any case, all voltages are easily within the 5% allowed by the ATX standards - see here for an explanation.
I have not independently tested the direct outputs of the rails with a volt meter, but will take a look at that to see if they give the same readings as NeilHart found.
The good news is that the unit booted up nicely - once I actually connected the EPS output to the correct on board socket. As mentioned earlier there are no instructions for this board, but initially I connected the EPS board connection to a graphic card output of the PSU and from there it did not boot, after then reading the markings on the PCB (doh!) I got it right and it did indeed boot.
There is a slight wheezy noise from the PicoBox unit but I found that this was very faint and then disappeared once the Mobo was actually at desktop, but I will keep an ear open for it!
I did do a quick geekbench test and nothing bad happened and the results were practically identical to what were obtained by the Asus mobo when powered by the Silverstone 850W PSU.
So, there we have it, so far so good. I do not know if this can be recommended for anyone else to buy just yet - as it seems that quality control might be variable if Neil received a dud.
I will come back to this in the coming days and let you know what I think once i have tried it with 2 power bricks and done some overclocking and attached a GPU.
