- Joined
- Mar 4, 2011
- Messages
- 32
- Motherboard
- Gigabyte P55M-UD2
- CPU
- i7
- Graphics
- GT 630
- Mac
- Mobile Phone
Motivation
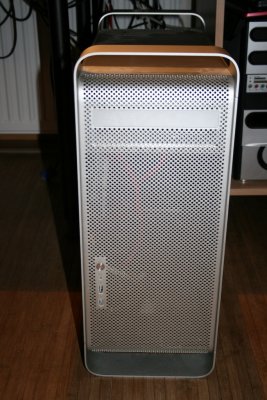
The great old Power Mac G5 case had always been a “want to have” for my Hackintosh system, so I have been watching out for a used case on ebay. Eventually I was lucky and got a box in good condition, completely empty though. Means I had no option to repurpose the cooling ducts, the fan arrangement or a dead power supply for the sake of repopulating it with some ATX electronics.
Some good pieces were left though: frontpanel PCB, hard disk cage, plexi cover, power wiring to the upper compartment (DVD and hard disk cage).
Here the hardware blocks I put in:
Priorities for me have been:
How I did it
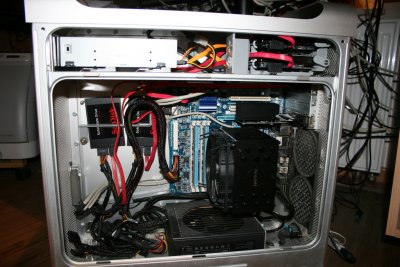
The mATX form factor really is key, because it lines up with the original extension slots of the housing without having to “escape” into the upper hard disk compartment.
Obviously none of the Apple motherboard mounting positions would fit the mATX form factor, so I cut them out with a Dremel tool in the area of the mATX board. I prepared new M3 standoffs with washer type of face plate, which I attached with 2k Epoxy in the desired locations. I used an old mATX board to act as a template for the positions and fixing it via an extension card to properly line up.
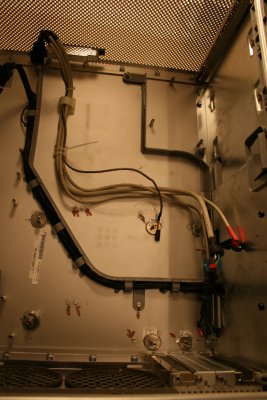
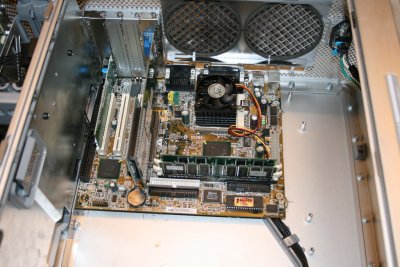
I was able to keep the original power cord for the upper compartment in place under the motherboard, rewired the bottom end to fit to standard Molex ATX power supply connectors.
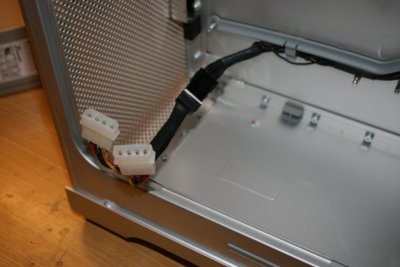
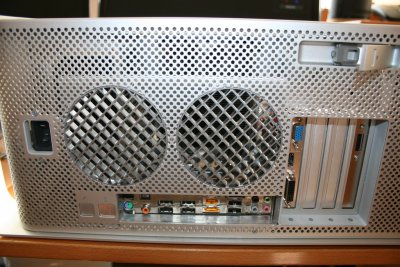
I carved out the back plate in a minimal way, so I only cut in the solid area of the plate. I was able to keep the fan grill in it´s original position. And the trade off: I am loosing 2 of the USB´s. I can live with that. This works for this motherboard, it may look different with yours.
Some sheet metal was used to create a nice framing between the recessed motherboard face and the original back side of the housing, so no holes are left open.
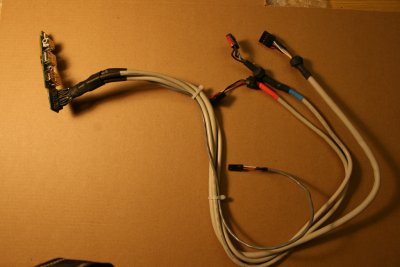
I also extended the front panel to standard PC style headers, so power button, power light, USB, Firewire and headphone socket are fully functional. Big thank you to the forum links to help me discover the pin out of the header and attain the correct wiring.
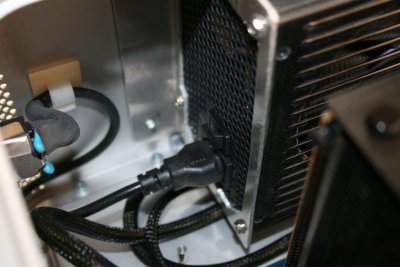
As stated above, in the absence of a Mac supply housing I simply put the ATX supply to the bottom of the case. An L shaped sheet of metal mounted to the bottom holds it tight. I created a pigtail power extension with an power inlet on the “other end”, 2 long M3 screws and spacers hold it in place exactly where it should be on the real Mac. Shrink tubing helps to protect you from touching any “hot” wiring when the case in open.
The two hard disks are mounted into the HDD cage, just the original SATA cables don´t reach. So I had to fit in longer ones, will be black next time around. I also took the fan out of the HDD compartment. I did not see the need for it and it is really a bit in the way trying to get all the wiring go through.
Finally, I had to find a home for the SSD´s and given the wide open space between mother board and front I simply stationed them there. (you see them clamped under a plastic frame, which happens to be there in the Mac) I may actually put a separation plate over the wiring and attach the SSD´s on top of that to give the whole thing a cleaner look, but that does not change anything to the basic work. ATX wiring really is a bit long, so a bit of cable management could indeed would be nice.
Cooling considerations
You may have noticed, that I have not added any additional fan or created any additional ducts for airflow.
Frankly, the PowerMac housing is so well vented, thanks to the perforated front and back there really is not a big need for that within the power budget I am running. You could argue for a separation plate for the PSU to the back panel, to prevent short cut circulation, but power supply fan and the CPU cooler run idle min speed all the time and are DEAD quiet. I don´t have a precision meter, but the BIOS based read back shows the system is running very low temps under regular workload. I noticed spin ups of the CPU fan during heavy video rendering, which is kind of expected. The GPU is fan less, the surface of the heatsink warms up, but remains in safe areas. So why should I add another source of noise? Minimum number of fans with LARGE diameters running very low RPMs, that really is the main theme.
Bottom line:
The modification of a G5 housing is very doable, I am very pleased with net outcome, I have a super quiet workhorse for my video jobs, which has not let me down at all in these years.
In retrospective I´d not do a lot different next time, (given the circumstances), maybe a power supply with modular cabling, so I don´t have to worry about all the unused open ends, but I also could have chopped those surplus branches the hard way and I did not, cause you never know, if you have to feed e.g. a new GPU card tomorrow.
In case of specific questions, just let me know!
The great old Power Mac G5 case had always been a “want to have” for my Hackintosh system, so I have been watching out for a used case on ebay. Eventually I was lucky and got a box in good condition, completely empty though. Means I had no option to repurpose the cooling ducts, the fan arrangement or a dead power supply for the sake of repopulating it with some ATX electronics.
Some good pieces were left though: frontpanel PCB, hard disk cage, plexi cover, power wiring to the upper compartment (DVD and hard disk cage).
Here the hardware blocks I put in:
- Gigabyte P55M-UD2 mATX board
- i7 870 Intel processor (Lynnfield generation)
- 2* 4 G DDR3 Ram (Kingston)
- nVidia GT630 fanless graphics
- LG BH16NS40 BlueRay Burner
- 2* 1TB HDD (WD and Samsung)
- 2* 128G Kingston SSD
- beQuiet Cooler (Dark Rock)
- beQuiet ATX PSU (400W)
Priorities for me have been:
- Minimal invasive cuts for the back panel and or other pieces of inner hardware of the box!
- System has to be dead quiet!


How I did it
The mATX form factor really is key, because it lines up with the original extension slots of the housing without having to “escape” into the upper hard disk compartment.
Obviously none of the Apple motherboard mounting positions would fit the mATX form factor, so I cut them out with a Dremel tool in the area of the mATX board. I prepared new M3 standoffs with washer type of face plate, which I attached with 2k Epoxy in the desired locations. I used an old mATX board to act as a template for the positions and fixing it via an extension card to properly line up.


I was able to keep the original power cord for the upper compartment in place under the motherboard, rewired the bottom end to fit to standard Molex ATX power supply connectors.

I carved out the back plate in a minimal way, so I only cut in the solid area of the plate. I was able to keep the fan grill in it´s original position. And the trade off: I am loosing 2 of the USB´s. I can live with that. This works for this motherboard, it may look different with yours.
Some sheet metal was used to create a nice framing between the recessed motherboard face and the original back side of the housing, so no holes are left open.
I also extended the front panel to standard PC style headers, so power button, power light, USB, Firewire and headphone socket are fully functional. Big thank you to the forum links to help me discover the pin out of the header and attain the correct wiring.

As stated above, in the absence of a Mac supply housing I simply put the ATX supply to the bottom of the case. An L shaped sheet of metal mounted to the bottom holds it tight. I created a pigtail power extension with an power inlet on the “other end”, 2 long M3 screws and spacers hold it in place exactly where it should be on the real Mac. Shrink tubing helps to protect you from touching any “hot” wiring when the case in open.

The two hard disks are mounted into the HDD cage, just the original SATA cables don´t reach. So I had to fit in longer ones, will be black next time around. I also took the fan out of the HDD compartment. I did not see the need for it and it is really a bit in the way trying to get all the wiring go through.
Finally, I had to find a home for the SSD´s and given the wide open space between mother board and front I simply stationed them there. (you see them clamped under a plastic frame, which happens to be there in the Mac) I may actually put a separation plate over the wiring and attach the SSD´s on top of that to give the whole thing a cleaner look, but that does not change anything to the basic work. ATX wiring really is a bit long, so a bit of cable management could indeed would be nice.

Cooling considerations
You may have noticed, that I have not added any additional fan or created any additional ducts for airflow.
Frankly, the PowerMac housing is so well vented, thanks to the perforated front and back there really is not a big need for that within the power budget I am running. You could argue for a separation plate for the PSU to the back panel, to prevent short cut circulation, but power supply fan and the CPU cooler run idle min speed all the time and are DEAD quiet. I don´t have a precision meter, but the BIOS based read back shows the system is running very low temps under regular workload. I noticed spin ups of the CPU fan during heavy video rendering, which is kind of expected. The GPU is fan less, the surface of the heatsink warms up, but remains in safe areas. So why should I add another source of noise? Minimum number of fans with LARGE diameters running very low RPMs, that really is the main theme.
Bottom line:
The modification of a G5 housing is very doable, I am very pleased with net outcome, I have a super quiet workhorse for my video jobs, which has not let me down at all in these years.
In retrospective I´d not do a lot different next time, (given the circumstances), maybe a power supply with modular cabling, so I don´t have to worry about all the unused open ends, but I also could have chopped those surplus branches the hard way and I did not, cause you never know, if you have to feed e.g. a new GPU card tomorrow.
In case of specific questions, just let me know!

