Contribute
Register

2013 Mac Pro - My variation

Status
Not open for further replies.
My team is about to get to the stage where we start putting the computer in the Trash Can. We were wondering how you made the aluminum rods that the components were mounted on. Could you send us detailed instructions? I think my school has the tools that we'd need to use. Thanks

The aluminum rails are off-the-shelf parts. See the first post. The were designed for building robots, 3D printers, etc.
 
Hello again.
I managed to get it up and running with a little settings help from this post:
http://www.tonymacx86.com/user-buil...z87n-wifi-i5-4670k-760gtx-customac-build.html
I figured i mention it for everyone who has come across similar problems when only using onboard graphics.

I made my own smaller 3D-Model of the Base and printed it at shapeways. (since i dont have the external graphics card i didnt need all the existing space. I also tried to get it as close as possible to match the original design. (for instance the right number of air ventholes). Additionally i will print my own Input Output plate which i will glue to extension cables and usb hubs which fit perfectly into my case. (also thx to the free space without an extra gfx)

If anyone is interested in my 3d-model feel free to let me know.
Further differences to Johns build are:
(as mentioned)
- new Build-Layout with the board positioned vertically (Ports facing upwards, RAM facing downwards.)
- PVC Pipes instead of epoxy/metalrod system
- bequiet 400w psu
- be quiet 140mm casefan (rounded the edges off by hand)
- Corsair 2x 8gb 1600mhz

extension cables:
- 2x hdmi (wanted to add a second hdmi port to my custom i/o shield for dual displays) / 50 cm
- 2x 3.5mm Audio Jack (for mic and headphones) / 50cm
- 2x 1 to 4 usb 2.0 hub
- 2x Gigabit LAN Cuppling /5cm
- 2x LAN Cable /15cm
- Power Switch (with leds)
- 90° angled Power Cable (40cm)

missing:
- 4x USB 3.0 Extension Cables (25cm) / Did anybody try to use the internal USB 3.0 Pins?
- Mini Pcie Wifi-Bluetooth Substitute Card
- printed I/O Shield (Need to adjust the 3d file for the right cables)

Whats not working so far:
- Grizzled Screen at bootup which looks pretty annoying (doesnt interfere with booting)
- HDMI Audio // Feel free to tell me how to enable it :)
- Wifi (because of the card)

I will soon add some pictures,
Best Regards,
Niksda.

Could I please get a copy of that 3D base? :)
 
Hello,

I walk gently on my project.

Quick question :
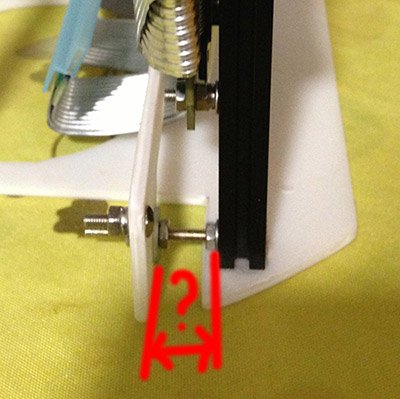
What is the dimension between the profile and support?

7695794011.jpg


Thank you
 
There wasn't an exact dimension. It was based on how close I could get the GPU card and the motherboard together with the folded cable in-between.

I can take a measurement and get back to you.
 
There wasn't an exact dimension. It was based on how close I could get the GPU card and the motherboard together with the folded cable in-between.

I can take a measurement and get back to you.

Thank you for the answers, sorry for the delay.

I'm still working on my mod.
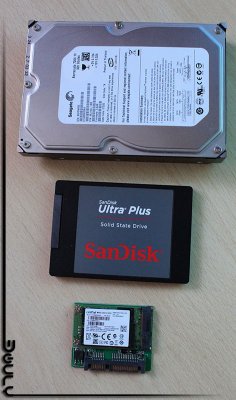
I found a solution for installing hard drives, I use an mSATA (with an adapter to SATA) for the OS and a 2.5 '' SATA for storage.
 
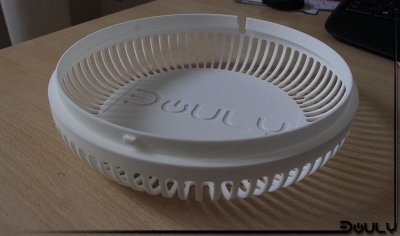
The 3D prints turned out great! Have you started work on the frame yet?

Edit: Ohh... that's right, you already have parts of the frame done.

It looks like you should be close to assembly?
 
The 3D prints turned out great! Have you started work on the frame yet?
Edit: Ohh... that's right, you already have parts of the frame done.
It looks like you should be close to assembly?


Thank you for your compliments. Honestly without your work I think I would not have achieved this result. Another big thank you for your shares and explanations.

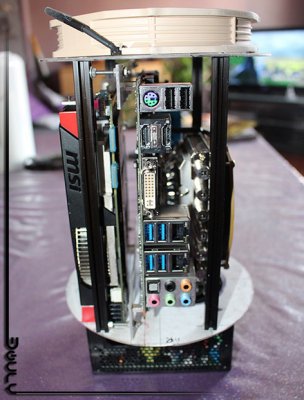
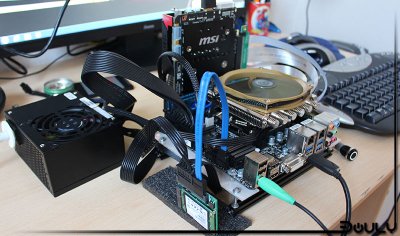
The provisional assembly is over and I managed to install two hard drives. It remains for me to make the final cut by adjusting all the cables, and there hard work in perspective.
5052445724.jpg


I received and tested my mSATA SSD , too well ...
Comparison between a hard disk 3.5 " 320GB SATA / SSD 2.5" 256GB / 256GB mSATA SSD and with adapter :
5472453139.jpg

A final test operation of all:
5632691640.jpg


To be continued... :naughty:
 
Very clean assembly so far! It is looking better than mine ;-)
 
Hey @DDemis,
i am sorry i didnt get back to you sooner,
for you and anyone else who needs my 3d-model for the base, here it is:

tip: i would scale it up 0.5-1% in the x-y-axis to get a tighter fit. i used shapeways for printing ~60€

Have Fun!
 

Attachments

  • lunar_base.zip
    10.1 MB · Views: 236
  • lunar_base.7z
    4.5 MB · Views: 228
Status
Not open for further replies.
Back
Top