- Joined
- Jun 13, 2017
- Messages
- 3,299
- Motherboard
- Gigabyte A520i AC
- CPU
- Ryzen 7 4700G
- Graphics
- Radeon Vega 8
- Mac
- Classic Mac
- Mobile Phone
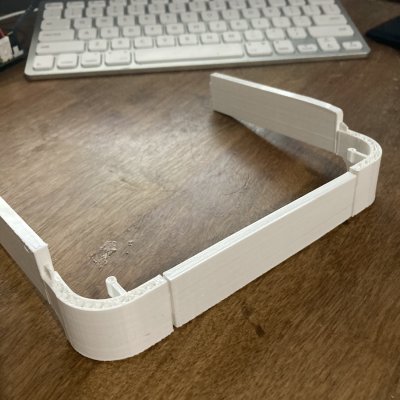
That was a bit of a learning curve!. After much delay, I spent the last 10 days putting this together for my mini Hackintosh mod, which can be found in my sig below. To get the best results from a small print bed I broke the design down into parts that could be printed individually or together, this has another advantage of allowing you to easily replace a part relatively quickly, should the 3D printer have an issue.
Yes!, gluing together was messy and was completed in stages and there are a lot of seams to be cleaned down. I now realize I could print just 4 pieces each measuring 82.5mm x 82.5mm, a corner with extensions, cutting down the gluing to just 4 seams. You'll notice standoffs attached to the corners, these hold up the H110MSTX motherboard, 2 of the standoffs, top left and bottom right, are correct!. I did fit the motherboard inside, despite only 2 standoffs aligning and felt confident that it would be secure. I also lowered the motherboard by 12mm to access the front IO.

Fitting the 2009 Mm shell was easy and is surprisingly snug, I can pick up the shell and the base doesn't fall out.

My modified rear IO, originally by @phunguss, needs a bit of a rethink.

Another method of attaching parts I tried but didn't finish, using extensions and slots.

Yes!, gluing together was messy and was completed in stages and there are a lot of seams to be cleaned down. I now realize I could print just 4 pieces each measuring 82.5mm x 82.5mm, a corner with extensions, cutting down the gluing to just 4 seams. You'll notice standoffs attached to the corners, these hold up the H110MSTX motherboard, 2 of the standoffs, top left and bottom right, are correct!. I did fit the motherboard inside, despite only 2 standoffs aligning and felt confident that it would be secure. I also lowered the motherboard by 12mm to access the front IO.
Fitting the 2009 Mm shell was easy and is surprisingly snug, I can pick up the shell and the base doesn't fall out.
My modified rear IO, originally by @phunguss, needs a bit of a rethink.
Another method of attaching parts I tried but didn't finish, using extensions and slots.