20" iMac G4 "Pro" Sandy/Ivy Bridge Mountain Lion Hackintosh Mod (in progress)
First, I apologize about using the "PRO" monicker, but its the easiest way to differentiate between my previous iMac G4 Mod and what I am currently working on. My goal with the last project was to recreate a modernized 20" iMac G4 that as closely as possible mimics the original. I was able to keep the optical drive and besides the ports on the back and the presence of a power brick, I feel as though it was successful. Because I wanted to be faithful the original, certain things that I wanted to incorporate had to be sacrificed. Also, I have discovered a few new things that have opened up new possibilities and was hoping to get the advice and opinion of this board. I have put together the hardware and am currently trying to figure out the USB wiring. But here are the intended differences/upgrades.
Better processor:
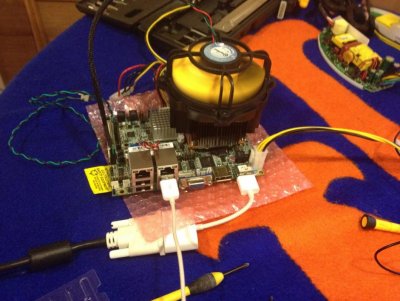
I previously used a dual core sandy bridge mobile core i5 because I was concerned about heat and power issues with the quad core i7. For this mod I have altered the internal design and scraped the optical drive. This allows me to fit a much larger heatsink/fan. Using a passive mobile heatsink and a a desktop heatsink fan, I have a cooling solution that has (so far) been more than adequate with a quad core i7.
?Better Graphics and Chipset:
While independent graphics continue to add too much cost (in terms of space and power requirements), there is an outside chance I may be able to obtain a first of its kind - Ivy Bridge Mobile ECX board. The GENE-QM77 by Aaeon (a part of Asus) Specs available here:
http://www.aaeonusa.com/download/datasheet/GENE-QM77.pdf - I have a few inquiries and I am hopeful, but I suspect the cost will be astronomical and I would need to have some protection if it turned out that it is not "Hackintoshable". Although I am quite happy with the performance of the KEEX-6100, the jump from HD3000 to HD4000 graphics is substantial. Until I hear I am proceeding with the core i7 sandy bridge KEEX-6100.
More Power:
I had a lot of difficulty understanding the native 20" iMac G4 Power Source. In my original mod, the 3.5" motherboard sat on top of the optical drive and replaced the HDD. The PSU in the iMac G4 consists of two semi circles that flank the HDD at the top of the dome. Because the 3.5" ECX Mobo is actually slightly larger than 3.5" and when cables plug into the board it becomes substantially larger, I could not fit the original PSU. Instead I used a PICO PSU with external brick. Unfortunately these seem to top out at 150 - 160 watts, significantly less than the native PSU's 190watts. With a quad core i7 though, I need that extra power. With the optical drive eliminated, the board sits lower in the dome and the PSU will flank the heatsink/cpu fan.
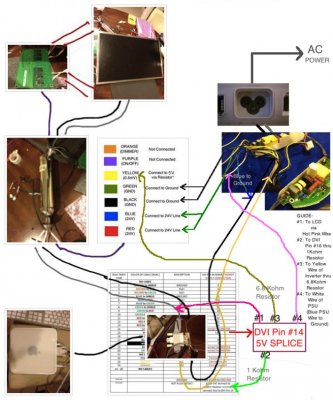
In actuality, the PSU turned out to be remarkably simple and elegant. By no means do I think I am the first person to "figure" out how the 20" iMac G4's PSU works, but the information is not readily available online, so I have posted instructions and a detailed description of the PSU on my blog for those interested:
Dremel Junkie: 20" iMac G4 - The Native PSU
In short, The PSU provides only +12V to the motherboard and it is on as soon as its plugged in. Unlike ATX PSUs there is no downconversion to 5V and 3.3V. That happens in the iMac's motherboard. However, the PSU also provides the 24V needed for the 20" backlight. The 24V line to the backlights of the PSU doesn't turn on unless the PSU receives +5V. So, the motherboard controls the backlights in this fashion. If the motherboard is off it can't down convert 12V to 5V and therefore the 24V is off. This is actually very beneficial as we can splice the 5V signal from the DVI itself - thus linking a DVI signal and the backlights turning on/off. The KEEX-6100 workalike the iMac G4's mobo, it requires only 12V and down converts to 5V itself (it has a molex/sata power connector for drives and peripherals). I have included a general power scheme in the pictures, but more detail is on my blog if needed.
Touchscreen and Camera:
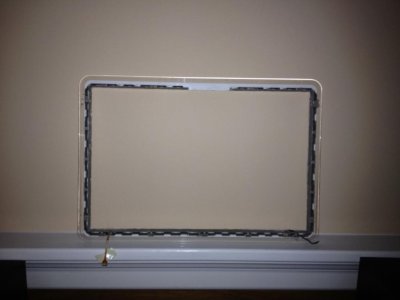
One of my original mods mounted a cinema display on the iMac G4 neck with a 5-wire resistive touchscreen. While touch screens on desktops may have limited functionality. The iMac G4s form works pretty well as a touch screen. The only problem was that the resistive touchscreen was terrible. Full of glare, distorted LCD image, and unreliable. The 20" iMacs 16:10 ratio is pretty much extinct which makes finding touch screens difficult. I found a capacitive one by 3M and after playing around with the drivers for a while some multitouch and gestures worked. The downside is that the capacitive screen is too thick to fit within the LCD enclosure.
As I want this mod to look different, I am OK with that. I have included two pics (front and back) of the LCD Bezel which I have dremeled away the inner white plastic, such that the touchscreen actually now sits flush with the bezel and the entire LCD (including its housing ) would be exposed. i am trying to think of something very thin and maybe white, gray, or silver in color that would form a square around the LCD and touchscreen and cover the inner bezel area that now leaves the outer area of the touchscreen exposed. I hope this makes sense and any ideas are appreciated.
Also you may notice I cut out an area in the bezel on the top. I am hoping to put an isight camera here. I have the iMac G5's iSight (which Ive converted to USB before), also a 13" macbook pro isight which I may use instead. I am running out of cables, while I have enough for one of these, two may be tough. Anyone familiar with modding USB know if there is any consequence if I have these two things share Power and Ground? I may have to keep the mic in the base, have a switch whereby only one can be used at a time or otherwise I would have to eliminate the camera altogether.
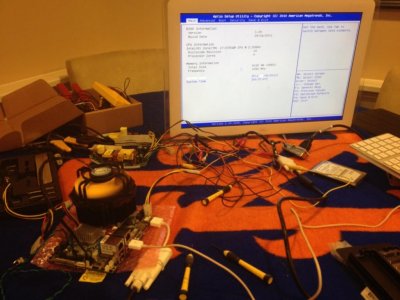
I am thinking about a few other small things like LEDs. I am also wondering if anyone has any ideas about a use for the drive door. Remember that it has to be something with minimal "depth" to it as the heatsink will be slightly further back. I have a pic of everything hooked up and booting to bios. As everything in the dome is now the motherboard and its heatsink, I'm likely to use a very small HDD, with the CF slot for an alternate OS. I may use a mSATA or 1.8" SSD.
Hopefully, I'll get the technical issues with the USB sorted out and just maybe a little Ivy Bridge magic. but, I'm definitely looking forward to these upgrades, the touch screen and mountain lion. Sorry about the length, hope it was clear, and any advise, comments, or suggestions would be greatly appreciated.
Thanks again, JB (Dremel Junkie)
Dremel Junkie