
- Joined
- Sep 21, 2010
- Messages
- 13,411
- Motherboard
- HP 17" 17-by3053cl
- CPU
- i5-1035G1
- Graphics
- Intel UHD Graphics, 1920x1080
- Mac
- Classic Mac
- Mobile Phone
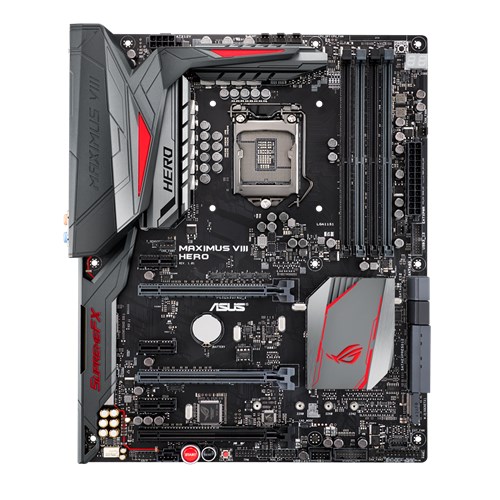
Stork's MyHero Build: ASUS Maximus VIII HERO - i7-6700K - GTX 980

Contents
Components
Components
ASUS ROG MAXIMUS VIII HERO ATX Z170 USB 3.1 Motherboard
https://www.amazon.com/dp/B0126R4F8W/?tag=tonymacx86com-20
http://www.newegg.com/Product/Product.aspx?Item=N82E16813132565
Intel i7-6700K Processor
http://www.amazon.com/dp/B012M8LXQW/?tag=tonymacx86com-20
http://www.newegg.com/Product/Product.aspx?Item=N82E16819117559
Corsair H55 Liquid Processor Cooler
https://www.amazon.com/dp/B009VV56TY/?tag=tonymacx86com-20
http://www.newegg.com/Product/Product.aspx?Item=N82E16835181029
G.SKILL TridentZ Series 32GB (4 x 8GB) 288-Pin DDR4 SDRAM DDR4 3200 (PC4 25600) Memory F4-3200C16Q-32GTZB
https://www.amazon.com/dp/B015FXWIEC/?tag=tonymacx86com-20
http://www.newegg.com/Product/Product.aspx?Item=N82E16820231930
Samsung 951 M.2 AHCI 512GB SSD MZHPV512HDGL-00000
http://www.newegg.com/Product/Product.aspx?Item=9SIA12K3GB5852
Corsair RM650X 650 Watt (650W), Fully Modular Power Supply, 80+ Gold Certified
https://www.amazon.com/dp/B079H6111J?tag=tonymacx86com-20
https://www.newegg.com/Product/Product.aspx?Item=N82E16817139143
EVGA GeForce GTX 980 4GB SC GAMING ACX 2.0 ACX Graphics Card
https://www.amazon.com/dp/B00NT9UT3M/?tag=tonymacx86com-20
https://www.newegg.com/Product/Product.aspx?Item=N82E16814487079
Fenvi FV-T919 WiFi/Bluetooth 4 PCIe Card - Handoff and Continuity
https://www.amazon.com/dp/B0734FNBW8/?tag=tonymacx86com-20
Note: if the Fenvi FV-T919 is out of stock, the Amazon link will show another Fenvi card. So, make sure you are ordering the FV-T919 model. It takes 7-10 days to return to in stock.
Already Owned
https://www.amazon.com/dp/B00DGM8B6O/?tag=tonymacx86com-20
http://www.newegg.com/Product/Product.aspx?Item=N82E16814125466
SYBA Low Profile PCI-Express 1394B/A Firewire Card Model SD-PEX30009
https://www.amazon.com/dp/B002S53IG8/?tag=tonymacx86com-20
http://www.newegg.com/Product/Product.aspx?Item=N82E16815124072
Apple iSight Firewire WebCam - No longer in production; see Buyer's Guide for newer webcams.
https://www.amazon.com/dp/B0000AKACN/?tag=tonymacx86com-20
https://en.wikipedia.org/wiki/ISight
Lian-Li PC-A05FN Mid Tower Computer Case
http://www.lian-li.com/en/dt_portfolio/pc-a05fn/
https://www.amazon.com/dp/B00GTZPO5Q/?tag=tonymacx86com-20
https://www.newegg.com/Product/Product.aspx?Item=N82E16811112331
Comments
The Build
The core component of a build is the motherboard followed by the processor, memory and graphics card. My previous build, Gene (I name my builds), is a ASUS MAXIMUS VIII GENE which was so successful as a hackintosh system that I decided to build another ASUS Z170 based system based upon the full size ATX motherboard. My last ATX size motherboard was the Gigabyte Z68X-UD3H which was the core of my Zorro system. I happened to luck onto a good deal on the ASUS MAXIMUS VIII HERO, and the HERO just intrigued me as it had all the "goodies" that my Gene has.
The Motherboard
This is my second ASUS motherboard, and, as I said in my Gene build description, I had heard good things about them from tonymacx86, MacMan, beelzebozo and Gordo74, especially the ASUS MAXIMUS series. And, they were right! So, it wasn’t hard for me to decide on the motherboard for my full size ATX based build - the ASUS ROG MAXIMUS VIII HERO. In addition to the usual number of PCIe slots, the HERO has a M.2 slot for either a AHCI (assigned to two SATA ports - SATA0 and SATA1) or NVMe SSD blade located between the two PCI x 16 slots. For Gene, I used the Samsung 950 Pro NVMe 512GB SSD, but had to use NVMeGeneric.kext. (See my Gene build for more information on the use of that kext and RehabMan’s patcher which works without the drawbacks of the NVMeGeneric.kext.) So, for this build, I’m using the Samsung 951 M.2 ACHI SSD, which is supported OOB. Hopefully, Apple will support NVMe in the near future.

Another feature is the ability to update the BIOS from within the BIOS using the Internet to grab the updated BIOS and install it. Nice. However, the feature I used to update the BIOS is called the USB BIOS Flashback (page 2-12 of the GENE User's Guide) which allows updating "the BIOS without entering the existing BIOS or operating system." Here's the simple instructions from the User's Guide:

To use USB BIOS Flashback:
- Download the latest BIOS from the ASUS website.
- Extract and rename the BIOS image file to M8H.CAP.
- Copy M8H.CAP to the root directory of your USB storage device.
- Turn off the system and connect the USB storage device to the USB BIOS Flashback port.
- Press the USB BIOS Flashback button.
| As with the Gene, another subtle, but extremely nice piece in the motherboard set of accessories is the Front Panel "ASUS Q-Connector which is a removable Front Panel plug that lets you connect the case's Front Panel connectors (wires) without all the inconvenience of trying it directly on the motherboard itself. Once all the wires are connected, then it's only a single plug to orient on the motherboard's Front Panel header. Finally, the HERO is just good looking with red lighting even when the computer has been shutdown. If I've piqued your interest, then I recommend you go to the ASUS HERO web page for a description in great detail. |

|
The rest of the components
Speaking of red, I chose the G.Skill TridentZ 4x8GB memory kit because the kit is on the HERO's Memory Qualified Vendors list, and, low & behold, the G.Skill TridentZ comes in red and gray colors. Well, I couldn't pass up red and gray memory sticks for a motherboard with red and accents, now could I?
I chose the Corsair H55 liquid processor cooler on a recommendation from MacMan, and it's size is perfect for the mid tower Lian Li case. The H55 was easy to install, and works great! At less than $60 USD, I can now recommend it, too.Speaking of good performance, I am, at the time of this writing, holding out for the Nvidia GTX 1060. But, in the meantime, I'm using a spare Gigabyte GTX 760 which I saw on eBay and bought for a very good price. Although the GTX 760 was supported natively since OS X 10.8.5, it definitely needs the Nvidia web drivers for El Capitan as the colors are not correct when using the Apple drivers. Update: I got tired of waiting for the Nvidia Pascal drivers, and picked up an EVGA GeForce GTX 980 4GB SC GAMING ACX 2.0 graphics card for the price of the GTX 1060 3GB cards.
So, that's the long and short of why I put the build together. If you've never put together a PC system or want to know how to build a HERO based system, see this post here as trs96 found a UTube instructional video.
The Installation
Since a build description is more about the build component selection than an installation guide, I'm going to only hit the essentials of the installation which are only peculiar to the HERO. The following assumes you've got all your components installed in the computer system's case.
The following installation procedures are written for a fresh installation of High Sierra using MultiBeast v10.4.0+. I have a written separate, step-by-step installation guide for Sierra and El Capitan which you can copy & paste into a document for printing to check off each step as you accomplish the step so as not to miss a step:
Making the UniBeast USB Thumb Drive
Use the tonymacx86 guide UniBeast: Install macOS Sierra on Any Supported Intel-based PC. Note: your USB Thumb drive needs to have 7.63 GB of free space to build the UniBeast installation thumb drive. Otherwise, you'll need a 16GB USB thumb drive which is a better size so you can copy the following items to the thumb drive for use in the post installation phase:
 MultiBeast v10.4.0 for High Sierra which you can probably put on a 8GB USB thumb drive, but a 16GB drive is best, EFI Mounter V3; KextBeast which will be useful for updating kexts; For proper processor power management, get the SSDT for your processor from ammulder's Guide and rename it SSDT.aml; I chose the SSDT for my i7-6700K. Note: ammulder's SSDTs are for non overclocking speeds; for overclocking, you'll need to create a SSDT for your processor using PikeRalpha's ssdtPRGen.sh script located here; Clover Configurator for fine tuning; IORegister v2.1 for fine tuning and checking for USB ports; (Optional) the nVidia Web drivers for the Maxwell chipset cards (750, 750 Ti, 950 Ti, etc). See tonymacx86's sticky thread in the Graphics forum section or the tonymacx86 Nvidia driver list.
BIOS Setup
Follow Step 3 in the tonymacx86 guide.
Update the BIOS to the latest version which is 3802 as of April 27, 2018. Follow the USB BIOS Flashback method on page 2-12 of the HERO User's Guide. Note: BIOS versions greater than 2202 will no longer save NVRAM (important) between boot ups. This impacts iMessage and Nvidia web drivers. So, if your BIOS version is greater than 2201, you will need to fix this in MultiBeast as I point out below. Once the BIOS is updated, boot into the BIOS, use the Advanced Mode and make the following changes:Extreme Tweeker
AI Overclocker Tuner > X.M.P. Extreme Tweeking > EnableAdvanced Items
System Agent (SA) Configuration > VT-d > Disable <--- Now default PCH Configuration > IOAPIC 24-119 > Disabled APM Configuration > Power on by PCI - E/PCI > Disabled <--- Now default USB Configuration > Legacy USB Support > Auto USB Configuration > Keyboard and Mouse Simulation > Disabled <--- See BIOS Note below.Boot Menu
Fast Boot > Disabled Boot Logo Display > Disabled Secure Boot > OS Type > Other OS Boot Option 1 > USB installer thumb drive (the UEFI choice if there are two entries) Exit > Save ChangesNote: The BIOS starting with version 3504 has eliminated the XHCI Hand Off parameter and added a KeyBoard/Mouse Simulation parameter which must be disabled.
Installation Notes
Note: You can install High Sierra over Sierra using the procedures below, too.
Follow Steps 4 & 5 in the tonymacx86 guide: UniBeast: Install macOS Sierra on Any Supported Intel-based PC. But, Insert the UniBeast created installation USB Thumb Drive in the USB port in the bottom USB port at the bottom of the stack with the PS/2 port at the top (see Rear Port graphic above); Boot into the High Sierra Installer with the UniBeast Installer USB thumb drive to begin the installation. The installer will reboot three times; On the first two reboots, select the "Boot macOS Install from [your installation drive name]"; On the third time, at the Clover Boot screen, double click on your High Sierra installation drive. Upon booting into the Desktop, the process will ask you to log into iCloud, do not log in - skip it - as it messes up Messages. Drag & drop MultiBeast and the other zip files from the thumb drive to your Applications folder in another folder of your choice, unzip them, and run MultiBeast and selection the following: Quick Start > UEFI Boot Mode Drivers > Audio > AppleALC (Optional) Drivers > Misc > FakeSMC Plugins (Optional) Drivers > Misc > FakeSMC HWMonitor Application Drivers > Network > Intel > IntelMausiEthernet Drivers > USB > USBInjectAll Drivers > USB > Remove XHCI USB Port Limit <--- Adds PMHeart’s patch to remove XHCI USB Port Limit Bootloaders -> Clover UEFI Boot Mode + Emulated NVRAM <--- Required if BIOS version is greater than 2202 (Optional) Customize -> Graphics Configuration -> NVIDIA Web Drivers Boot Flag <--- Required for use of Nvidia drivers Build <--- To see your full configurationNote: MultiBeast for High Sierra default System Definition is iMac14,2. The Mac Pro 3,1 & 4.1 is not supported in Sierra. I recommend you use the iMac14,2 SysDef for your installation and to get Sierra up and running. You can change it later if need be.
Save <--- Save your MultiBeast configuration file somewhere convenient Click on the Install button in the MultiBeast window bottom right hand corner and wait for MultiBeast to finish. Don't reboot yet. (Optional) If you have a current Nvidia graphics card, copy the Nviida driver from the thumb drive onto your Desktop, unzip it and install the driver now, but don't reboot when the installer is done, just leave it along as we'll come back to it. Now you need to install your processor's SSDT.aml (if your EFI partition has been mounted from doing the Nvidia mod above, then skip the first three steps): Open the Terminal and run the following:
Code:
diskutil listUEFI Samsung 951 M.2 drive
or
UEFI setting for your High Sierra drive.
Note: Always pick the UEFI choice if there are two entries for the same drive.
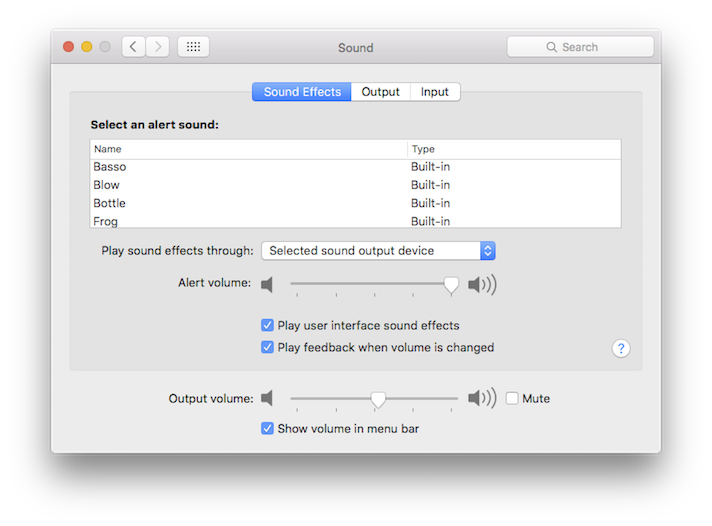
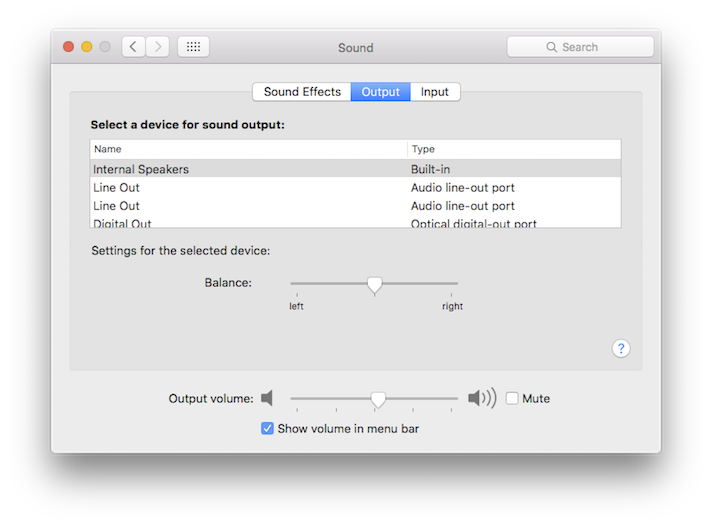
EXIT to save the BIOS update and reboot.To get audio working you'll need to use the Green sound port on the Rear Panel with the System Preference's Sound pane set up as follows:
SSDT to Limit USB Assignments to 15 ports
Time to define the USB ports with a SSDT so we're not at the mercy of someone coming up with a config.plist patch for unlimited USB ports for each new version of macOS. Here's how I did it with the help of @pastrychef and @Feartech.
Make sure all your USB ports are enabled. (The MultiBeast Remove XHCI USB Port Limit option.) Also, you're using USBInjectAll.kext. (The MultiBeast USB USBInjectAll.kext option.) Both MultiBeast Options are shown above.
1. Get Hackintool and run it.
2. Click on the "padlock" icon in the lower left hand corner of the Hackintool window;
3. Click on the USB tab.
4. Plug and unplug a USB 2 device to each and every USB port on your computer.
Plug and unplug a USB 3 device to each and every USB port on your computer. (Note: USB 3 ports will count as two.) Here is what I came up with for my USB use with the Fernvi T919 Bluetooth and case headers.
6. Click on the button shown to generate your USB files.
8. Remove the 15 port unlimited patches from the /EFI/.../CLOVER/config.plist file.
9. Now reboot.
10. Use IORegister to confirm your successful limit to 15 or under USB assignments.
11. Lastly, remove the SSDT and kext from your Desktop. I put them in my /Applications/Hackintosh/SSDT/ folder and deleted the kext.
Wake-up from Sleep Fix
Finally, since we're using the iMac14,2 system definition, we have to make one more change since Sierra broke wake-up from long (4+hours) sleep. Special thanks to pastrychief for discovering this "fix"; see his Build Description and Post #63 in his Build Description thread for more details. So, in the Terminal, execute the following command:
Code:
sudo pmset -a autopoweroff 0One last tip/note, to check to see if your SSDTs are loading, use the following command in the Terminal:
Code:
bdmesg|grep -y amlWelcome to Clover and Sierra!
Summary
This hackintosh is fantastic! Enjoy your hackintosh. I am really enjoying MyHero.
What Works
- USB 3.1 ports work and USB 3.0 ports charging iDevices.
- Sleep & Wake-up, both manual (Apple > Sleep) and scheduled (Energy Saver SysPerf pane).
- Audio through the Green back panel port. Audio works after sleep/wake-up.
- iMessages (See P1lgram's build description on how to get iMessages working.)
What Doesn't Work
- So far, everything is working as it should.
- Continuity and Handoff because I don't have a Broadcom iMac wireless/Bluetooth 4 card and PCIe yet, but is on order.
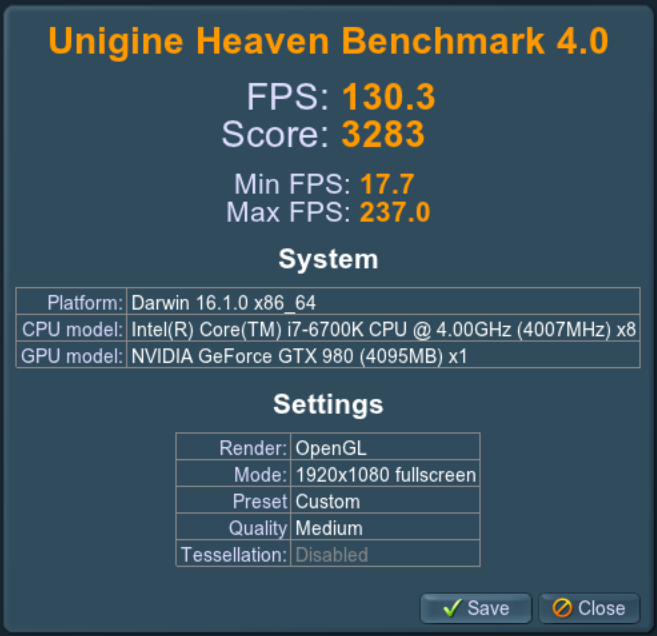
Benchmarks
EVGA GeForce GTX 980 SC GAMING ACX 2.0

Updates
June 05, 2020. Fixed the Amazon link for the PSU.
July 29, 2019. I finally got 'round to it and created SSDT-UIAC for USB port definition and SSDT-USBX.aml for power injection to charge my iPhone and/or iPad. See Post #1683.
Aug 19, 2018. Updated the MultiBeast procedures for MultiBeast v10.4.0+.
May 16, 2018. Updated for the two past MultiBeast run for audio. See the MultiBeast v10.3.0 Announcement. Note: No longer needed when using AppleALC.kext.
May 06, 2018. Added "darkwake=0" to the config.plist Boot > Arguments. Thanks to Richard325 who called it to my attention in Post #1457.
May 05, 2018. Updated the post MultiBeast installation procedure for High Sierra 10.13.4+.
April 28, 2018. Update the BIOS to 3802, dated April 27, 2018.
April 22, 2018. Upgraded to High Sierra 10.13.4 from Sierra 10.12.6.
September 10, 2017. Updated the BIOS information for v3504. Thanks to Pandabox, for this information. See Post #1247. This BIOS update also applied to my Gene build.
August 01, 2017. Removed the Optional MultiBeast configuration item "3rd Party SATA as it is not needed. Thanks to WedgeTail and pastrychef for pointing out that it is not needed for Z170 chipset motherboards. (My excuse is that I've been using that option since 2010 and just assumed that it might be needed. Shame on me.
July 02, 2017. Added note to update BIOS to latest version to correct HyperThreading processor microcode problem. See Post #1176 for more information. Thanks to Iwagsz for this information.
May 20, 2017. Corrected the name of the FakeSMC_GPUSensors.kext to delete. Thanks to Maddeen for catching that mistake.
May 19, 2017. Patched the /EFI/EFI/Clover/config.plist for enabling USB 3 power/charging. See Post #1081.
May 16, 2017. Update to Sierra 10.12.5.
May 15, 2017. Update the MultiBeast v9.1.0 Build screen snapshot.
May 05, 2017. Updated the MultiBeast installation procedures due to MultiBeast v9.1.0 installation problems.
March 10, 2017. Added the Fenvi WiFi/BT PCIe card that works OOB including Continuity/Handoff.
February 28, 2017. Removed the the GenericUSBXHI.kext from the MultiBeast configuration as it is not needed for Sierra. Thanks to pastrychef for this insight.
February 09, 2017. Added RehabMan's check for SSDT & DSDT loading.
December 12, 2016. Added pasytrychief's Terminal command to fix wake-up from long (4+hours) sleep with references to his explanation on why it's necessary for using the iMac system definition.
December 11, 2016. Thanks to robaird for catching a typo.
November 23, 2016. Added Heaven and Valley benchmarks for the GTX 980 that replaced the GTX 760.
November 09, 2016. Added the post link on the Utube video, which trs96 found, on how to build up a HERO based computer system.
November 03, 2016. Sierra 10.12.1 introduced a problem with wake-up after sleep. Need to add to Boot Arguments darkwake=0.
October 03, 2016. Moved the El Capitan installation procedures to a separate thread in the El Capitan Desktop Guides forum section.
September 14, 2016. Update the MultiBeast note to recommend iMac14,2 system definition in preparation for installing Sierra.
September 06, 2016. Updated to the latest BIOS v2001.
July 29, 2016. Removed a non existent MultiBeast configuration option in the MultiBeast configuration. Thanks to Porkfoo for ponting out this mistake.
July 27, 2016. Noted latest BIOS version is 1902 and corrected the link to the BIOS page. Thanks, portfoo, for calling it to my attention.
July 15, 2016. Added the Syba Firewire 800/400 PCIe card and an Apple iSight Firewire webcam to the Already Owned component list
July 11, 2016. In the MultiBeast configuration, I left out "Drivers > Audio > 100 Series Audio" although I had it in the MultiBeast Build screen snapshot.
Attachments

Last edited:
") Thoroughly enjoyed reading it.
Thoroughly enjoyed reading it.