- Joined
- Jul 2, 2014
- Messages
- 2
- Motherboard
- Gigabyte GA-X58-UD3R rev 2.0 FF
- CPU
- Intel i7 990x 3.46 GHz
- Graphics
- EVGA GeForce GT 640
- Mac
Finally!!!! a fully working installation of this powerful build. I compiled the info from several users and I wanted to share what I learned to help somebody with the same build because I spent so many hours trying to get this build done!!!. Thank you very much Tonymac for letting us share this valuable info !!!!
Build:
CPU: Intel Core i7-4930K (6 core)
MotherBoard: GA-X79-UP4 BIOS F7
Graphics: EVGA GeForce GT 640 (2GB)
Ram: Corsair Vengeance LP DDR3 1866 (64 Gb)
CPU Cooler: Corsair Hydro Series H60
HD: SSD 840 EVO 250 Gb
Power: Corsair RM Series RM1000w
Case: Zalman GS1200 Black Aluminum
BIOS SETTINGS F7
Setup for OSX Mavericks 10.9.4
(current for July 2nd, 2014)
This setup uses UniBeast 3.0.1 and MultiBeast 6.3.1
1. Set up UniBeast USB with OSX 10.9.4 from app store in an original Mac
I followed this guide:
http://www.tonymacx86.com/374-unibeast-install-os-x-mavericks-any-supported-intel-based-pc.html
1a. Copy MultiBeast 6.3.1 into USB
2. Use the following BIOS settings:
BIOS SETTINGS! IMPORTANT!
Getting the proper ram detection you will have to enter “advanced memory settings” and set X.M.P to “profile1”
Go to “advanced CPU Core Settings”
Make sure you disable
CPU EIST Function
CPU Enhanced Halt (C1E)
Next go to BIOS Features
Disable following
Full Screen Logo
Fast Boot
Limit CPUID Maximum
Intel Virtualization Technology
Intel VT-d
Intel I/OAT
Set Windows 8 features to “other OS”
Boot mode = legacy
Lan PXE = disabled
storage boot = legacy
Other lci device = legacy
Network stack = disabled
go to -> Peripherals
High Precision timer = Enabled
EHCI-Handoff = Enabled
XHCI-Handoff = Enabled
USB 3.0 Supoort = Disabled (XHCI Controller)
Make sure you're running all SATA ports as AHCI
Turn on HOTPLUG for every port
Under Peripherals go to gigabit network connection and
WAKE on LAN = disabled
Power management:
Wake on LAN from S5 = disabled

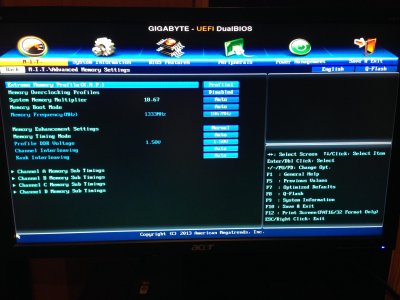


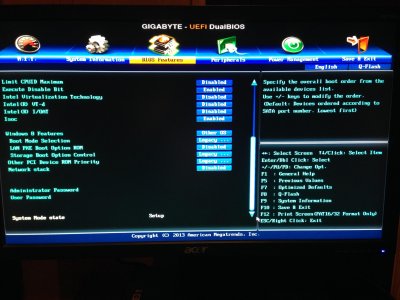
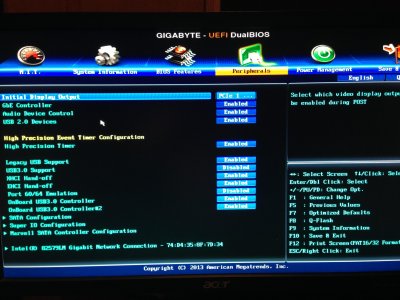
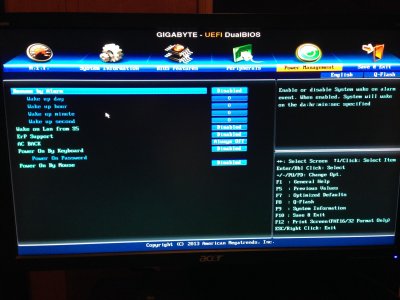

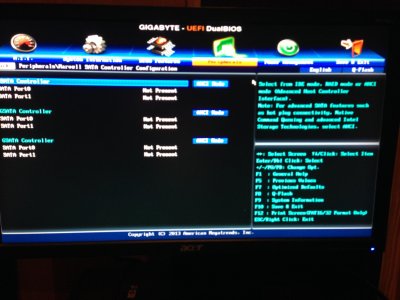
3. Insert USB and use the following boot flags to get into the Mavericks installer:
-v cpus=1 npci=0x2000 (in order, no commas just spaces)
4. Install Mavericks and reboot to USB again
4a. Select Mavericks installations and boot with the same flags as before:
-v cpus=1 npci=0x2000
5. Should boot successfully to Mavericks but it will be VERY SLOW… be patience, once in Mavericks run MultiBeast from the UniBeast USB with the following settings: remember.. it will be very slow… chill out …..
• Quick Start>EasyBeast
• Drivers>Audio>Realtek>Without DSDT>ALC892
• Drivers>Disk>3rd Party Sata
• Drivers>Disk>TRIM Enabler>10.9.x TRIM Patch
• Drivers>Misc>ElliotForceLegacyRTC
• Drivers>Misc>EvOreboot
• Drivers>Misc>FakeSMC v6.8.1307
• Drivers>Misc>NullCPUPowerManagement
• Drivers>Misc>USB 3.0 - Universal
• Drivers>Misc>VoodooTSCSync>VoodooTSCSync 6 Core
• Drivers>Network>Intel – hnak’s AppleIntelE1000e v2.4.14
• Drivers>System>AppleACPIPlatform Rollback>10.8.1 Rollback
• Drivers>System>Patched AppleIntelCPUPowerManagement>OS X 10.9.0
• Bootloaders>Chimera v3.0.1
• Customize>Boot Options>Basic Boot Options
• Customize>Boot Options>Use KernelCache
• Customize>System Definitions>Mac Pro>Mac Pro 5,1
• Customize>SSDT Options> Sandy Bridge Core i5 / i7 Overclocked
• Customize>Themes>tonymacx86 Black
Build and install.
6. Open up with PlistEdit Pro: /Extra/org.chameleon.Boot.plist and copy/paste this:
<?xml version="1.0" encoding="UTF-8"?>
<!DOCTYPE plist PUBLIC "-//Apple//DTD PLIST 1.0//EN" "http://www.apple.com/DTDs/PropertyList-1.0.dtd">
<plist version="1.0">
<dict>
<key>EthernetBuiltIn</key>
<string>Yes</string>
<key>GraphicsEnabler</key>
<string>No</string>
<key>HDAEnabler</key>
<string>Yes</string>
<key>HDEFLayoutID</key>
<string>01000000</string>
<key>IGPEnabler</key>
<string>Yes</string>
<key>Kernel</key>
<string>mach_kernel</string>
<key>Kernel Flags</key>
<string>npci=0x2000</string>
<key>Legacy Logo</key>
<string>Yes</string>
<key>Timeout</key>
<string>2</string>
<key>UseKernelCache</key>
<string>Yes</string>
</dict>
</plist>
7. Save + Quit.
8. Reboot as normal. BAM! OSX 10.9.4 is ready to rock!
If your system still too slow then install Chameleon-2.2svn-r2377 without customize anything, just like that
http://www.insanelymac.com/forum/fil...meleon-22-svn/
Build:
CPU: Intel Core i7-4930K (6 core)
MotherBoard: GA-X79-UP4 BIOS F7
Graphics: EVGA GeForce GT 640 (2GB)
Ram: Corsair Vengeance LP DDR3 1866 (64 Gb)
CPU Cooler: Corsair Hydro Series H60
HD: SSD 840 EVO 250 Gb
Power: Corsair RM Series RM1000w
Case: Zalman GS1200 Black Aluminum
BIOS SETTINGS F7
Setup for OSX Mavericks 10.9.4
(current for July 2nd, 2014)
This setup uses UniBeast 3.0.1 and MultiBeast 6.3.1
1. Set up UniBeast USB with OSX 10.9.4 from app store in an original Mac
I followed this guide:
http://www.tonymacx86.com/374-unibeast-install-os-x-mavericks-any-supported-intel-based-pc.html
1a. Copy MultiBeast 6.3.1 into USB
2. Use the following BIOS settings:
BIOS SETTINGS! IMPORTANT!
Getting the proper ram detection you will have to enter “advanced memory settings” and set X.M.P to “profile1”
Go to “advanced CPU Core Settings”
Make sure you disable
CPU EIST Function
CPU Enhanced Halt (C1E)
Next go to BIOS Features
Disable following
Full Screen Logo
Fast Boot
Limit CPUID Maximum
Intel Virtualization Technology
Intel VT-d
Intel I/OAT
Set Windows 8 features to “other OS”
Boot mode = legacy
Lan PXE = disabled
storage boot = legacy
Other lci device = legacy
Network stack = disabled
go to -> Peripherals
High Precision timer = Enabled
EHCI-Handoff = Enabled
XHCI-Handoff = Enabled
USB 3.0 Supoort = Disabled (XHCI Controller)
Make sure you're running all SATA ports as AHCI
Turn on HOTPLUG for every port
Under Peripherals go to gigabit network connection and
WAKE on LAN = disabled
Power management:
Wake on LAN from S5 = disabled


3. Insert USB and use the following boot flags to get into the Mavericks installer:
-v cpus=1 npci=0x2000 (in order, no commas just spaces)
4. Install Mavericks and reboot to USB again
4a. Select Mavericks installations and boot with the same flags as before:
-v cpus=1 npci=0x2000
5. Should boot successfully to Mavericks but it will be VERY SLOW… be patience, once in Mavericks run MultiBeast from the UniBeast USB with the following settings: remember.. it will be very slow… chill out …..
• Quick Start>EasyBeast
• Drivers>Audio>Realtek>Without DSDT>ALC892
• Drivers>Disk>3rd Party Sata
• Drivers>Disk>TRIM Enabler>10.9.x TRIM Patch
• Drivers>Misc>ElliotForceLegacyRTC
• Drivers>Misc>EvOreboot
• Drivers>Misc>FakeSMC v6.8.1307
• Drivers>Misc>NullCPUPowerManagement
• Drivers>Misc>USB 3.0 - Universal
• Drivers>Misc>VoodooTSCSync>VoodooTSCSync 6 Core
• Drivers>Network>Intel – hnak’s AppleIntelE1000e v2.4.14
• Drivers>System>AppleACPIPlatform Rollback>10.8.1 Rollback
• Drivers>System>Patched AppleIntelCPUPowerManagement>OS X 10.9.0
• Bootloaders>Chimera v3.0.1
• Customize>Boot Options>Basic Boot Options
• Customize>Boot Options>Use KernelCache
• Customize>System Definitions>Mac Pro>Mac Pro 5,1
• Customize>SSDT Options> Sandy Bridge Core i5 / i7 Overclocked
• Customize>Themes>tonymacx86 Black
Build and install.
6. Open up with PlistEdit Pro: /Extra/org.chameleon.Boot.plist and copy/paste this:
<?xml version="1.0" encoding="UTF-8"?>
<!DOCTYPE plist PUBLIC "-//Apple//DTD PLIST 1.0//EN" "http://www.apple.com/DTDs/PropertyList-1.0.dtd">
<plist version="1.0">
<dict>
<key>EthernetBuiltIn</key>
<string>Yes</string>
<key>GraphicsEnabler</key>
<string>No</string>
<key>HDAEnabler</key>
<string>Yes</string>
<key>HDEFLayoutID</key>
<string>01000000</string>
<key>IGPEnabler</key>
<string>Yes</string>
<key>Kernel</key>
<string>mach_kernel</string>
<key>Kernel Flags</key>
<string>npci=0x2000</string>
<key>Legacy Logo</key>
<string>Yes</string>
<key>Timeout</key>
<string>2</string>
<key>UseKernelCache</key>
<string>Yes</string>
</dict>
</plist>
7. Save + Quit.
8. Reboot as normal. BAM! OSX 10.9.4 is ready to rock!
If your system still too slow then install Chameleon-2.2svn-r2377 without customize anything, just like that
http://www.insanelymac.com/forum/fil...meleon-22-svn/


 . Thank you for putting all the info in one easy to ready setup, now i want to over clock and get some more performance out of the machine. I still believe my Quicktime is messed up, cause i can't export anything in prores or H.264 when using final cut pro X or Premiere, i have to install my new card ( GTX 770 ) and then try to get the CUDA cores out of it and i should be all done. Do you know of any ways to improve the machine? what are some things you have done to make it run quickly and i am unsure if i am able to boot from the SSD now, i haven't tried but what are some ways to get the boot loader to work as soon as the machine turns on so i can jump from this to windows 8 when i want to go gaming. Also do you know if i am able to see my windows SSD from the mac? running like VMware so i won't have to switch to the PC when i want to run those applications.
  Your awesome thank you again and good luck everyone.