- Joined
- Oct 6, 2010
- Messages
- 59
- Motherboard
- CustoMac Pro 2010
- CPU
- i7-930 2.8GHz
- Graphics
- Apple HD 5770 (2 Mini DisplayPorts and 1 DVI)
- Mac
- Classic Mac
- Mobile Phone
Installation Guide for GA-X58A-UD3R (2.0) BIOS FH - i7 930 - Apple OEM HD5770
-----------------------------------------------------------------------------------------
Please offer any constructive criticism that may improve this build which I based from tonymac's Customac 2010
http://tonymacx86.blogspot.com/2010/...-pro-2010.html
---------------
Components:
---------------
- Intel i7 930 LGA1366
- Gigabyte GA-X58A-UD3R (rev. 2.0) - FH BIOS Mobo
- Corsair XMS3 DDR3 12GB RAM (3x 4GB matched) 9-9-9-24 1333MHz
- Apple Branded Radeon HD5770 (2 Mini Displayports and 1 DVI) PCI-E Video Card
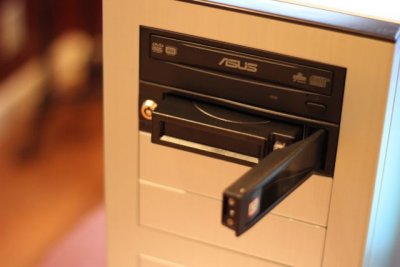
- ASUS DRW-24B3ST Multi Recorder Optical Drive
- Apple Cinema Display 24"
--------------------
Install Procedure:
--------------------
1. Make Unibeast Installer for Mavericks USB
(Unibeast version 3.0.1 was used)
http://www.tonymacx86.com/374-unibea...-based-pc.html
2. Within the Unibeast Installer USB I made a folder for "post install" folder that contains
3. BIOS config:memory timings set manually on expert then returned to auto to lock timings - additional settings are based from Lnx2Mac's Optimal BIOS blog
http://lnx2mac.blogspot.com/2010/07/optimal-bios-configuration.html
***Extra note about BIOS - It is a good idea to disable features that you are not using (e.g. I disabled firewire since I do not have any firewire peripherals) and to set all drives to AHCI (even if you disable them). This helps minimize potential glitches between the BIOS and running your Hackintosh.***
4. F12 at start-up screen then select start-up drive USB-HDD for the Unibeast Installer USB
5. Make sure destination drive for the install is properly formatted then install Mavericks following Apple step-through
6. Reboot with F12 again start-up screen select USB-HDD and this time choose the drive you installed Mavericks onto (instead of OS X Mavericks unibeast installer)
7. At desktop copy contents of "post install" folder that you made in step 2 from the USB Unibeast Installer
8. Open Disk Utility to Repair Disk Permissions of your Mac Install
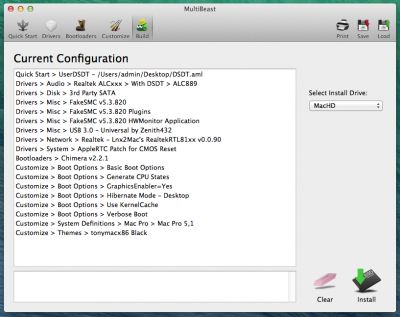
7. Run Multibeast linking your DSDT (see my screenshot for the build setting I used)
8. When Multibeast is finished run Chameleon Wizard to make adjustments (I added ATI Config for hoolock - set graphics mode for my monitor's resolution - ticked Graphics Enabler. Then save (see screenshot)
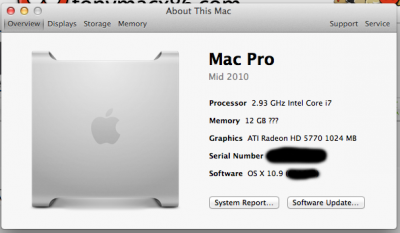
9. I checked my SMBios using Chameleon Wizard to confirm system preference is 5,1 Mac Pro - Be sure to save if you made changes
10. If you have an advanced format drive then Reboot using F12 at boot again and select Installer then follow tonymac's solution 1 to fix the "boot0 error" http://www.tonymacx86.com/25-boot0-e...ial-guide.html
11. Reboot your computer and enjoy!
-----------------------
Graphics Card Note:
-----------------------
I am using the Apple OEM Radeon HD5770 card the framebuffer is suppose to be "hoolock" and the chameleon graphics enabler set to "yes".
------------------
iMessage notes:
------------------
This is what worked for me -> iMessage Not working after upgrading to Mavericks!
http://www.tonymacx86.com/general-h...g-after-upgrading-mavericks-3.html#post696304
Here is a thread that might be of use -> How to Fix iMessage
http://www.tonymacx86.com/general-help/110471-how-fix-imessage.html
__________________________________________________ __________________________________________________ _____
I have a dual boot system so I have hidden a partition and renamed some drives but here is a copy of my org.chameleon.Boot.plist which provided support for my OEM Apple graphics card with the "hoolock" frame buffer. Doing some searching can reveal your frame buffer to substitute.
<?xml version="1.0" encoding="UTF-8"?>
<!DOCTYPE plist PUBLIC "-//Apple//DTD PLIST 1.0//EN" "http://www.apple.com/DTDs/PropertyList-1.0.dtd">
<plist version="1.0">
<dict>
<key>AtiConfig</key>
<string>Hoolock</string>
<key>EthernetBuiltIn</key>
<string>Yes</string>
<key>GenerateCStates</key>
<string>Yes</string>
<key>GeneratePStates</key>
<string>Yes</string>
<key>Graphics Mode</key>
<string>1920x1200x32</string>
<key>GraphicsEnabler</key>
<string>Yes</string>
<key>Hide Partition</key>
<string>hd(1,2)</string>
<key>IGPEnabler</key>
<string>Yes</string>
<key>Kernel</key>
<string>mach_kernel</string>
<key>Kernel Flags</key>
<string>-v</string>
<key>Legacy Logo</key>
<string>Yes</string>
<key>Rename Partition</key>
<string>hd(0,2) "OS X Mavericks"; hd(1,1) "Windows 8.1"</string>
<key>Timeout</key>
<string>2</string>
<key>UseKernelCache</key>
<string>Yes</string>
</dict>
</plist>
-----------------------------------------------------------------------------------------
Please offer any constructive criticism that may improve this build which I based from tonymac's Customac 2010
http://tonymacx86.blogspot.com/2010/...-pro-2010.html
---------------
Components:
---------------
- Intel i7 930 LGA1366
- Gigabyte GA-X58A-UD3R (rev. 2.0) - FH BIOS Mobo
- Corsair XMS3 DDR3 12GB RAM (3x 4GB matched) 9-9-9-24 1333MHz
- Apple Branded Radeon HD5770 (2 Mini Displayports and 1 DVI) PCI-E Video Card
- ASUS DRW-24B3ST Multi Recorder Optical Drive
- Apple Cinema Display 24"
--------------------
Install Procedure:
--------------------
1. Make Unibeast Installer for Mavericks USB
(Unibeast version 3.0.1 was used)
http://www.tonymacx86.com/374-unibea...-based-pc.html
2. Within the Unibeast Installer USB I made a folder for "post install" folder that contains
a) Latest version of Multibeast (version 6.0.1 was used)
http://www.tonymacx86.com/downloads.php?do=file&id=206
b) DSDT for the Gigabyte GA-X58A-UD3R (rev. 2.0) - FH BIOS
http://www.tonymacx86.com/11-dsdt-database.html
c) Chameleon Wizard (4.2.3 was used)
http://www.insanelymac.com/forum/top...for-chameleon/
http://www.tonymacx86.com/downloads.php?do=file&id=206
b) DSDT for the Gigabyte GA-X58A-UD3R (rev. 2.0) - FH BIOS
http://www.tonymacx86.com/11-dsdt-database.html
c) Chameleon Wizard (4.2.3 was used)
http://www.insanelymac.com/forum/top...for-chameleon/
3. BIOS config:memory timings set manually on expert then returned to auto to lock timings - additional settings are based from Lnx2Mac's Optimal BIOS blog
http://lnx2mac.blogspot.com/2010/07/optimal-bios-configuration.html
***Extra note about BIOS - It is a good idea to disable features that you are not using (e.g. I disabled firewire since I do not have any firewire peripherals) and to set all drives to AHCI (even if you disable them). This helps minimize potential glitches between the BIOS and running your Hackintosh.***
4. F12 at start-up screen then select start-up drive USB-HDD for the Unibeast Installer USB
5. Make sure destination drive for the install is properly formatted then install Mavericks following Apple step-through
6. Reboot with F12 again start-up screen select USB-HDD and this time choose the drive you installed Mavericks onto (instead of OS X Mavericks unibeast installer)
7. At desktop copy contents of "post install" folder that you made in step 2 from the USB Unibeast Installer
8. Open Disk Utility to Repair Disk Permissions of your Mac Install
7. Run Multibeast linking your DSDT (see my screenshot for the build setting I used)
8. When Multibeast is finished run Chameleon Wizard to make adjustments (I added ATI Config for hoolock - set graphics mode for my monitor's resolution - ticked Graphics Enabler. Then save (see screenshot)
9. I checked my SMBios using Chameleon Wizard to confirm system preference is 5,1 Mac Pro - Be sure to save if you made changes
10. If you have an advanced format drive then Reboot using F12 at boot again and select Installer then follow tonymac's solution 1 to fix the "boot0 error" http://www.tonymacx86.com/25-boot0-e...ial-guide.html
11. Reboot your computer and enjoy!
-----------------------
Graphics Card Note:
-----------------------
I am using the Apple OEM Radeon HD5770 card the framebuffer is suppose to be "hoolock" and the chameleon graphics enabler set to "yes".
------------------
iMessage notes:
------------------
This is what worked for me -> iMessage Not working after upgrading to Mavericks!
http://www.tonymacx86.com/general-h...g-after-upgrading-mavericks-3.html#post696304
Here is a thread that might be of use -> How to Fix iMessage
http://www.tonymacx86.com/general-help/110471-how-fix-imessage.html
__________________________________________________ __________________________________________________ _____
I have a dual boot system so I have hidden a partition and renamed some drives but here is a copy of my org.chameleon.Boot.plist which provided support for my OEM Apple graphics card with the "hoolock" frame buffer. Doing some searching can reveal your frame buffer to substitute.
<?xml version="1.0" encoding="UTF-8"?>
<!DOCTYPE plist PUBLIC "-//Apple//DTD PLIST 1.0//EN" "http://www.apple.com/DTDs/PropertyList-1.0.dtd">
<plist version="1.0">
<dict>
<key>AtiConfig</key>
<string>Hoolock</string>
<key>EthernetBuiltIn</key>
<string>Yes</string>
<key>GenerateCStates</key>
<string>Yes</string>
<key>GeneratePStates</key>
<string>Yes</string>
<key>Graphics Mode</key>
<string>1920x1200x32</string>
<key>GraphicsEnabler</key>
<string>Yes</string>
<key>Hide Partition</key>
<string>hd(1,2)</string>
<key>IGPEnabler</key>
<string>Yes</string>
<key>Kernel</key>
<string>mach_kernel</string>
<key>Kernel Flags</key>
<string>-v</string>
<key>Legacy Logo</key>
<string>Yes</string>
<key>Rename Partition</key>
<string>hd(0,2) "OS X Mavericks"; hd(1,1) "Windows 8.1"</string>
<key>Timeout</key>
<string>2</string>
<key>UseKernelCache</key>
<string>Yes</string>
</dict>
</plist>