
- Joined
- Mar 1, 2011
- Messages
- 11
- Motherboard
- Gigabyte GA-Z77X-UP5 TH
- CPU
- i7-3770K
- Graphics
- GTX 660 TI
- Mac
- Mobile Phone
So my original post is gone....don't know why....wish I had saved it.
So New post!!
[size=+1]Components[/size]
[size=+1]The Case Mod[/size]
I used Dozuki to make an online manual on how to mod the PowerMac G5. I have included roughly 80 pictures and steps to assist anyone else crazy like me with build a PowerMac G5
[size=+1]Check out pmg5.dozuki.com for full case mod details.[/size]
Quick Overview of the Build
Started with an empty PowerMac G5 Case


After about an hour and 100 screws, the case was apart.


Lots of cutting, epoxy and sanding...


...the case was ready to be assembled.


Click here for full details.
[size=+1]BIOS Setup[/size]
I updated my BIOS to F11 and started based off of the Optimized Setting. Note this is set for a dedicated graphics card.
[size=+1]Install Mountain Lion[/size]
Using the UniBeast Install Guide, install Mountain Lion. I made a USB drive with 10.8.3 on it. To boot the USB drive, hit F12 as your computer boot to get into Boot Mode and select your USB drive there. It took me about 20 mins for it to install on my SSD. After the install, it will ask you to reboot. Make sure to hit F12 and select your USB drive again to boot OSX.
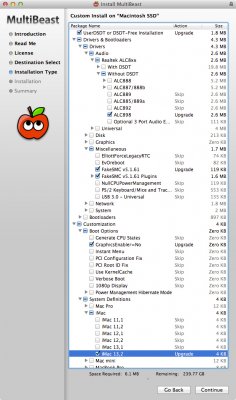
[size=+1]Install MultiBeast (See Update 2 for Yosemite MultiBeast instructions)[/size]
Once you've booted into OSX, download and run MultiBeast. In the screen shot below, I used MultiBeast 5.3.
**The System definitions need to be set as iMac 13.2 so Thunderbolt works correctly.**

Once you do a reboot, you should be good to go!
[size=+1]Other Thoughts[/size]
I did a couple tests to make sure things worked and they all worked perfectly.
The case is very nice, not only to the eyes but it keeps everything very cool. Average temps under normal loads are between 20ºC-30ºC.
[size=+1]Disk Benchmarks[/size]


[size=+1]Updates[/size]
Update 1:
The computer is very stable. I installed Adobe CS6 Production Premium and are currently doing video editing with Premiere Pro. I downloaded and installed the CUDA drivers for Mac from Nvidia's site to get the most out of the GTX660 TI. When previewing 4-5 1080p video tracks using 2 monitors, the CPU usage stays at around 5% and overall system temperature is 35°C. When I start adding fx to the video, the CPU uses 100% and overall system temperature is around 45°C.
I noticed that AirDrop wasn't enabled on the unit so I ran the following terminal command to get it up and running.
Also, I've noticed after I build a mac, the admin account looses permissions to certain files in its home directory. I used this to reset that. The Repair Permissions command in Disk Utility, DOES NOT repair permissions in the user's home directory.
Update 2 (Oct. 19, 2014) - Updating for Yosemite:
I decided to do a clean install for Yosemite. I've never been a fan of doing upgrades.
Do a Time Machine backup of your Mavericks computer.
Download UniBeast and make a Yosemite flash drive. Boot into the Yosemite flash drive. (I didn't have to use any boot flags)
Use Disk Utility to erase your primary OS X partition. Perform a clean install.
Once the install finishes, boot into your new Yosemite install using the flash drive. Follow the setup instructions. When I asked if you want to restore from a Time Machine backup, select yes, and restore your backup. After a reboot, your computer should be running Yosemite with all of your files and applications.
Delete the old /Extra folder then run MultiBeast with the following options. My MultiBeast config file is attached below.
You should be good to go.

So New post!!
[size=+1] The Final Build[/size]

[size=+1]Components[/size]
- Intel i7-3770K
- Gigabyte Z77X-UP5 TH
- EVGA GTX-660 TI
- Samsung 840 Pro 256GB SSD
- Corsair HX850
- Corsair 16GB RAM
[size=+1]The Case Mod[/size]
I used Dozuki to make an online manual on how to mod the PowerMac G5. I have included roughly 80 pictures and steps to assist anyone else crazy like me with build a PowerMac G5
[size=+1]Check out pmg5.dozuki.com for full case mod details.[/size]
Quick Overview of the Build
Started with an empty PowerMac G5 Case
After about an hour and 100 screws, the case was apart.
Lots of cutting, epoxy and sanding...
...the case was ready to be assembled.
Click here for full details.
I updated my BIOS to F11 and started based off of the Optimized Setting. Note this is set for a dedicated graphics card.
- BIOS Features > Intel Virtualization Technology = Enabled
- Peripherals > XHCI Pre-Boot Driver = Enabled
- Peripherals > XHCI Mode = Auto (NOT Smart Auto!)
- Peripherals > Init Display First = PEG
- Peripherals > XHCI Hand-off = Enabled
- Peripherals > EHCI Hand-off = Enabled
- Power Management > Wake on LAN = Disabled
- Power Management > High Precision Event Timer = Enabled
[size=+1]Install Mountain Lion[/size]
Using the UniBeast Install Guide, install Mountain Lion. I made a USB drive with 10.8.3 on it. To boot the USB drive, hit F12 as your computer boot to get into Boot Mode and select your USB drive there. It took me about 20 mins for it to install on my SSD. After the install, it will ask you to reboot. Make sure to hit F12 and select your USB drive again to boot OSX.
[size=+1]Install MultiBeast (See Update 2 for Yosemite MultiBeast instructions)[/size]
Once you've booted into OSX, download and run MultiBeast. In the screen shot below, I used MultiBeast 5.3.
**The System definitions need to be set as iMac 13.2 so Thunderbolt works correctly.**
Once you do a reboot, you should be good to go!
[size=+1]Other Thoughts[/size]
I did a couple tests to make sure things worked and they all worked perfectly.
- Audio - Works perfectly, no noise or crackling sounds.
- Ethernet - Works, I can talk with other devices in my house at 100MB/s
- Sleep - Works, put the computer to sleep in the evening, woke it up the next morning.
- USB3 - Works. I read somewhere to NOT use the 1st Front USB3 Header as it doesn't work correctly. I'm using the 2nd and so far, everything works as fast as my MacBook Pro that has USB3. I used an external USB3 SSD drive as a test.
- Thunderbolt - Works. The device must be plugged in before booting, or else the system will hang. I tested it with an Apple Thunderbolt to Ethernet adapter. I was able to get internet through it.
The case is very nice, not only to the eyes but it keeps everything very cool. Average temps under normal loads are between 20ºC-30ºC.
[size=+1]Disk Benchmarks[/size]
[size=+1]Updates[/size]
Update 1:
The computer is very stable. I installed Adobe CS6 Production Premium and are currently doing video editing with Premiere Pro. I downloaded and installed the CUDA drivers for Mac from Nvidia's site to get the most out of the GTX660 TI. When previewing 4-5 1080p video tracks using 2 monitors, the CPU usage stays at around 5% and overall system temperature is 35°C. When I start adding fx to the video, the CPU uses 100% and overall system temperature is around 45°C.
I noticed that AirDrop wasn't enabled on the unit so I ran the following terminal command to get it up and running.
Code:
defaults write com.apple.NetworkBrowser BrowseAllInterfaces 1Also, I've noticed after I build a mac, the admin account looses permissions to certain files in its home directory. I used this to reset that. The Repair Permissions command in Disk Utility, DOES NOT repair permissions in the user's home directory.
Code:
chmod -RN ~/Library/PreferencesUpdate 2 (Oct. 19, 2014) - Updating for Yosemite:
I decided to do a clean install for Yosemite. I've never been a fan of doing upgrades.
Do a Time Machine backup of your Mavericks computer.
Download UniBeast and make a Yosemite flash drive. Boot into the Yosemite flash drive. (I didn't have to use any boot flags)
Use Disk Utility to erase your primary OS X partition. Perform a clean install.
Once the install finishes, boot into your new Yosemite install using the flash drive. Follow the setup instructions. When I asked if you want to restore from a Time Machine backup, select yes, and restore your backup. After a reboot, your computer should be running Yosemite with all of your files and applications.
Delete the old /Extra folder then run MultiBeast with the following options. My MultiBeast config file is attached below.
You should be good to go.
Attachments


Last edited by a moderator: