
- Joined
- Nov 25, 2012
- Messages
- 180
- Motherboard
- I still didn't read
- CPU
- the RULES
- Graphics
- so ignore me
- Mobile Phone
Probook 4540s Ivy Bridge howto (old don't use)
Due to the recent excellent developments with the Probook Installer and the inclusion of the 4x40 series in Rehabmans excellent guide I strongly suggest you now follow that guide and NOT THIS ONE.
Link to RehabMan guide here ................. http://www.tonymacx86.com/hp-probook/77057-guide-installing-mountain-lion-hp-probook.html
STOP, STOP, STOP!..................DO NOT USE THE INSTRUCTIONS BELOW, THEY ARE NOW REDUNDANT!
*Completely re-written on March 28th 2013 due to new methods/ML app/tools/support files, please ignore all replies up to page 12*
HP Probook 4540s OS X Mountain Lion Hackintosh "simple and quick" howto.
This will be continuously updated, check back for the latest version.
This (modified/simplified) guide is for installing the latest (March 2013) Mountain Lion v10.8.3 from the Apple app store
Firstly, I could not have done this without the input of the guys on the tonymacx86 forum, fact!
MacMan, RehabMan, Philip-Petev, BigDonkey, zoltankr, Elrom, corebuilder, kpkp, duydangle and many, many others have brought us to where we are today with the HP 4x40s series of laptops, thank you all .
.
I originally followed the method first described for the 4440s by jelembic, adapting it for my system, since then many advances have been made by the forum members of tonymacx86, installation is now much easier/more reliable.
Youtube vids of my working original system here.........http://www.youtube.com/watch?v=E6nG4SvtXSA
And another here..............http://www.youtube.com/watch?v=D9r7sBk-1RA
I take no responsibility for your Computer or files, if you follow this guide and your computer or files are wrecked, its you're own fault, not mine! BACK UP EVERYTHING BEFORE YOU BEGIN!
I strongly advise you use the HP tools in Windows to back up both your Windows system (you may have a supplied disk for this) and also your system driver files onto a DVD. It is possible of course to get all the drivers from the HP site, BUT, HP use many different manufacturers for the components in your laptop, finding the correct ones can be a nightmare, the time to download them (especially when you discover its the wrong one) is also a pain in the bum!
If you are not prepared to delete Windows and all other stuff (recovery partition etc.) on your hard drive, you will need to get another one, or not bother at all, you really need to format the whole drive! (other options are documented elsewhere, but are MUCH more involved)
There are several variants of this laptop, this is for the Ivy Bridge dual core CPU but adjusting the Probook Installer selections should allow Sandybridge to also work fine. Some hard drives used in the 4540s are of the Advanced Format 4k sector size type, see the link below for information about this.
Link Advanced Format 4K drive fix..........http://www.tonymacx86.com/25-boot0-e...ial-guide.html
At the time of writing the wifi/bluetooth card (it does both jobs) will not work for wifi with mac osx (there are several types used in the 4540s, from various manufacturers, none work), so you have a few options…..
1, use a usb wifi dongle that is compatible, or 2, swap the card for one that is compatible. these are cheap and easy to fit, but, with most you will lose bluetooth too. Again there are plenty of usb bluetooth dongles that are VERY small and work with mac osx, Windows and Linux.
I'm using the Atheros AR5B93 wifi card in my laptop which works natively in Mac osx, Windows 7 and Linux and requires no extra drivers or work to function, (others are also reported to work) and a tiny "D" shaped USB dongle for bluetooth (search ebay for "usb bluetooth mac" to find a suitable device)
You will need to create a Unibeast (1.7) USB installer for Mountain Lion 10.8.3 using an 8GB usb pen drive on a working mac system which is running 10.6.8 or later. Mountain Lion 10.8.3 installer app is available for download from the online Apple Store for $19.99 (about £14), a bargain!
The Unibeast installer CANNOT be created on a Windows or Linux PC, BUT, you can create one on a "virtual mac" (running 10.6.8 or later) by using Virtualbox on a Windows or Linux PC (Virtualbox must have both the Guest additions and the extension pack installed). Creating a virtual PC is a learning curve in itself, but, bottom line (as I didn't have access to a mac), I did it, you should be able to.
See the tonymac website for instructions of how to create the unibeast installer for the Probook byRehabMan. (its actually a guide for the earlier 4530s model, just use it to make the Unibeast installer and then return to this guide).
I used the latest (at the time) Unibeast 1.7, your mileage may vary with other versions.
link……….http://www.tonymacx86.com/hp-probook/77057-guide-installing-mountain-lion-hp-probook.html
If you want to create a multi boot setup I also suggest you read RehabMan's blog referring to this very subject. His method was the only one I could get to work.
link………http://racerrehabman.wordpress.com
Get the excellent probook installer (at the time of writing I used the latest version 1.61beta4) from tonymacx86 and copy it to your newly created Unibeast installer stick.
Optional but recommended…….
Download Linux Mint 14 (or your distro of choice including Ubuntu as suggested by RehabMan) and burn it to a DVD, or, my preferred method, get Unetbootin (Windows or Linux versions) and use that to install it to another USB stick of 1GB or more. This will make an amazingly useful rescue tool to allow modifying your hard drive and accessing the internet if things get iffy. It will also let you install it to a spare partition if you want a Linux option on a multi boot system.
Mint Linux 64bit with Cinnamon desktop download link, choose a server near you ………..http://www.linuxmint.com/edition.php?id=118
NOTE>>Booting with a Linux live DVD or USB sick might be your ONLY method of accessing the internet with your laptop if something goes wrong later, make the boot disk or USB stick, boot from it (press F9 to select it if its USB) and have a play (don't install it) so you feel "at home" using it to connect to your wifi, accessing your hard drive, the net etc.
………….optional ends
Update your bios to f.40 in Windows, and once completed, check in BIOS that SATA is set for AHCI not IDE.
Some people also report boot issues unless Legacy boot (or CSM = compatibily support mode) is also enabled in BIOS so check that too.
Radeon HD graphics adapters WILL NOT WORK with mac osx on these laptops, if you have one disable it in BIOS now!
HP 4540s bios update link …………..http://h20000.www2.hp.com/bizsupport...nvOID=4059#120
So, lets get started on the install.
Boot with your Unibeast stick (in the right hand usb port closest to you) and press the F9 key IMMEDIATLEY you see the HP logo, and use the arrow keys to highlight your USB sick Unibeast installer. Now press the enter key and the laptop will boot to the loader screen showing the boot options, use the arrow keys to highlight the Unibeast Installer option. With your Unibeast boot option highlighted (not the windows one) start typing (a box will appear when you begin to type) the following, making sure you type the whole line, EXACTLY. (all upper/lower case characters and spaces must be IDENTICAL to this)
GraphicsEnabler=No UseKernelCache=No -f -v
and press the enter key.
Your system should boot to the Installer screen, (it takes a while and stops a few times) and because you used the "-v" flag in the line above, all file loads/executions will be visible, and any errors will be seen. You will now see line after line of text during the boot process.
NOTE, if you get the "waiting for boot device" error, unplug the USB installer stick and plug it back into another port.
Once at the Install screen you need to use the disk utility (select it from "Utilities" on the bar at the top of the screen) to erase/create/format the drive. Click on your hard drive to highlight it, select partition from the menu bar and in options select GUID type. If you want a multi boot system refer to Rehabmans guide again. You need to create a mac journalised partition to install the Mountain Lion 10.8.3 system to.
Here's a tip if you do choose the multi boot option. Just do a basic install for the other operating systems, if your mac install fails you may need to start over and install them again. Do a basic install now and return to setup them properly once your mac install is OK.
Once you have your drive sorted click continue and select the partition to install to. (If it says you can't install to the chosen partition, read why and go back and do it again, sometimes even after re-formatting the Mac partition at this point it still won't install, and a complete re-boot might be needed. Have faith it will eventually work, honest) When the install ends (if the screensaver kicks in during install, just tap the left touchpad key) the computer will need to reboot when it completes this stage, so quickly press F9 when it does, and select to boot from your USB Unibeast stick AGAIN. Now you should see two (or more) options to boot from, use arrow keys to move this time to highlight your new hard drive installation and again type……
GraphicsEnabler=No UseKerenelCache=No -f -v (NOTE if your system hangs during this second Unibeast boot try adding -x to this line too)
........and press the enter key. This should eventually bring up the install setup menus. I suggest you skip through all options apart from the account log in/password one and the wifi setup, you can easily set the others up later, as and when needed.
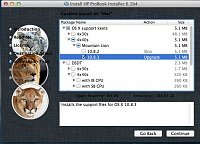
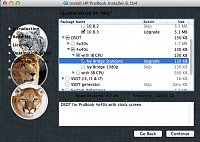
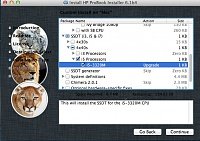
Once your mac is up and running click on the System Preferences icon on the dock to open it. Now open the Security & Privacy options. At the bottom left you will see a padlock, click on this to unlock the options. Now you should be able to change the "Allow applications download from" option to "Anywhere" so you can run non Apple approved apps. Close the Preferences windows and then find the Probook installer saved on your Unibeast stick, which should show as an icon on your desktop. Run the probook installer and select (tick) the required options, for my i5-3210 cpu version I used these, modify them as needed (the selected CPU is not an exact match but it works fine for now), selecting the SSDT creator creates and SSDT.aml file specific to your CPU into your /Extra folder.


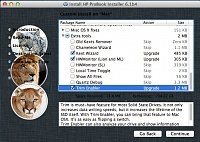
Install these options and exit Probook installer. The Trim enabler is only required for SSD (solid state) hard drives.
Click Go on the top bar and select computer, eject the installer stick (click the little up arrow symbol next to the drive) and take it out. (you can just take it out but this will get you complained at) and reboot.
Hopefully now you will see the chimera boot screen and a fast moving timer, if you tap any key now you get another (chameleon) menu allowing you to choose a different boot option (only if you have multi partitions/installs) otherwise it should just boot into Mountain Lion.
If instead of the Chimera screen, your system boots straight into Windows, or you get a list of boot0 errors, you have a 4k advanced format drive and need to look at the link above to fix it. Remember that during the 4k drive fix you need to modify/install Chimera to the Mac installation partition.
Good luck!
Pete
This guide should get you a stable system fairly quickly, but long term it is recommended that you create and patch your own DSDT file.
The waking from sleep issue can be avoided be setting computer sleep (System Preferences/Energy saver) to never, alternatively load the latest version of RehabMan's VoodooPS2Controller from here........ http://www.tonymacx86.com/hp-probook/75649-new-voodoops2controller-keyboard-trackpad.html
*Please remember, the next 12 pages of posts refer to the OLD version of this guide, so jump to there to save confusion *
*
Due to the recent excellent developments with the Probook Installer and the inclusion of the 4x40 series in Rehabmans excellent guide I strongly suggest you now follow that guide and NOT THIS ONE.
Link to RehabMan guide here ................. http://www.tonymacx86.com/hp-probook/77057-guide-installing-mountain-lion-hp-probook.html
STOP, STOP, STOP!..................DO NOT USE THE INSTRUCTIONS BELOW, THEY ARE NOW REDUNDANT!
*Completely re-written on March 28th 2013 due to new methods/ML app/tools/support files, please ignore all replies up to page 12*
HP Probook 4540s OS X Mountain Lion Hackintosh "simple and quick" howto.
This will be continuously updated, check back for the latest version.
This (modified/simplified) guide is for installing the latest (March 2013) Mountain Lion v10.8.3 from the Apple app store
Firstly, I could not have done this without the input of the guys on the tonymacx86 forum, fact!
MacMan, RehabMan, Philip-Petev, BigDonkey, zoltankr, Elrom, corebuilder, kpkp, duydangle and many, many others have brought us to where we are today with the HP 4x40s series of laptops, thank you all
I originally followed the method first described for the 4440s by jelembic, adapting it for my system, since then many advances have been made by the forum members of tonymacx86, installation is now much easier/more reliable.
Youtube vids of my working original system here.........http://www.youtube.com/watch?v=E6nG4SvtXSA
And another here..............http://www.youtube.com/watch?v=D9r7sBk-1RA
I take no responsibility for your Computer or files, if you follow this guide and your computer or files are wrecked, its you're own fault, not mine! BACK UP EVERYTHING BEFORE YOU BEGIN!
I strongly advise you use the HP tools in Windows to back up both your Windows system (you may have a supplied disk for this) and also your system driver files onto a DVD. It is possible of course to get all the drivers from the HP site, BUT, HP use many different manufacturers for the components in your laptop, finding the correct ones can be a nightmare, the time to download them (especially when you discover its the wrong one) is also a pain in the bum!
If you are not prepared to delete Windows and all other stuff (recovery partition etc.) on your hard drive, you will need to get another one, or not bother at all, you really need to format the whole drive! (other options are documented elsewhere, but are MUCH more involved)
There are several variants of this laptop, this is for the Ivy Bridge dual core CPU but adjusting the Probook Installer selections should allow Sandybridge to also work fine. Some hard drives used in the 4540s are of the Advanced Format 4k sector size type, see the link below for information about this.
Link Advanced Format 4K drive fix..........http://www.tonymacx86.com/25-boot0-e...ial-guide.html
At the time of writing the wifi/bluetooth card (it does both jobs) will not work for wifi with mac osx (there are several types used in the 4540s, from various manufacturers, none work), so you have a few options…..
1, use a usb wifi dongle that is compatible, or 2, swap the card for one that is compatible. these are cheap and easy to fit, but, with most you will lose bluetooth too. Again there are plenty of usb bluetooth dongles that are VERY small and work with mac osx, Windows and Linux.
I'm using the Atheros AR5B93 wifi card in my laptop which works natively in Mac osx, Windows 7 and Linux and requires no extra drivers or work to function, (others are also reported to work) and a tiny "D" shaped USB dongle for bluetooth (search ebay for "usb bluetooth mac" to find a suitable device)
You will need to create a Unibeast (1.7) USB installer for Mountain Lion 10.8.3 using an 8GB usb pen drive on a working mac system which is running 10.6.8 or later. Mountain Lion 10.8.3 installer app is available for download from the online Apple Store for $19.99 (about £14), a bargain!
The Unibeast installer CANNOT be created on a Windows or Linux PC, BUT, you can create one on a "virtual mac" (running 10.6.8 or later) by using Virtualbox on a Windows or Linux PC (Virtualbox must have both the Guest additions and the extension pack installed). Creating a virtual PC is a learning curve in itself, but, bottom line (as I didn't have access to a mac), I did it, you should be able to.
See the tonymac website for instructions of how to create the unibeast installer for the Probook byRehabMan. (its actually a guide for the earlier 4530s model, just use it to make the Unibeast installer and then return to this guide).
I used the latest (at the time) Unibeast 1.7, your mileage may vary with other versions.
link……….http://www.tonymacx86.com/hp-probook/77057-guide-installing-mountain-lion-hp-probook.html
If you want to create a multi boot setup I also suggest you read RehabMan's blog referring to this very subject. His method was the only one I could get to work.
link………http://racerrehabman.wordpress.com
Get the excellent probook installer (at the time of writing I used the latest version 1.61beta4) from tonymacx86 and copy it to your newly created Unibeast installer stick.
Optional but recommended…….
Download Linux Mint 14 (or your distro of choice including Ubuntu as suggested by RehabMan) and burn it to a DVD, or, my preferred method, get Unetbootin (Windows or Linux versions) and use that to install it to another USB stick of 1GB or more. This will make an amazingly useful rescue tool to allow modifying your hard drive and accessing the internet if things get iffy. It will also let you install it to a spare partition if you want a Linux option on a multi boot system.
Mint Linux 64bit with Cinnamon desktop download link, choose a server near you ………..http://www.linuxmint.com/edition.php?id=118
NOTE>>Booting with a Linux live DVD or USB sick might be your ONLY method of accessing the internet with your laptop if something goes wrong later, make the boot disk or USB stick, boot from it (press F9 to select it if its USB) and have a play (don't install it) so you feel "at home" using it to connect to your wifi, accessing your hard drive, the net etc.
………….optional ends
Update your bios to f.40 in Windows, and once completed, check in BIOS that SATA is set for AHCI not IDE.
Some people also report boot issues unless Legacy boot (or CSM = compatibily support mode) is also enabled in BIOS so check that too.
Radeon HD graphics adapters WILL NOT WORK with mac osx on these laptops, if you have one disable it in BIOS now!
HP 4540s bios update link …………..http://h20000.www2.hp.com/bizsupport...nvOID=4059#120
So, lets get started on the install.
Boot with your Unibeast stick (in the right hand usb port closest to you) and press the F9 key IMMEDIATLEY you see the HP logo, and use the arrow keys to highlight your USB sick Unibeast installer. Now press the enter key and the laptop will boot to the loader screen showing the boot options, use the arrow keys to highlight the Unibeast Installer option. With your Unibeast boot option highlighted (not the windows one) start typing (a box will appear when you begin to type) the following, making sure you type the whole line, EXACTLY. (all upper/lower case characters and spaces must be IDENTICAL to this)
GraphicsEnabler=No UseKernelCache=No -f -v
and press the enter key.
Your system should boot to the Installer screen, (it takes a while and stops a few times) and because you used the "-v" flag in the line above, all file loads/executions will be visible, and any errors will be seen. You will now see line after line of text during the boot process.
NOTE, if you get the "waiting for boot device" error, unplug the USB installer stick and plug it back into another port.
Once at the Install screen you need to use the disk utility (select it from "Utilities" on the bar at the top of the screen) to erase/create/format the drive. Click on your hard drive to highlight it, select partition from the menu bar and in options select GUID type. If you want a multi boot system refer to Rehabmans guide again. You need to create a mac journalised partition to install the Mountain Lion 10.8.3 system to.
Here's a tip if you do choose the multi boot option. Just do a basic install for the other operating systems, if your mac install fails you may need to start over and install them again. Do a basic install now and return to setup them properly once your mac install is OK.
Once you have your drive sorted click continue and select the partition to install to. (If it says you can't install to the chosen partition, read why and go back and do it again, sometimes even after re-formatting the Mac partition at this point it still won't install, and a complete re-boot might be needed. Have faith it will eventually work, honest) When the install ends (if the screensaver kicks in during install, just tap the left touchpad key) the computer will need to reboot when it completes this stage, so quickly press F9 when it does, and select to boot from your USB Unibeast stick AGAIN. Now you should see two (or more) options to boot from, use arrow keys to move this time to highlight your new hard drive installation and again type……
GraphicsEnabler=No UseKerenelCache=No -f -v (NOTE if your system hangs during this second Unibeast boot try adding -x to this line too)
........and press the enter key. This should eventually bring up the install setup menus. I suggest you skip through all options apart from the account log in/password one and the wifi setup, you can easily set the others up later, as and when needed.
Once your mac is up and running click on the System Preferences icon on the dock to open it. Now open the Security & Privacy options. At the bottom left you will see a padlock, click on this to unlock the options. Now you should be able to change the "Allow applications download from" option to "Anywhere" so you can run non Apple approved apps. Close the Preferences windows and then find the Probook installer saved on your Unibeast stick, which should show as an icon on your desktop. Run the probook installer and select (tick) the required options, for my i5-3210 cpu version I used these, modify them as needed (the selected CPU is not an exact match but it works fine for now), selecting the SSDT creator creates and SSDT.aml file specific to your CPU into your /Extra folder.
Install these options and exit Probook installer. The Trim enabler is only required for SSD (solid state) hard drives.
Click Go on the top bar and select computer, eject the installer stick (click the little up arrow symbol next to the drive) and take it out. (you can just take it out but this will get you complained at) and reboot.
Hopefully now you will see the chimera boot screen and a fast moving timer, if you tap any key now you get another (chameleon) menu allowing you to choose a different boot option (only if you have multi partitions/installs) otherwise it should just boot into Mountain Lion.
If instead of the Chimera screen, your system boots straight into Windows, or you get a list of boot0 errors, you have a 4k advanced format drive and need to look at the link above to fix it. Remember that during the 4k drive fix you need to modify/install Chimera to the Mac installation partition.
Good luck!
Pete
This guide should get you a stable system fairly quickly, but long term it is recommended that you create and patch your own DSDT file.
The waking from sleep issue can be avoided be setting computer sleep (System Preferences/Energy saver) to never, alternatively load the latest version of RehabMan's VoodooPS2Controller from here........ http://www.tonymacx86.com/hp-probook/75649-new-voodoops2controller-keyboard-trackpad.html
*Please remember, the next 12 pages of posts refer to the OLD version of this guide, so jump to there to save confusion
*

")