Update #1 - HackinDROM and Bluetooth-on-Wake Fix
Just a quick update to report on two things:
- HackinDROM: Followed @CaseySJ's mini tutorial and smoothly and effortless updated OpenCore from the initial install (0.7.8) to 0.8.3. This went completely without a hitch. I'm seriously impressed. A couple years ago I used MountEFI and ProperTree for config.plist editing - EFIAgent, HackinDROM, and OpenCore Configurator are just some much nicer and more robust to use. BTW... to edit the O.C. 0.8.3 config.plist, use OpenCore Configurator version 2.61.2.0
- Bluetooth on Wake - FIXED: Bluetooth on macOS Monterey has been a bit of a painful issue, but it seems to be working now. For the initial installation, I used an old USB wired Mac keyboard and a Logitech USB mouse. Once I got the system installed, I switched over to an Apple BT Magic Keyboard, mouse, and trackpad. With the first system sleep, I was able to wake the system by tapping the trackpad, but the keyboard, mouse and trackpad were completely unresponsive. I did a bit of reading on the forums and tried the following, which seems to have fixed the problem:
- Disabled FastBoot in BIOS
- Enabled the set of Broadcom kernel Kexts:

I also used pmset to adjust a few things per the 'Fixing Sleep | OpenCore Post-Install' guide:
sudo pmset autopoweroff 0
sudo pmset powernap 0
sudo pmset standby 0
sudo pmset proximitywake 0
sudo pmset tcpkeepalive 0
So far, I've been really happy with this build and can't recommend it highly enough. I've finished the tedious, watching-paint-dry, software installation process and, so far, everything seems to be working well on macOS Monterey. Time will tell if issues come but.
So far, so good.
J
Initial Post
Cracking New Build: Successes, Hiccups, and Some Lessons Learned
TL;DR Summary:
I used
@CaseySJ's comprehensive hardware shopping and build guide for build out and excellent installation guide and had a
mostly event-free installation with O.C. 0.7.8 and macOS Montgomery. There were a couple small hiccups along the way, which is to be expected: I'll share the lessons learned.
30 Second Executive Summary:
If you're planning to attempt this build, start ordering the components
now, before they disappear off the shelves of Amazon and NewEgg. OpenCore 0.7.8 + macOS Monterey has been a huge success so far and I can heartily recommend them. Read
@CaseySJ's excellent installation guide (several times) and
do exactly what he tells you to do - you should be good. Post to the forum if you get stuck.
Long Summary:
First, I can't say thanks enough to
@CaseySJ for the
huge amount of time and effort into putting this build guide together! It represents a tremendous amount of work and I wanted to start by calling him out and thanking him for it.
Huge Kudos, buddy!
Next, here's the parts list for this build (all sourced from Amazon US):
- MB: ASUS ProArt Z690-Creator WIFI
- CPU: Intel Core i7-13700 (socket LGA 1700)
- GPU: Gigabyte AMD Radeon RX 6800 XT
- RAM: G.Skill Trident Z5 RGB DDR5 32GB x4 (128GB total)
- SSD (primary): Western Digital Black SN850X Gen4 2TB
- SSD (secondary): Western Digital Black SN770 1TB
- CPU Cooler: Lian Li Galahad AIO 360 RGB
- WIFI/BT: Fenvi T919 PCIe card (see discussion below)
- CASE: Lian Li PC-011 Dynamic EVO Snow White ATX Full Tower (love this thing!)
- PS: NZXT C1000 80+ Gold 1000 watt power supply
- FANS: Lian Li SL-Infinity 120mm RGB and 2x NZXT 120 fans
I repurposed a set of Apple Magic Keyboard, Mouse, and Trackpad from a prior build. Once I move this to its final resting place, it will drive a BenQ 4K monitor.
The Build:
This mostly went very smoothly. It took a while to source all of the parts. One thing I've learned from building systems over the years is that many components have a pretty short shelf life - if you wait more than 6-12 months, they can become increasingly difficult to find or end up in the hands of scalpers. A few of these components were already in short supply when I ordered them.
I ended up spending the better part of a day with the build. I took my time. I did run into a couple issues, which I eventually resolved:
- WIFI/BT: I had planned to use the BCM94360NG M.2 WIFI/BT card for WIFI and Bluetooth connectivity in order to save a PCIe slot - installation went pretty smoothly (see prior post), but for some reason I could not get Bluetooth to work. I'm sure it's My Bad. In the end, I stole a Fenvi T919 PCIe card from a prior build and installed in and Everything Just Worked. These Fenvi cards are the best.
- RAM: I ran into two issues with the G.Skill Trident memory: (1) the system refused to boot when XMP Profile 1 was enabled - it just hung (disabling XMP solved that problem), and (2) it takes a very long time during POST for memory checking - probably on the order of 60-70 seconds - not sure why, but it just does. I'll live with it.
Things about the build I really loved:
- CASE: I am totally enthralled with the Lian Li 001 Dynamic EVO case. I was really surprised by this. I'm a pretty huge NZXT fanboy and just finished Windows 10 builds with NZXT i510 and i710 cases - both of these are great cases and both in basic black. For this build, I decided to try something different - I wasn't sure I'd like a pure white case, but in the end, I'm really loving it. More importantly, the Lian Li case is a work of art - everything is nicely laid out, build materials are top notch, cable routing is quite good, there's easy access to nearly everything with thumb screws, no sharp points, and its just a gorgeous case to look at.
The Installation:
This went mostly smoothly, although I did run into a problem with my first choice of OpenCore and macOS versions:
- First attempt: The Problem: OpenCore 0.8.3 and macOS Big Sur- I chose Big Sur because I plan to use this build for a combination of digital photography, video editing, and a bit of digital music production. I checked compatibility lists for the big ticket apps that I use and most of them recommended Big Sur with a proviso that Monterey support was still a bit sketchy. So, I figured I'd go conservative.
- Here's the problem: I could not get macOS Big Sur to recognize the Marvell Aquantia AQC113 10 GbE LAN adapter. I spent a couple hours reading through Tonymacx86 forums and doing some Google searches and reading. There were a handful of on topic posts in another forum. I tried a couple SSDT's and tinkered with kernel patches, but... No Love.
I'm too old to keep banging my head against the wall...
- Second attempt: The solution: OpenCore 0.7.8 and macOS Monterey - I started from scratch, rebuilt the install USB drive with the O.C. 0.7.8 EFI and a fresh download of macOS Monterey and everything installed and worked!
Aside: I configured this as MacPro 7,1 in config.plist. BIOS settings were as outlined in the installation guide, except as noted above.
What's working:
Pretty much everything, at least so far. The system has been up and running for only about 24 hours, so it's a bit too early to declare victory. Still, everything has been stable so far.
Here's what I've tested and found working:
- iCloud
- iMessage
- WIFI
- Bluetooth
- USB ports
- Audio (front and rear panel connectors)
- AirDrop
- Sleep/wake (no issues with USB on wake)
Here's what the system has detected, but I haven't had time yet to test:
- Ethernet ports: the system correctly identifies both the Intel i225 and Marvell Aquantia AQC113 10 GbE adapters
- Thunderbolt 4
Benchmarks:
I was pleasantly surprised by how this thing hums along. Here's a quick rundown:
- WD BLACK XN850X
- WRITE: 5864 MB/s
- READ: 5805 MB/s
- WD BLACK SN770
- WRITE: 4209 MB/s
- READ: 4286 MB/s
- Cinebench R23:
- Single Core: 1801
- Multi Core: 28987
N.B. - I decided to configure the BIOS with all P-cores and E-cores enabled.
Plans and Final Thoughts:
With the proviso that this system is still in its infancy, I am already enjoying it and have high hopes. I'm anticipating a duty cycle of 3-4 years and will be using this primarily for digital photo editing (Adobe CC, ON1 Photo RAW, DxO NiK Plugins, and BorisFX primarily) with some video editing (Final Cut Pro X and/or DaVinci Resolve Studio 18) and digital music production (Logic Pro X, MainStage, FL Studio 20, Ableton Live Studio 10, Bitwig 4). It will likely share day-to-day computing responsibilities (email, web, and some office work) with a Windows 10 Home build.
I'm already sourcing parts for a NAS server (TrueNAS Core, more than likely) - content will live on the NAS server for both archiving and file sharing between the macOS and Win10 computers. I still need Win10 for a couple things, including Microsoft ICE, which is still my absolute favorite image composite editor. I'm hoping to set up a small 10 GbE LAN - the ASUS board has built-in 10 GbE support and the Win10 MB (ASUS ROG Strix X570-E WIFI) has 2.5 GbE support. I'll probably add a 10 GbE PCIe card to it in the future. If I can get anything close to 400-500 MB/s transfer speeds, I'll plan to download images from the camera directly to the NAS server and simply work off of SMB shares. Video editing... probably not. I hate latency. I'll probably work off a scratch drive (WD SN770) and use the NAS server for archiving and sharing.
I'll plan to check back in and post from time to time as I get more experience with this system, particularly if I run into issues.
Screenshots:
Final Build
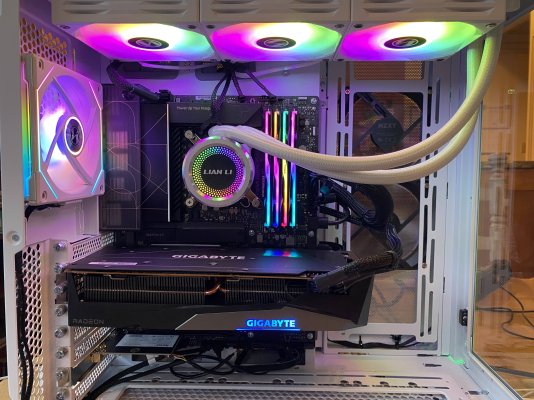
Case internals (I'll spare you a look at the rat's nest of cabling hidden on the back side...)
Both LAN adapters correctly identified
WD BLACK SN850X NVMe SSD drive - Speed test
WD SN770 NVMe SSD drive - Speed test
Cinebench Multi Core: Score: 28987
Cinebench R23 Single Core: Score: 1801
Successful Install!
Once again, huge thanks to
@CaseySJ for sharing his hard work and being available to help with builds and answering the myriad questions and issues that come up.
Cheers!
JMF (
@CatBus)