
- Joined
- Sep 21, 2010
- Messages
- 13,411
- Motherboard
- HP 17" 17-by3053cl
- CPU
- i5-1035G1
- Graphics
- Intel UHD Graphics, 1920x1080
- Mac
- Classic Mac
- Mobile Phone
Stork's Thunderball II Build:
ASUS ProArt Z490 Creator - i5-10400 - RX 6600 XT

ASUS ProArt Z490 Creator - i5-10400 - RX 6600 XT
Note: for Catalina and Big Sur users, See Post 198 for the latest config.plist update.
Contents
Components
Components
ASUS ProArt Z490 Creator Motherboard
https://www.newegg.com/p/N82E16813119290
Corsair Vengeance LPX 16GB (4x4GB) 2800MHz DDR4 CMK16GX4M4A2800C16R Memory
https://www.amazon.com/dp/B00MPIEECU
https://www.newegg.com/p/N82E16820233696
Intel i5-10400 Comet Lake Processor
https://www.amazon.com/dp/B086MN38Q2
https://www.newegg.com/p/N82E16819118135
Noctua NH-D15S CPU Cooler
https://www.amazon.com/dp/B00XUVGLEU
https://www.newegg.com/p/N82E16835608072
Sabrent Rocket Q 1TB NVMe M.2 SB-RKTQ-1TB SSD
https://www.amazon.com/dp/B07ZZYWTBP
https://www.newegg.com/p/0D9-001Y-00024
Sabrent Rocket 256GB NVMe M.2 SB-ROCKET-256 SSD
https://www.amazon.com/dp/B07KGLN3HN
https://www.newegg.com/sabrent-rocket-nvme-256gb/p/1B0-003U-000H3
Sapphire Pulse RX 580 8GB Graphics Card
https://www.amazon.com/dp/B06ZZ6FMF8
https://www.newegg.com/p/N82E16814202362
Gigabyte RX 6600 XT Eagle 8GB WindForce 3x
https://www.amazon.com/dp/B09BWQ6R46
Fenvi FV-T919 Hackintosh 1750Mbps PCI-E Bluetooth 4.0 Wireless Adapter
https://www.amazon.com/dp/B07VCCZS54
https://www.newegg.com/p/0XM-00JK-00033?Item=9SIADXZ7GS4848
Thermaltake Toughpower Grand RGB 750W 80 PLUS GOLD Certified Full Modular Power Supply PS-TPG-0750FPCGUS-R
https://www.amazon.com/dp/B01N4C39AR
https://www.newegg.com/p/N82E16817153309
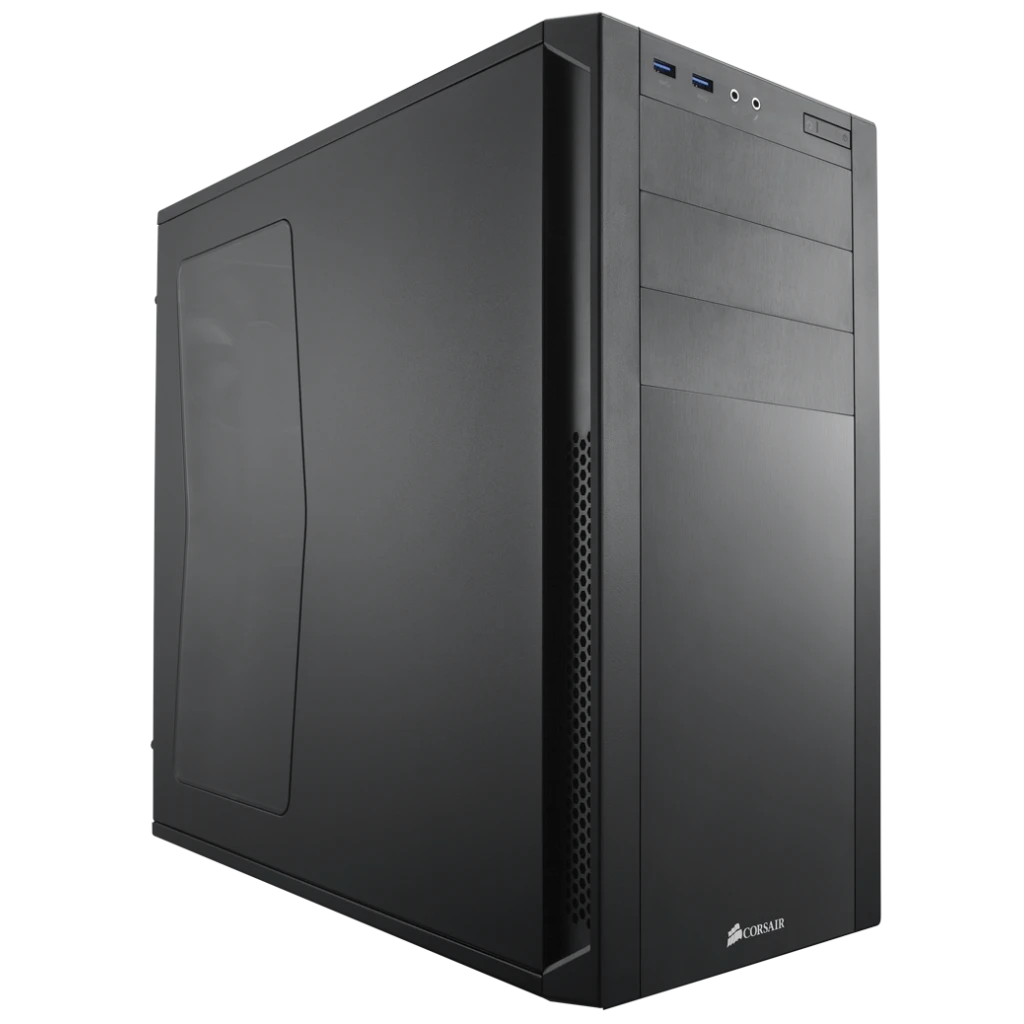
Corsair Carbide Series 200R Black Compact ATX Mid Tower Case
https://www.amazon.com/dp/B009GXZ8MM
https://www.newegg.com/p/N82E16811139018
Already Owned
Other World Computing Thunderbolt 3 14 Port Dock
https://www.owcdigital.com/products/thunderbolt-3-dock-14-port
https://www.amazon.com/dp/B07JMH6BSY
https://www.newegg.com/p/37G-003D-00004
Dell 27" Ultrasharp U2711 monitor
Apple Keyboard USB
Apple Magic Mouse
Logitech K750 White Mac Keyboard
https://www.amazon.com/dp/B005L38VRU
https://www.newegg.com/p/N82E16823126277
Comments
The Build
I have a MacBook Pro with four Thunderbolt 3 ports. Consequently, I wanted a motherboard with Thunderbolt 3. My previous systems used Asus motherboards which I found to be easy to adapt to macOS. Since @CaseySJ had such good success with his three Thunderbolt 3 Gigabyte motherboards, the Asus ProArt Z490 Creator with Thunderbolt 3 won the motherboard competition. Additionally, this my second Thunderbolt system (Z77 Thunderball). So, as I mentioned above, I named this system Thunderball II. (The Thunderball name comes from the James Bond movie.)
The Motherboard
This is my third ASUS motherboard, and, as I said in my Gene & MyHero build descriptions, I had heard good things about them from tonymacx86, MacMan, @beelzebozo and @Gordo74. The ProArt Creator series of the ASUS motherboards is one of the top of the line, and you get what you pay for! If you desire to overclock, then the ASUS BIOS gets you started with one click overclocking choices. I recommend you read the User's Manual to follow the overclocking tutorial.
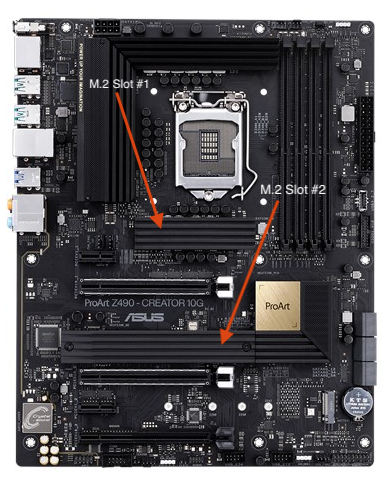
In addition to the usual number of PCIe slots for a ATX size motherboard, the Creator has two M.2 slots for either a AHCI (assigned to two SATA ports - SATA0 and SATA1) or NVMe SSD blade. The Number 1 M.2 slot in located under a special heat sink between the processor socket and the first PCIe 16x slot; the second M.2 slot is located after the two PCI x 16 slots to the right side of the motherboard. I have the Sabrent Rocket Q 1TB NVMe SSD in the M.2 slot 1, and the Sabrent Rocket 256GB NVMe SSD in the 2nd M.2 slot. The former is for my production macOS system drive, and the latter is for testing new versions of macOS and the tonymacx86 Beasts.
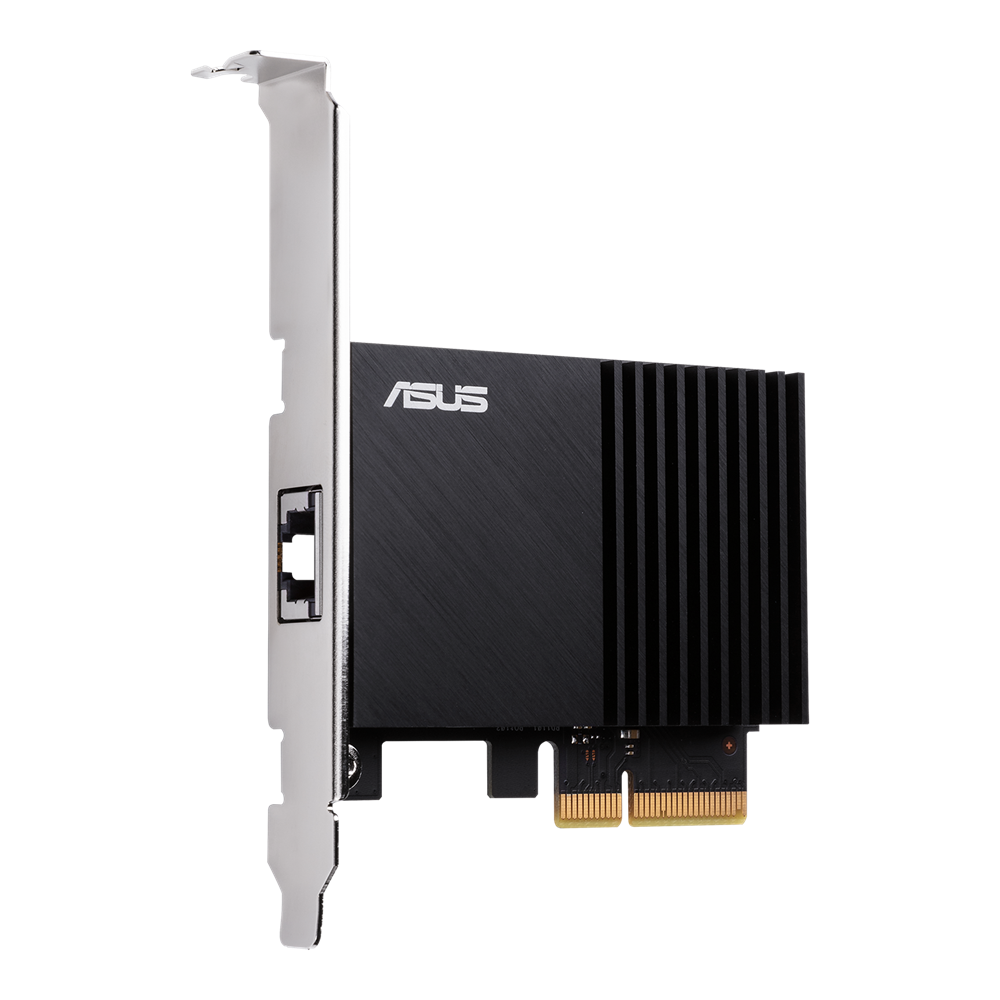
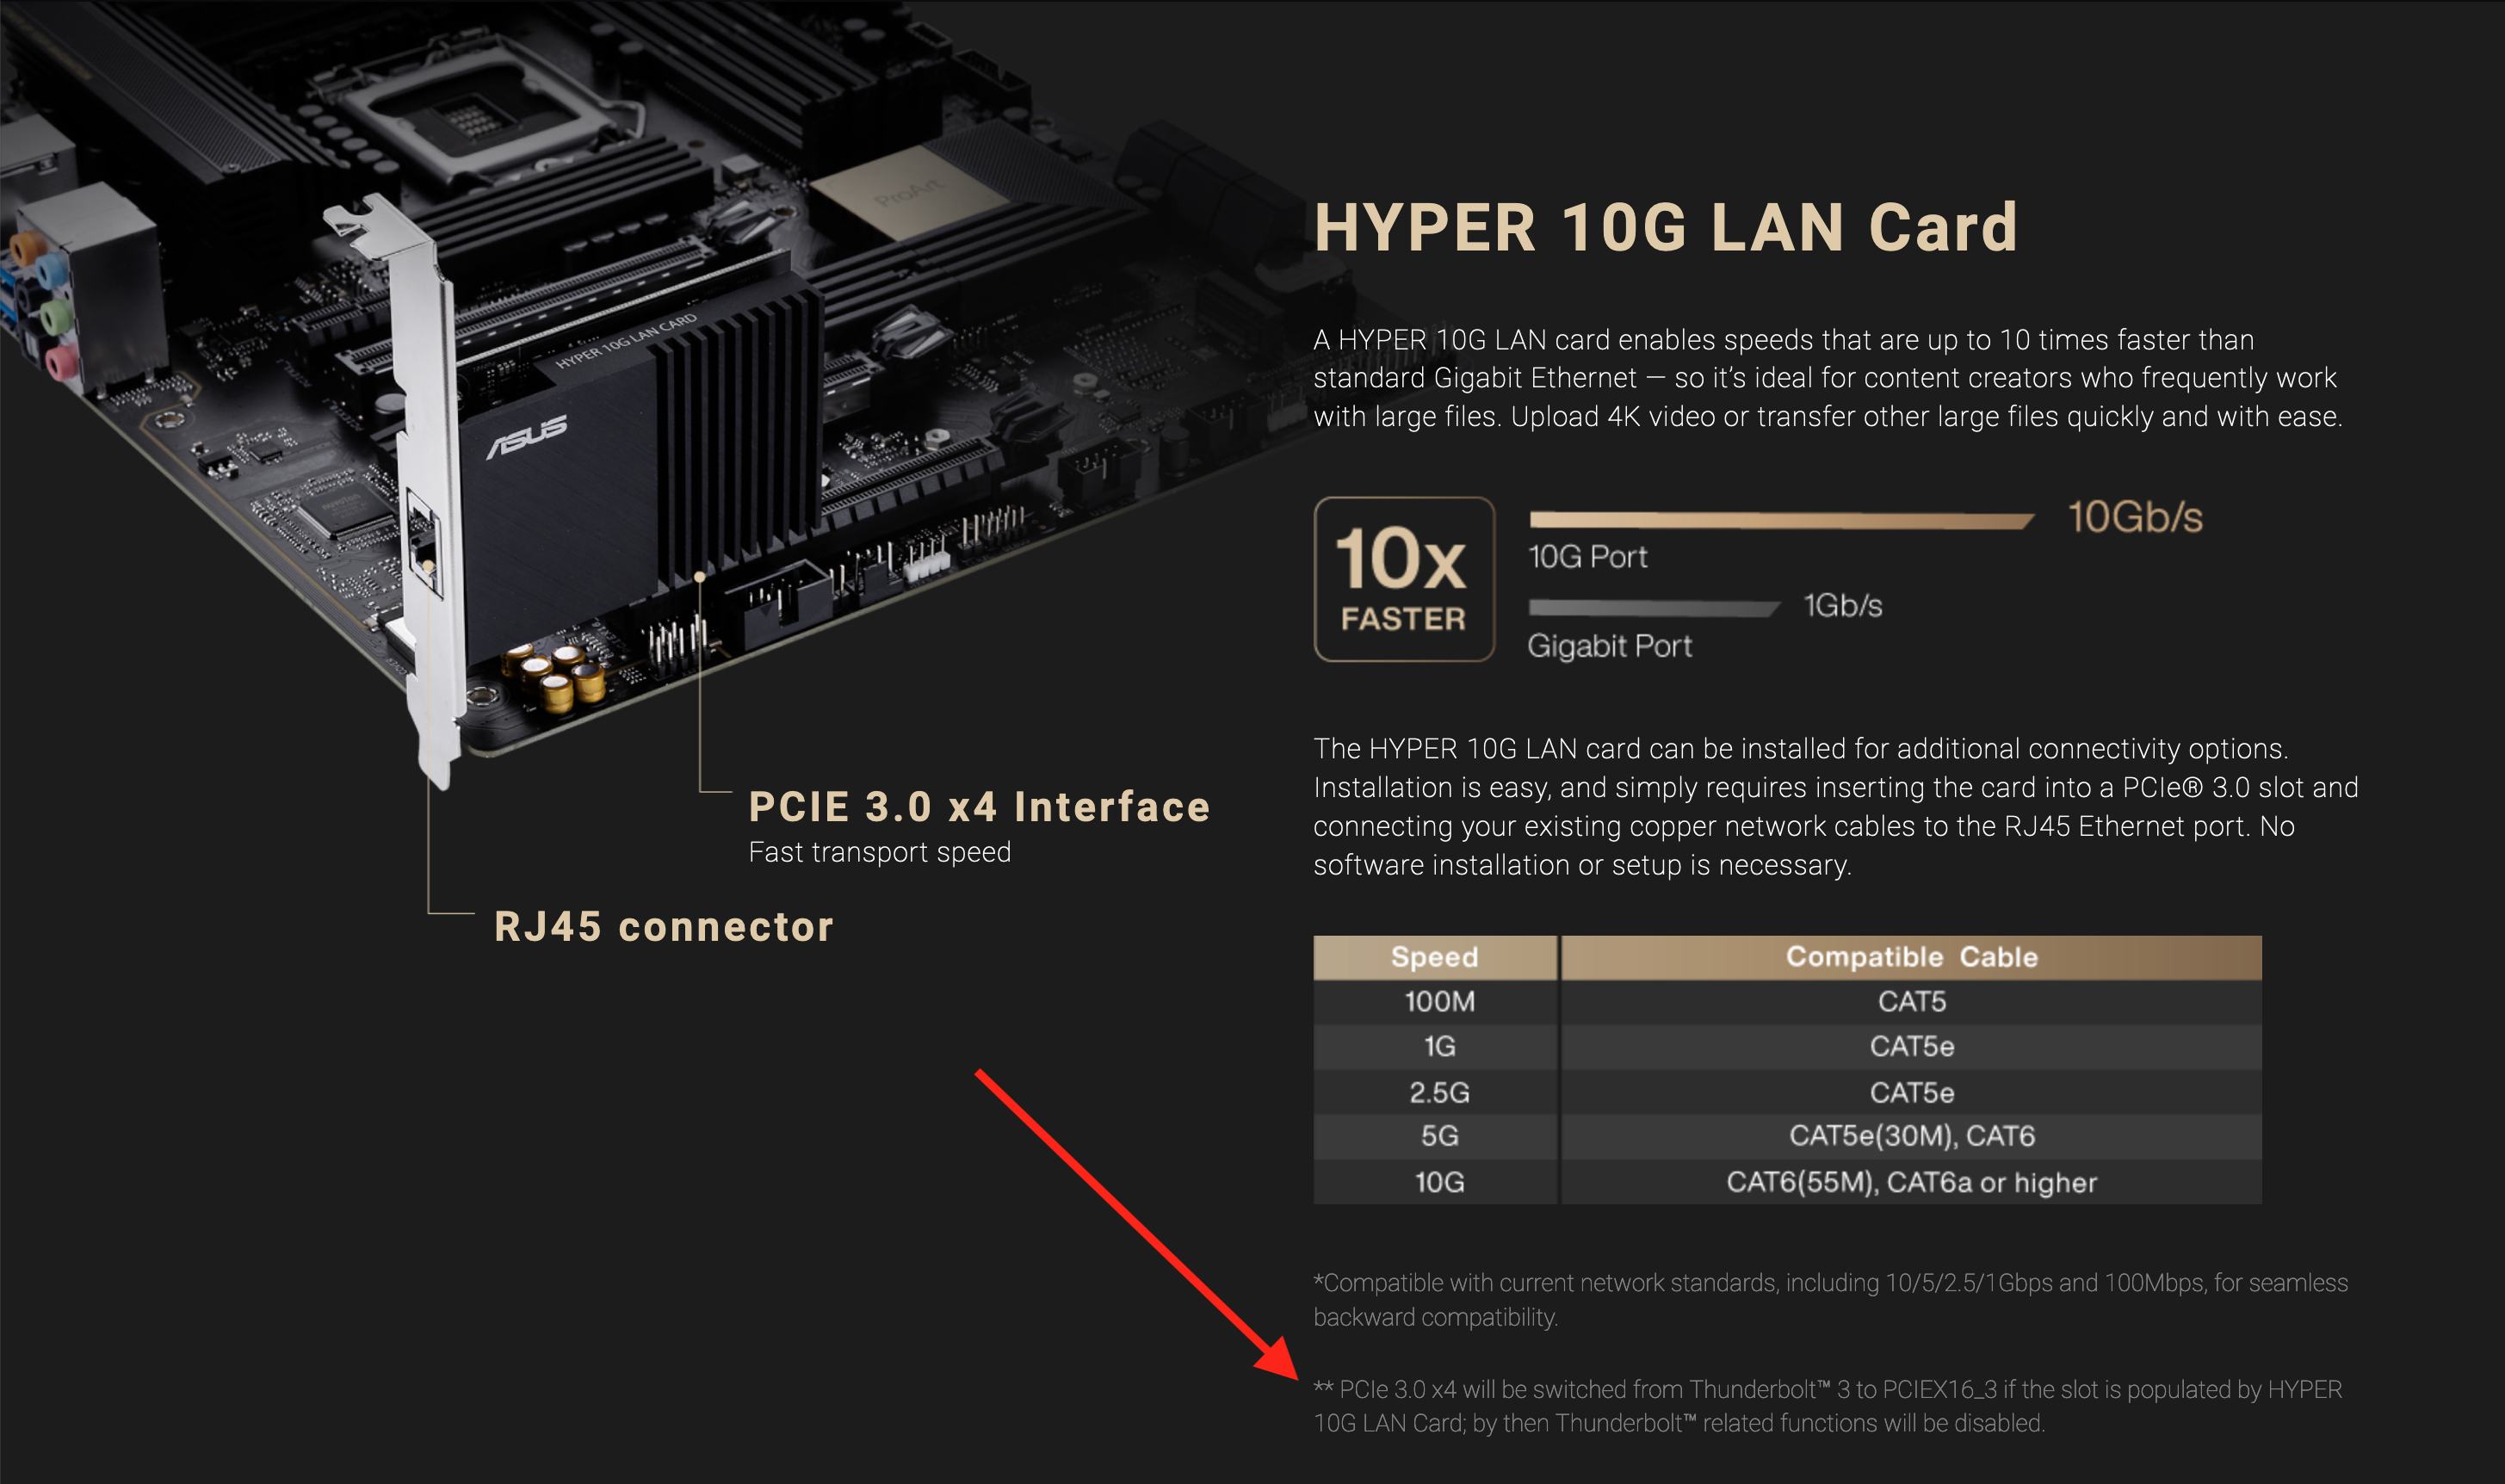
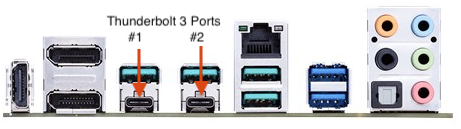
Note that if you use the included 10Gb Ethernet card, you will disable the Thunderbolt. Since I wanted Thunderbolt capability, I'm not using the 10Gb Ethernet card, mainly because of my use of WiFi or the onboard 2Gb Ethernet speed. Unfortunately, I didn't read the web site carefully or not, though I doubt the use of the Thunderbolt or 10Gb Ethernet would have swayed me to another motherboard. However, I may use the card in another computer if I ever update my 1Gb Ethernet LAN to 10Gb. BTW, the onboard Ethernet has up to 2Gb speed.
From the Asus web site Creator page:
(See the Users Manual for more information, pages 2-16 and 2-18.)PCIe 3.0 x4 will be switched from Thunderbolt™ 3 to PCIEX16_3 if the slot is populated by HYPER 10G LAN Card; by then Thunderbolt™ related functions will be disabled
Speaking of Thunderbolt 3, @CaseySJ's Gigabyte Z390 and Z490 Golden Build descriptions were a great reference to get the Thunderbolt 3 working with Catalina and Big Sur.
To make it easy for you, I have attached the SSDT that makes Thunderbolt 3 work in Mojave and earlier without modifying the Creator's motherboard's Thunderbolt 3 chipset. This SSDT is not needed for Catalina and Big Sur (see notes below). Thanks to @CaseySJ for his advice and help.
The Rest of the Components
I chose the i5-10400 Comet Lake processor because I didn't have the immediate need for an i7 or i9 Comet Lake processing power. However, I bought the Noctua NH-D15S CPU Cooler just in case I wanted to upgrade the process and overclock. @pastrychef swears by his Noctua processor coolers.
The choice of memory was a choice like the i5-10400 processor - good enough for my computing needs. I have had good experiences with Corsair Vengeance LPX memory in the past and found the Corsair Vengeance LPX at a good price.
The Sapphire Pulse RX 580 8GB graphics card was a no brainier choice - it just works in macOS starting with the last High Sierra build. The RX 580 has all the graphics power I need to drive my older Dell 27" 4K P2715Q monitor without any glitches. I will probably buy the next generation AMD graphics cards when they come down in price - latest models are twice as much or more than the RX 580. Ugh!
The Sabrent Rocket NVMe M.2 SSD have nice performance for the price; I recommend them. The Fenvi FV-T919 WiFi (1750Mbps) and Bluetooth 4.0 PCI-e Adapter card has been working with macOS since Moses was a child. I'm currently getting 1300Mbps download speeds on my router's 5GHz channels. Works as advertised.
The Power Supply (PSU) was the only 650-750 watt PSU that I could order in the Spring of 2020, and I was lucky to find it.
I bought Corsair Carbide Series 200R Black Compact ATX Mid Tower Case on a whim as I've had a Corsair case for my first hackintosh. It was a mistake because it's dark black (the Creator motherboard is also black), and it is small enough so that my hands had a heck of time to get cables routed and the world's small screws (for the NVMe M.2 SSDs) to be screwed into the motherboard. I'd recommend a Lian Li PC-A05FNB Computer Case (or the current equivalent) or a Fractal Refine Design R5 (great case!).
Finally, I use the OWC Thunderbolt 3 14 port dock because of the Firewire port (newer dock doesn't have the Firewire port) which I need for several of my audio components. This dock has too many great features to list here, but I highly recommend it for your Thunderbolt uses.
The Installation
BIOS Setup
Update the BIOS to the latest version which is 2701 as of March 21, 2023. Follow the USB BIOS Flashback method on page 3-2 of the Creator's User's Guide. I will list the critical BIOS changes, some of which are Default, in case of a BIOS update that might change from this BIOS version settings.
 Once the BIOS has been updated, boot into the BIOS, use the Advanced Mode (F7) and make the following changes per the OpenCore Guide (Note: I listed all the BIOS changes per the OC Guide which is for all motherboards/systems; you needn't worry about the ones labeled Default):
First > Exit Menu
Load Optimized DefaultsAI Tweeker
AI Overclocker Tuner > XMP I Tweeker's Paradise > Enabled (default)Advanced Items
CPU Configuration > SGX >Disable (default) PCH StorageConfiguration > SATA Mode > ACHI (default) System Agent (SA) Configuration > VT-d > Enabled for Catalina, Big Sur & Monterey System Agent (SA) Configuration > Graphics Configuration > Primary Display > PEG (for graphics cards) System Agent (SA) Configuration > Graphics Configuration > iGPU > Enabled Thunderbolt Configuration > Thunderbolt Support > Enabled (default) Thunderbolt Configuration > Thunderbolt Boot Support >Enabled Thunderbolt Configuration > Wake from Thunderbolt Devices >Enabled (default) Thunderbolt Configuration > Security Level > No Security Thunderbolt Configuration > Thunderbolt Configuration > GPI03 Force Power >Enabled USB Configuration > Legacy USB Support > Enabled (default) USB Configuration > XHCI Handoff > XCHI > Enabled (default) Onboard Device Configuration > Serial Port Configuration > Serial Port > Disable (motherboard does have a Serial Port header, not a Back Panel port.) APM Configuration > Power on by PCI - E/PCI > Disabled (default)Boot Menu
CSM > Launch CSM > Disable (default) Secure Boot > OS Type > Other OS (default) Boot Configuration > Fast Boot > Disabled Boot Configuration > Boot Logo Display > Disabled Boot Option 1 > USB installer thumb drive (the UEFI choice if there are two entries) Exit > Save ChangesMaking the OpenCore USB Installation Thumb Drive
I used the OpenCore (OC) guide to create USB Installation drive. So, just hunker down for several hours and follow the (very good) OC guide by Dortania: https://dortania.github.io/OpenCore-Install-Guide/.
Now, we have to modify your USB Installation disk EFI partition. I use MountEFI, located in the Dortania guide and OpenCore Configurator is best config.plist editor for OC.
It turns out the one DeviceProperties item for activating the Intel i225-V 2.5GBe Ethernet controller isn't enough for getting the Back Panel's Ethernet port to work. IIRC, the macOS installers require Internet access. So, we need to do an EFI mod. As both @dolgarrenan and @CaseySJ stated, both the FakePCIID_Intel_I225-V.kext and the FakePCIID.kext are needed to make our Ethernet work. (Attached below.) As CaseySJ said:
Therefore, the above parts to the USB Installer's config.plist file are as shown below.The Dortania guide states that we should simply set DeviceProperties --> Device ID to F2150000. But this is insufficient and incomplete because macOS doesn't "see" this fake ID when it first scans the PCI bus upon booting. Hence, we need Rehabman's FakePCIID to force macOS to see the fake ID and therefore attach the right driver to it.
In DeviceProperties, I added a new entry:
RM,device-id = F2150000
 |
 |
Installation Notes
Note: I will not post my EFI folder as it's too easy to create. You just need to take the time with the above guide. It's the old proverb, give a man a fish to eat...or teach him to fish.
Now boot the USB Installer drive. Choose the installer drive at the OC boot screen, and complete the installation. If you haven't formatted your disk to install macOS onto, then the installer will let you do that after you pick your language. Use Disk Utility < I'll add more on the installation process in the next couple of days including some screen snapshots.
After the Installation, still booting with the USB installer, at the OC Boot screen, choose the installation disk. At the Desktop,
Mount the USB Installer's EFI partition; Copy the EFI folder to the Desktop; Unmount USB Installer's EFI partition (highlight the USB Installer's EFI partition > right click> Eject); Mount the macOS drive's EFI partition; Move any EFI folder in the macOS drive's EFI partition; and Copy the EFI folder on the Desktop to the macOS drive's EFI partition.Here's some post install changes for the config.plist that are different from the OC Guide:
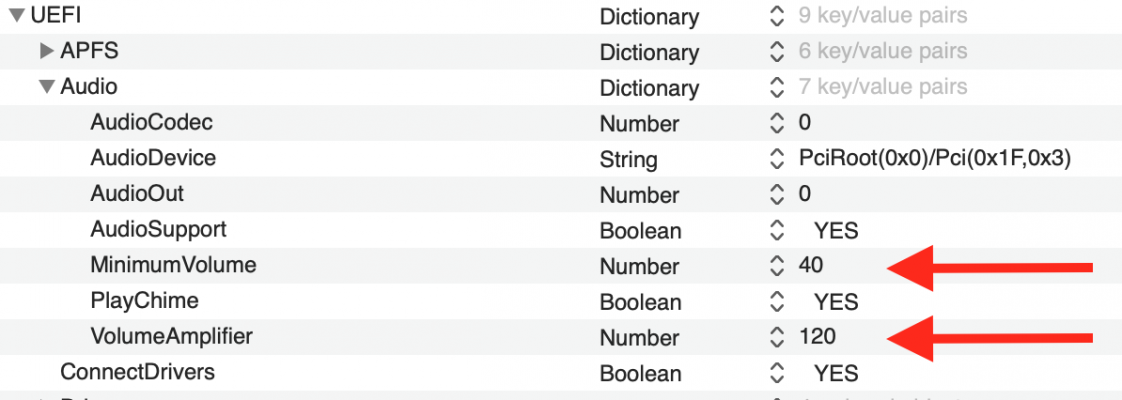
UEFI > Audio > MinimumVolume=40 & VolumeAmplifier=120 < This will keep you from going deaf at boot chime. Note: do not have a headset on during the boot process!Now reboot into the BIOS > Boot Menu > Boot Option 1 > your macOS drive. Save the BIOS update and select your macOS installation drive at the OC Boot menu.
Done!
I've attached the Thunderbolt 3 SSDT below. You don't need to modify the onboard TB3 chipset. However, you may find that TB peripherals will probably have to Hot-Plugged to use. A special thank you to @CaseySJ for helping me with the TB3 SSDT for the Creator.
Summary
Very nice Thunderbolt 3 build. I highly recommend the Asus ProArt Z490 Creator motherboard with the above noted Thunderbolt or 10Gb Ethernet constraint.
What Works
Just about everything including SidCar (thanks to @mike878 for confirming SideCar.)
Thunderbolt 3 works with my Other World Computing TB3 dock and TB3 external NVMe drive.
Note: If the Ethernet port is active, my Thunderbolt 3 dock with a NVMe external SSD is shown on the Desktop upon boot up. If the Ethernet port is not active (you're using WiFi), then you have to hot-plug the TB3 device(s).
What Doesn't Work
Nothing that I'm aware of
Not Test Yet
SideCar.
Benchmarks
One of these days.
Updates
September 04, 2023. Update latest BIOS version information including the BIOS download link.
June 27, 2021. Updated the BIOS notes for Big Sur, especially the Thunderbolt settings. Thanks again to @CaseySJ for his help with the settings. You can now see the TB drives and dock in the OC Boot Picker menu and upon getting to the Desktop. See Post 198 for the update.
June 20, 2021. Since I use WiFi, I found out we need to change the Ethernet Device IDs. See Post #198. I'll update the above Installation Notes real soon now.
June 13, 2021. Updated to OC 0.7.0 and Big Sur 11.4. All is running well.
May 12, 2021. Updated to OC 0.6.9 with ease. Finally got around to running USBMap to get the USBMap.kext. Updated Big Sur test installation disk to 11.3.1. See Post #177.
April 10, 2021. Updated to OC 0.6.8. See Post #151.
January 16, 2021. Updated the build description.
January 02, 2021. Updated the Installation guide for activating the Intel i225-V 2.5GBe controller.
December 27, 2020. Updated BIOS information as Asus release BIOS 1003; which not only replaced 1002, Asus removed 1002 from the BIOS history.
Also, updated BIOS COM/Serial Port note. Remove note that graphics card DisplayPort doesn't work. Added that motherboard Back Panel Ethernet port not working.
December 23, 2020. Minor update to installation on current macOS use.
December 21, 2020. Updated information on the Thunderbolt vs. 10Gb Ethernet card use, and other assorted updates/clarifications/typos.
December 18, 2020. Final draft. Solutions to getting almost all the bugs corrected.
June 20, 2020. Original draft.
Attachments
Last edited: