Contribute
Register

[SUCCESS] Gigabyte Designare Z390 (Thunderbolt 3) + i7-9700K + AMD RX 580

** SIDE-GUIDE: Asus X99 Deluxe II OpenCore EFI for Big Sur **
Please do not quote this guide in its entirety. Post an excerpt or link instead.

Contains OpenCore 0.6.3 ZIP
Contains OpenCore 0.6.6 ZIP
Contains OpenCore 0.6.7 ZIP
Contains OpenCore 0.6.8 ZIP
Contains OpenCore 0.7.1 ZIP Supporting Catalina, Big Sur and Monterey


Warning:
This side-guide is for owners of Asus X99 Deluxe II motherboards with Broadwell or Broadwell-E CPUs who want to upgrade from Catalina to Big Sur.

Background:
The venerable Asus X99 Deluxe II motherboard is part of the Intel High-End Desktop (HEDT) family. It is the 5th Hackintosh listed below in my signature. Fortunately, this system is fully capable of running Big Sur, but a handful of critical EFI modifications are necessary.

The EFI ZIP attached below has these features:
  • OpenCore 0.6.3, OpenCore 0.6.6, OpenCore 0.6.7, or OpenCore 0.6.8
  • OpenCore 0.7.1 version supports Catalina, Big Sur and Monterey
    • This version does not use kernel patches; instead, it enables AppleXcpmExtraMsrs kernel quirk
    • Refer to this post for additional important details
  • Kernel patches for Big Sur by @nmano at Insanely Mac
  • New and modified SSDTs by dortania:
    • SSDT-RTC0-RANGE-HEDT.aml
    • SSDT-PLUG-DRTNIA.aml
    • SSDT-UNC.aml
    • SSDT-EC-DESKTOP.aml
  • Specially modified FakeSMC that provides expanded sensor data to iStat Menus
Prerequisites:
  • Requires MSR 0xE2 to be unlocked.
    • If you have not already done so, please install the special BIOS located here that unlocks MSR 0xE2.
    • This is the same BIOS that was posted on May 10, 2020. No changes were made since.
Procedure:
  • Download the attached ZIP and copy the following entries into the OpenCore config.plist located inside the downloaded EFI/OC folder:
    • System Name (e.g. iMacPro1,1)
    • System Serial Number
    • System UUID
    • MLB (Board Serial Number)
    • ROM
      Screen Shot 2020-11-14 at 5.31.31 PM.png
    • Use OpenCore Configurator 2.18.0.0 for OpenCore 0.6.3.
    • Use OpenCore Configurator 2.27.0.0 for OpenCore 0.6.6.
    • Use OpenCore Configurator 2.30.0.0 for OpenCore 0.6.7.
    • Use OpenCore Configurator 2.33.1.0 for OpenCore 0.6.8
    • Double check the entries.
  • Then copy the entire EFI folder to the EFI partition of an available USB flash disk. This allows us to test the EFI partition safely, without damaging the macOS SSD.
  • Make a full bootable backup of Catalina and test the backup before proceeding with the upgrade to Big Sur.
  • Reboot the system and press F8 at the Asus BIOS Splash Screen to open the BIOS Boot Menu.
  • Select the USB flash disk.
  • OpenCore Picker will appear.
  • Boot the Catalina SSD.
  • Now open System Preferences --> Software Update and begin the in-place upgrade to Big Sur.
  • The system will reboot about 4 times.
  • Each time the system reboots, press F8 at the Asus BIOS Splash Screen and select the USB flash disk.
  • At the OpenCore Picker, if you see macOS Installer, select that (it should already be selected).
  • At the OpenCore Picker, if you don't see "macOS Installer", select your existing macOS SSD (the one that is being upgraded). It should already be selected.
Finishing Up:
  • If all went well you should now be running Big Sur!
  • Mount the EFI partition of the macOS SSD and the EFI partition of the USB flash disk.
  • Then copy the EFI folder from the USB flash disk to the EFI partition of the macOS SSD. This will make the macOS SSD bootable. (Backup or rename any previous EFI folder located in the EFI partition of the macOS SSD.)


This post coming at you from Asus X99 Deluxe II running Big Sur 11.2:
Screen Shot 2021-02-02 at 6.39.24 PM.png


Updates:
  • This EFI may also be used with Haswell or Haswell-E processors if the following changes are made:
    • OpenCore Configurator --> Kernel --> Change first 8 bytes of Cpuid1Data to C3060300 for Haswell or F2060300 for Haswell-E.
    • OpenCore Configurator --> Kernel --> Patch --> Make the following change:
      Screen Shot 2020-11-15 at 6.12.24 AM.png
 

Attachments

  • Asus X99 Deluxe II OpenCore 063 Big Sur.zip
    6.9 MB · Views: 108
  • EFI-ASUS-X99-DII-OC-066.zip
    7.6 MB · Views: 85
  • EFI-ASUS-X99-DII-OC-067.zip
    7.5 MB · Views: 85
  • EFI-ASUS-X99-DII-OC-068.zip
    6.8 MB · Views: 89
  • EFI-OC-071-ASUS-X99-DELUXE-II.zip
    6.9 MB · Views: 114
Last edited:
hmmm. I thought I needed both SSDT's since I have both the titan ridge card and the built-in thunderbolt.
If there are two Thunderbolt controllers, then two Thunderbolt SSDTs are needed, but each SSDT must refer to the correct root port of the controller.

Internal controller is at RP05 on Designare Z390.

As for GC-Titan Ridge, its root port depends on the slot into which it's installed. We can determine this by examining IORegistryExplorer.
 
Please use this EFI folder and let us know.
This is a correct EFI folder for your system, this should work if you have configured BIOS parameters like in Post #1
View attachment 496008
+ CFG-Lock disable
Thhkx a lot

I made your recommendations and I redid a usb key and I redone the bios configuration with an optimized load bios default and it is installed on a disk, I will keep you posted
 
Is there any indication in Big Sur that it will support the new AMD 6800 XT video card that will be released next week?
 
Hello, just a message to thanks for this wonderful thread. I have Designare z390, I9 9900, 4 x16gb Kingstone 3733 MHZ, Samsung Evo Pro 1TB as SSD1 and WD Black NVME as SSD2, where I have a mirror installation of the system. Which, BTW, works perfectly with no issues known until now.

Anyway, I just updated to BigSur. First I had to migrate to or-encore 0.6.3 and in this matter the information in this thread was key.

Opencore is a little bit tricky to be installed, but honestly, It is way better than clover. I had everything working with clover, but with Opencore everything is faster and smoother. In my opinion is a 100% real Mac experience. So I recommend everyone to switch to Opencore as soon as possible.

Thanks again Casey.:clap:
 
I don't see my windows 10 ssd disk anymore
Is it because of the option in the other os bios?

is there a solution to have it again without changing this option?
 
Hi!

I have been following the forum for a long time and so far I have not had a problem. Now the clean installation of Big Sur fails and I can't find a solution. I don't understand the reason either.

I have a working backup of Catalina so I can try different solutions.

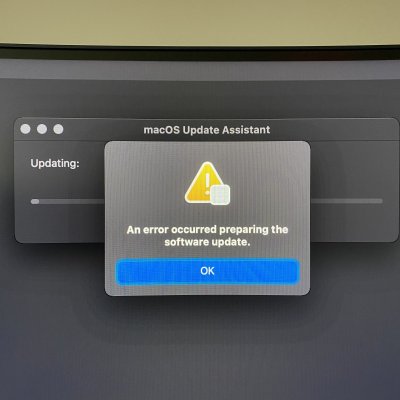
The Big Sur installer USB starts (oc 0.6.3) and then the installation. However, after the first restart, about 23-21 minutes before completion, the caption shown in the image will be received. I tried another usb key, tried to download the Big Sur installer again. I tried port 2.0, port 3.0. But constantly, this message is the end result.

I've searched for the bug here and in other forums, but I can't find a solution. Maybe if I understood the error, I would find a solution.

Has anyone ever seen anything like this?

Thank you very much for the answers

Peet
 

Attachments

  • IMG_1906.jpeg
    IMG_1906.jpeg
    5 MB · Views: 73
I don't see my windows 10 ssd disk anymore
Is it because of the option in the other os bios?

is there a solution to have it again without changing this option?
Are you saying that Windows disk does not appear in OpenCore Picker? Try shutdown and turn off power switch on PSU for 10 seconds. Then try again.
 
Hi!

I have been following the forum for a long time and so far I have not had a problem. Now the clean installation of Big Sur fails and I can't find a solution. I don't understand the reason either.

I have a working backup of Catalina so I can try different solutions.

The Big Sur installer USB starts (oc 0.6.3) and then the installation. However, after the first restart, about 23-21 minutes before completion, the caption shown in the image will be received. I tried another usb key, tried to download the Big Sur installer again. I tried port 2.0, port 3.0. But constantly, this message is the end result.

I've searched for the bug here and in other forums, but I can't find a solution. Maybe if I understood the error, I would find a solution.

Has anyone ever seen anything like this?

Thank you very much for the answers

Peet
I found this on a site I hope it can help you

Set the SUS server to the DeveloperSeed SUS URL.​

To resolve this issue we can use the nvram binary to set the SUS catalog to the correct one that has the BridgeOS update that we need.
sudo nvram IASUCatalogURL=https://swscan.apple.com/content/ca...n-lion-snowleopard-leopard.merged-1.sucatalog
You can use sudo nvram -p to view all the nvram settings.
NOTE! When you are done with the upgrade, don’t forget to remove the value!
sudo nvram -d IASUCatalogURL
 
Back
Top