Contribute
Register

[SUCCESS] Gigabyte Designare Z390 (Thunderbolt 3) + i7-9700K + AMD RX 580

It seems harmless, but technically should not be there. Please try the following:
  • Reset NVRAM.
  • If not successful, perform cold boot by shutting down and flipping power switch on PSU to OFF for 10 seconds, then power back up and boot.
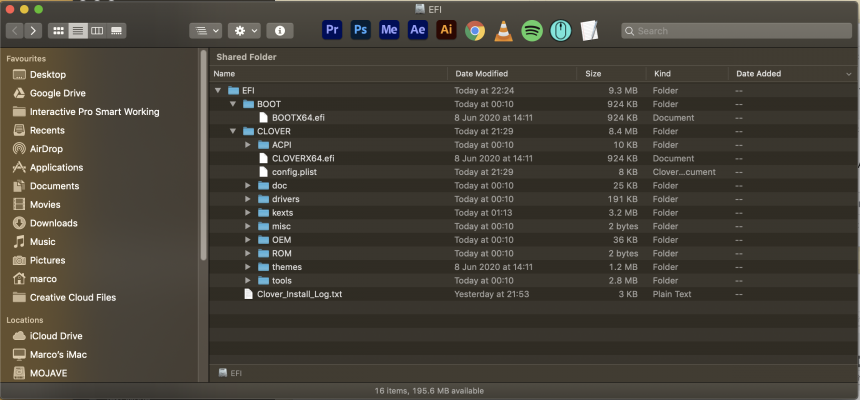
  • If not successful, mount EFI partition of that disk, open it in Finder, expand the EFI, EFI/OC, EFI/BOOT folders and post a screenshot.
VRAM Resent and cold boot didn't work.
I think is also missing the OC folder you mentioned.
 

Attachments

  • Screenshot 2020-10-23 at 22.26.39.png
    Screenshot 2020-10-23 at 22.26.39.png
    1.3 MB · Views: 69
VRAM Resent and cold boot didn't work.
I think is also missing the OC folder you mentioned.
Sorry, I meant CLOVER, not OpenCore (OC). You posted the right screenshot, and CLOVER folder looks fine. Two suggestions:
  • Ignore it for now because it's cosmetic.
  • Try CMOS Reset (by shorting two pins on motherboard with flathead screwdriver; see manual) and re-configuring BIOS parameters afterwards.
 
  • I'm not sure if it's the right way to check the version number, but according to the screenshot it's 1.3.5 (I used **Mini-Guide for Fresh Installation of Catalina 10.15.1 and Newer ** to set things up and didn't install any additional kexts)
  • I'm trying to use this cable. I actually ordered two, because I didn't know it's not recommended to drive monitors through USB C. Sad to hear that is the case.
  • In BIOS, is Internal Graphics enabled? - I believe so. I was able to run one monitor via HDMI (before changing the platform ID), when I removed the GPU according to your previous suggestions and tested everything in Windows, because the issue happened on Windows when trying to wake from hibernation mode. Just to remind you, the result was that I was able to wake up normally from hibernation. Here's the link to the post with more details.
  • IORegistryExplorer file seems to contain the serial number, which you asked to remove before. Can I send this file privately to you or I shouldn't be bothered? I don't seem to be able to remove it from the created file.
  • I have Catalina 10.15.3.
  • The GPU I have is MSI VGA Graphic Cards RX 580 ARMOR 8G OC.
I would suggest updating Lilu, WhateverGreen, AppleALC, VirtualSMC, SMCProcessor, and SMCSuperIO to the latest versions. They can be copied from the OC/Kexts folder of the OpenCore zip file (don't worry, we're just copying the kexts, not installing OpenCore) located here.

Just copy these files from the downloaded ZIP file to your CLOVER/kexts/Other folder and reboot.

Regarding IORegistryExplorer, scroll the device tree on left side (do not use the search bar) until you see iGPU@2. Then post a screenshot.
 
@CaseySJ I want to be sure, are you talking about this post: Update: Fixing Handoff, Unlock w/Apple Watch, Continuity Camera ?

Because I followed it twice, even if it is quite long process, but it still doesn't work it was working perfectly with Clover, so it has to be something specific with OpenCore.

View attachment 492882
Finally found the solution, I posted it on Apple Watch related thread:
It turn out it wasn't a Hackintosh problem, I noticed it when I saw that it wasn't working on my Macbook Pro neither!

I followed this process and it worked like a charm: https://discussions.apple.com/thread/251803595
@CaseySJ, I think it’s worth being mentioned in the troubleshooting section
 
** Using HackinDROM to Create Thunderbolt SSDT with Custom DROM **
Please do not quote this guide in its entirety. Post a link instead.
Credit: @Inqnuam


Introduction:
Up to now we have created separate Thunderbolt DROM Mini-Guides for each motherboard and add-in-card. Now that HackinDROM is available and allows designated users to add files to its internal database, we can create a single Thunderbolt DROM Mini-Guide for all users. This is that guide!

Prerequisites:
This guide applies to users who have flashed their Thunderbolt controller using an external SPI Flash ROM reader/writer such as Raspberry Pi or a CH341a USB flasher. A flashed controller enables Thunderbolt Bus, which in turn enables macOS to make better and fuller use of Thunderbolt.

How to Check if Thunderbolt Bus is Enabled:
Open System Information and select Thunderbolt from the left side. If you see No drivers are loaded, then this guide does not apply.

Procedure:
  1. Open the HackinDROM webpage in your browser: https://hackindrom.zapto.org/index.php
  2. Select your Thunderbolt controller from the pop-up menu.
    Screen Shot 2020-11-16 at 2.26.14 PM.png
  3. The list of available devices (as of this writing) is shown below. This list is subject to change.
    Screen Shot 2020-11-16 at 1.28.05 PM.png
  4. In most cases, no modifications are necessary. HackinDROM will generate a random Unique ID (UID) and set Thunderbolt Bus ID to 0. So just click the Download icon as shown. However, it is also possible to customize the SSDT as described in the next step (optional).
  5. OPTIONAL STEP:
    • We can change Bus ID (if more than one Thunderbolt controller is present in the system, assign a different Bus ID to each one).
    • We can change Unique ID or UID (if we want to assign a UID manually instead of using the random value generated by HackinDROM).
    • We can change the Vendor and Device names of the Thunderbolt controller.
    • These changes are made from the Customize button.
      Screen Shot 2020-11-16 at 2.26.27 PM.png
      Screen Shot 2020-11-16 at 2.26.36 PM.png
    • Every Thunderbolt SSDT in this list is attached to a specific PCI bus "root port". Some of these SSDTs are attached to RP05 while others may be attached to RP21 or RP09, etc. However, the Thunderbolt controller in your system may be attached to a different port!
    • Download and run IORegistryExplorer to determine your Thunderbolt controller's root port. Search for "Thunderbolt" and check the resulting PCI path.
    • Then follow the instructions in the screenshots below.
    • Ask questions if you need assistance (but only after trying the steps yourself).
      Screen Shot 2020-11-16 at 2.56.03 PM.png
  6. Some OpenCore installations already have a "Method DTGP" defined. Most Clover installations do not. Check all SSDTs in your ACPI folder (CLOVER/ACPI/patched or OpenCore's OC/ACPI) to see if DTGP is already defined. If it is not defined, download the attached SSDT-DTGP.amland copy it to the ACPI folder:
    • Clover ACPI folder is: CLOVER/ACPI/patched
    • OpenCore ACPI folder is: OC/ACPI
  7. OpenCore users also need to update their config.plist to include references to the Thunderbolt SSDT and, if applicable, to SSDT-DTPG.aml as well.
  8. A reboot is necessary for changes to take effect.
End of Procedure

Updates:

  • 24 Oct 2020: First version.
  • 16 Nov 2020: Revised per latest version of HackinDROM.
 

Attachments

  • SSDT-DTPG.aml
    100 bytes · Views: 261
Last edited:
I would suggest updating Lilu, WhateverGreen, AppleALC, VirtualSMC, SMCProcessor, and SMCSuperIO to the latest versions. They can be copied from the OC/Kexts folder of the OpenCore zip file (don't worry, we're just copying the kexts, not installing OpenCore) located here.

Just copy these files from the downloaded ZIP file to your CLOVER/kexts/Other folder and reboot.

Regarding IORegistryExplorer, scroll the device tree on left side (do not use the search bar) until you see iGPU@2. Then post a screenshot.
Update all of the kexts you mentioned. Should I try anything old/new after that?
As for the iGPU@2 I couldn't find it... I checked several times. I wasn't sure if I'm looking at the right place (I scrolled through the whole list), but according to google it should be here: IOService:/AppleACPIPlatformExpert/PCI0@0/AppleACPIPCI/IGPU@2. I couldn't find it there or anywhere else:
1603491745499.png
 
Last edited:
Update all of the kexts you mentioned. Should I try anything old/new after that?
As for the iGPU@2 I couldn't find it... I checked several times. I wasn't sure if I'm looking at the right place (I scrolled through the whole list), but according to google it should be here: IOService:/AppleACPIPlatformExpert/PCI0@0/AppleACPIPCI/IGPU@2. I couldn't find it there or anywhere else:
Okay, just type “iGPU” in the search bar. If there’s a match, then click the “x” on the right side of the search bar to clear the result. Then post a screenshot.
 
Finally found the solution, I posted it on Apple Watch related thread:

@CaseySJ, I think it’s worth being mentioned in the troubleshooting section
Nice. Will add it to “Troubleshooting / FAQ” section in Z490 Vision D thread because it already has such a section.
 
While waiting I tried:
1) Disconnecting all monitors and booting with only one monitor connected to USB C -> still "check cable connection"
2) Unplugging HDMI cable from GPU with the machine completely booted and connected monitor via USB C -> result the same as the above.
3) Booting the machine with monitors connected to HDMI ports in the GPU -> black screen, no success as before.

Here's the screenshot after I queried iGPU and then hit "x":
1603493919794.png
 
Back
Top