
CaseySJ
Moderator
- Joined
- Nov 11, 2018
- Messages
- 22,195
- Motherboard
- Asus ProArt Z690-Creator
- CPU
- i7-12700K
- Graphics
- RX 6800 XT
- Mac
- Classic Mac
- Mobile Phone
Glad to hear the build went well!
Why do you say that TB3 is not working? What are the symptoms? Please see Step 12 in the build guide.I just wish TB3 is working so that I can use my Qnap TB3 10GBE but I'm a bit nervous about flashing the chip. So instead, I plan to use an ASUS 10G XG-C100F SFP+. I haven't installed it yet, but meanwhile, is there any required settings to use this card?
If you used config-AMD-GPU.plist from the OC 0.6.1 zip, then platform ID is already 0x3E980003. To double check, simply run Hackintool and look at the default view that appears when it is launched.I will be using this machine mainly to edit videos on DaVinci Resolve 16 (I currently use a mac mini 2018 i7 with a Sapphire Vega 56 Pulse inside a Razer Core X) and in the guide for the Z390 Designare, there's a section called Going the Extra Mile and instructions to set headless platform ID 0x3E980003.
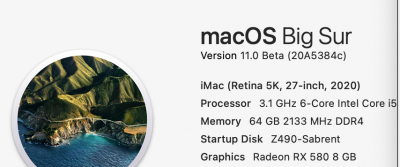
If you haven’t logged into iCloud and registered/licensed any apps, then it’s best to change serial numbers along with system name. Otherwise, change just the system name although you’ll still see the computer referred to by the original name (iMac19,1) in some places. The cleanest solution is to change all PlatformInfo parameters. The same platform ID can be used with iMacPro1,1....
Also, I read @starchyfind 's post on the test he made using different models and I'm thinking of changing the model to iMacPro1,1 (current is iMac19,1). Can I just update the model without a complete install? And do I also need to update the platform ID to 0x3E980003 if using iMacPro1,1?
Finally, do I need to update Serial Number, Board Serial Number, and System UUID?


")