I followed the instructions but only got the 2nd screen as black (using a DIV-to-VGA adapter), the 1st monitor running the VGA port didn't have any problems. If I do boot with only 1 monitor running VGA port first then after finishing booting I can use the 2nd monitor normally (display mode extended)
These are connectors when starting in turn
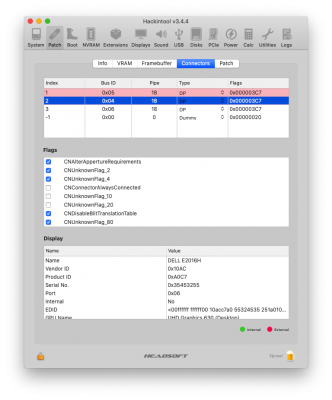
Index 1, BusID 0x05, Type DP
Index 2, BusID 0x04, Type DP
Index 3, BusID 0x06, Type DP
Index -1, BusID 0x00, Type Dummy
Perform the test as in step 5, Index 2 must have port 0x06 and I exchanged the BusID of Index 2 and index 3 for each other; the type of index 2 I changed to DigitalDVI (as quick note at the top because I used a converter cable).I turned off index 3 because the motherboard only supports 2 ports of DVI and VGA.
The following results:
Index 1, BusID 0x05, Type DP
Index 2, BusID 0x06, Type DigitalDVI
Index 3, BusID 0x00, Type DP
Index -1, BusID 0x00, Type Dummy
I also try to change Index 2 to HDMI type and change the BusID for index 2 in turn, as in step 14, the result is still black on the screen 2. Note: when booting to boot 2 the screen displays fine. The hardware I use is:
- Gigabyte B365M D2V
- Intel UHD 630
I attached both EFI after doing "Preflight Checklist"