
- Joined
- Mar 26, 2018
- Messages
- 7
- Motherboard
- ASUS K550JX
- CPU
- i7-4750HQ
- Graphics
- Iris Pro 5200 / GTX 950M
ASUS K550JX - MacOS Catalina - Full Guide
(ASUS K550JK GUIDE COMING SOON...)
Hello! This is a guide on how to install macOS Catalina 10.15 on your ASUS K550JX.
To be clear, I will provide all the files, folders, SSDT´s and DSDT´s I used on my Laptop, but bear in mind that you may need different files for your PC. ASUS has several K550J models with different configurations and hardware, so be careful and follow the guide patiently. Also, this guide assumes you know how to mount "EFI" partitions and that you have at least "Clover Configurator" on you system.
My Hardware:
- Intel Core I7-4750HQ
- Intel Iris Pro 5200 & Nvidia GTX 950M
- 8GB RAM
- 1TB HDD (Should work the same if you have a SSD)
- USB 3.0 & USB 2.0
- Realtek WiFi card (Replaced with an Atheros 9285. Realtek WiFi cards are not supported by MacOS. There are plenty of solutions out there. I used this Atheros because I had one already from a previous computer of mine. Follow the guide for more information on WiFi cards.)
- 15.6" FHD (1920x1080)
- Realtek SD Card Reader
- CD/DVD Drive
- HDMI and VGA ports
Issues That Can't Be Fixed (For now...) :
- Nvidia GTX 950M (Most Laptops with a Nvidia dGPU use the Optimus technology. This technology is not supported by MacOS at the time.)
- VGA port (Still working on it...)
- Stock Realtek WiFi card does not work. (Follow the guide for more information on WiFi cards.)
Requirements:
- 16GB USB Drive.
- Access to a Mac.
- MacOS Catalina downloaded from the App Store.
- Patience.
Pre-Installation:
For this step you will need a Mac to install Clover Bootloader and the macOS Installer to the USB Drive.
USB Setup
Installation:
Bios Menu Setup
Note: Even if you have PS2SmartTouchPad.kext installed correctly, keyboard and mouse might not work in the installation process. I recommend having an external mouse and keyboard ready if needed.
Post-Installation:
Clover Bootloader in HDD (or SSD)
As you may have noticed, Clover Bootloader is loading from a USB Drive. It would be more convenient loading Clover Bootloader from the HDD/SSD where you've just installed MacOS.
In order to do that:
Unless you used my "EFI" folder for the installation, in which I assume you have the same Hardware as me, there are still a few issues that need to be fixed:
Disabling the Nvidia Graphics Card
Note: This will only disable the Nvidia Graphics Card in MacOS. You can still use in Windows if you want a dual-boot.
Display brightness
Note: Display Brightness will not work if you didn't disabled the Nvidia Graphics card.
Note: The SSDT I'm giving here most probably will work with you K550JX and similar models. However, if you're not confident enough and feel like you have a different port scheme than mine, follow this guide: https://www.tonymacx86.com/threads/guide-creating-a-custom-ssdt-for-usbinjectall-kext.211311/.
Realtek SD Card Reader
Note: Bear in mind that (at the time I'm writing this) this Kext is an initial release. It still has some errors but it will recognise the SD cards. Follow the link given below for future releases.
Troubleshooting
If you have any issues or questions about your installation or you're coming from another ASUS laptop, just comment below.
Thank you Rehabman, acidanthera, and many other people for the incredible support in the hackintosh world.
(ASUS K550JK GUIDE COMING SOON...)
Hello! This is a guide on how to install macOS Catalina 10.15 on your ASUS K550JX.
To be clear, I will provide all the files, folders, SSDT´s and DSDT´s I used on my Laptop, but bear in mind that you may need different files for your PC. ASUS has several K550J models with different configurations and hardware, so be careful and follow the guide patiently. Also, this guide assumes you know how to mount "EFI" partitions and that you have at least "Clover Configurator" on you system.
My Hardware:
- Intel Core I7-4750HQ
- Intel Iris Pro 5200 & Nvidia GTX 950M
- 8GB RAM
- 1TB HDD (Should work the same if you have a SSD)
- USB 3.0 & USB 2.0
- Realtek WiFi card (Replaced with an Atheros 9285. Realtek WiFi cards are not supported by MacOS. There are plenty of solutions out there. I used this Atheros because I had one already from a previous computer of mine. Follow the guide for more information on WiFi cards.)
- 15.6" FHD (1920x1080)
- Realtek SD Card Reader
- CD/DVD Drive
- HDMI and VGA ports
Issues That Can't Be Fixed (For now...) :
- Nvidia GTX 950M (Most Laptops with a Nvidia dGPU use the Optimus technology. This technology is not supported by MacOS at the time.)
- VGA port (Still working on it...)
- Stock Realtek WiFi card does not work. (Follow the guide for more information on WiFi cards.)
Requirements:
- 16GB USB Drive.
- Access to a Mac.
- MacOS Catalina downloaded from the App Store.
- Patience.
Pre-Installation:
For this step you will need a Mac to install Clover Bootloader and the macOS Installer to the USB Drive.
USB Setup
- First, find what USB Drive you're going to use:
- In terminal.app type:
Code:
$ diskutil list - In my case it shows:
Code:
/dev/disk0 (internal, physical): #: TYPE NAME SIZE IDENTIFIER 0: GUID_partition_scheme *1.0 TB disk0 1: EFI EFI 209.7 MB disk0s1 2: Apple_APFS Container disk1 399.6 GB disk0s2 3: Microsoft Reserved 16.8 MB disk0s3 4: Microsoft Basic Data Party Hard 200.1 GB disk0s4 5: Microsoft Basic Data 400.2 GB disk0s5 /dev/disk1 (synthesized): #: TYPE NAME SIZE IDENTIFIER 0: APFS Container Scheme - +399.6 GB disk1 Physical Store disk0s2 1: APFS Volume Mac - Data 46.6 GB disk1s1 2: APFS Volume Preboot 82.1 MB disk1s2 3: APFS Volume Recovery 526.6 MB disk1s3 4: APFS Volume VM 1.1 MB disk1s4 5: APFS Volume Mac 10.8 GB disk1s5 /dev/disk2 (external, physical): #: TYPE NAME SIZE IDENTIFIER 0: GUID_partition_scheme *15.5 GB disk2 1: Windows_FAT_32 ESD_USB 15.5GB disk2s1 - In my case the USB Drive is located at /dev/disk2. Please make sure that you are selecting the correct USB Drive as you can format your whole drive if you select the wrong disk.
- In terminal.app type:
- Formatting the USB Drive:
- Repartitioning the USB Drive (Copy the code below and run it in terminal. Remember, chose the right disk for you):
Code:# repartition /dev/disk2 GPT, one partition # EFI will be created automatically # second partition, "install_osx", HFS+J, remainder $ diskutil partitionDisk /dev/disk2 1 GPT HFS+J "install_osx" R - You should get something like this:
Code:Started partitioning on disk2 Unmounting disk Creating the partition map Waiting for partitions to activate Formatting disk2s2 as Mac OS Extended (Journaled) with name install_osx Initialized /dev/rdisk2s2 as a 15 GB case-insensitive HFS Plus volume with a 8192k journal Mounting disk Finished partitioning on disk2 /dev/disk2 (external, physical): #: TYPE NAME SIZE IDENTIFIER 0: GUID_partition_scheme *8.0 GB disk2 1: EFI EFI 209.7 MB disk2s1 2: Apple_HFS install_osx 7.7 GB disk2s2
- Repartitioning the USB Drive (Copy the code below and run it in terminal. Remember, chose the right disk for you):
- Download the latest Clover installer from Github: https://github.com/CloverHackyColor/CloverBootloader/releases
- Once downloaded, run the package. During the installation make sure you select:
and choose the USB DriveCode:
Change install locationCode:install_osx - From there, click on customise and select:
- Clover for UEFI booting only
- Install Clover in ESP
- UEFI Drivers
- Recommended drivers (Select all in recommended drivers)
- File System drivers:
- APFSDriverLoader
- VBoxHFS
- Memory fix drivers:
- OsxAptioFix3Drv
- Click install.
- Now that the installation is finished, we still need to do some configurations do the "EFI" folder in the USB Drive, such as preparing Kexts and configuring the "config.plist" file.
- Mount the USB Drive "EFI" partition.
- Preparing Kexts:
- Remove all but "Others" folder in EFI/CLOVER/Kexts/, as we don't need the MacOS versions folders.
- You can install the kexts from my "EFI" folder to EFI/CLOVER/kext/Other, but for reference I will link the necessary kexts for at least boot to installer
- VirtualSMC (Apple SMC emulation)
- ApplePS2SmartTouchPad (Touchpad and Keyboard. I know this one is not the recommended but it makes multi-gestures work with no effort.)
- Lilu (Allows use of plugins and other Kexts)
- Whatevergreen (Injects Video Graphics)
- USBInjectAll (USB Injection)
- RealtekRTL8111 (Ethernet Connection)
- Next, you will need to replace the "config.plist" file in the EFI/CLOVER folder of the USB Drive. Again, you can use my "config.plist" file if my hardware is similar to your Laptop (if your Intel Graphics Card is an Intel Iris Pro/HD 5000, 5100 or 5200). If you're not sure, choose the right "config.plist" that matches your Intel Graphics card from the Rehabman's repository.
- After replacing it, make sure it has the name "config.plist" on it. Rename if you need to.
- Customising "config.plist":
- If you used my "config.plist" you can jump to the next step. If not, you need to open "config.plist" and tweak some settings (use clover configurator):
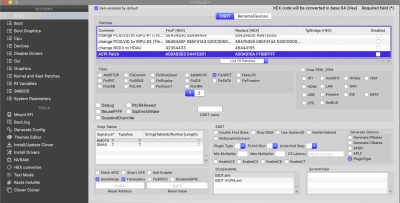
- Make sure that all DSDT patches are enabled under the "ACPI" tab. You can enable them by unchecking the box "Disabled".
- Add a DSDT patch by the name of "ACPI Patch". The Find* [HEX] value is "A00A9353 54415301" and the Replace*[HEX] value is "A00A910A FF0BFFFF". This will fix some ACPI Panic errors. I'll leave a screenshot at the bottom on how it looks in clover configurator.
- Also, on "Disable Drivers" tab, make sure you have nothing there. Sometimes it disables "VBoxHFS".
- If you used my "config.plist" you can jump to the next step. If not, you need to open "config.plist" and tweak some settings (use clover configurator):
- Done!
- Download macOS Catalina from the AppStore.
- Once downloaded, open terminal and run:
Code:
sudo "/Applications/Install macOS Catalina.app/Contents/Resources/createinstallmedia" --volume /Volumes/install_osx --nointeraction - Wait until it copies the MacOS installer to the USB Drive. Once it's finished rename the USB Drive by running the following code:
Code:
sudo diskutil rename "Install macOS Catalina" install_osx - Now, you're ready to install MacOS!
Installation:
Bios Menu Setup
- Advanced tab:
- Sata Mode = AHCI
- VT-d = Disabled
- Boot:
- Fastboot = Disabled
- Launch CSM = Enabled
- Change boot priority by putting the USB Drive in the first place
- Security:
- Secure Boot = Disabled
Note: Even if you have PS2SmartTouchPad.kext installed correctly, keyboard and mouse might not work in the installation process. I recommend having an external mouse and keyboard ready if needed.
- After changing the Bios settings, if you selected "Save settings and reboot", it should boot into Clover Bootloader.
- In Clover Bootloader choose the USB Drive "install_osx".
- After it loads, click on "Disk Utility":
- Format the HDD (or SSD) where you're going to install MacOS. If you wish to make a dual-boot with Windows later on, you can use the partition tool and divide the disk. Guide on dual-boot coming soon...
- Once the Format is done, quit "Disk Utility".
- Click on "Install macOS Catalina" and follow the steps.
- Once the installation process begins, it will restart after a few minutes. Now, in Clover Bootloader, choose the HDD (or SSD) where you're installing MacOS.
- After that, wait a few more minutes and go through the introduction of MacOS Catalina.
Post-Installation:
Clover Bootloader in HDD (or SSD)
As you may have noticed, Clover Bootloader is loading from a USB Drive. It would be more convenient loading Clover Bootloader from the HDD/SSD where you've just installed MacOS.
In order to do that:
- Mount the USB Drive "EFI" partition.
- Copy the "EFI" folder to your Desktop.
- Unmount the "EFI" partition of your USB Drive.
- Mount the HDD "EFI" partition.
- Copy the "EFI" folder that you just copied to the Desktop and paste it on the HDD/SSD partition.
- Done!
Unless you used my "EFI" folder for the installation, in which I assume you have the same Hardware as me, there are still a few issues that need to be fixed:
- Nvidia card running even though it's not supported (which wastes a lot of battery)
- Display brightness
- Audio and microphone
- USB ports not configured properly (Which means you only have USB 2.0 working now)
- Sleep/Wake issues
- Realtek SD Card Reader
- HDMI audio
Disabling the Nvidia Graphics Card
Note: This will only disable the Nvidia Graphics Card in MacOS. You can still use in Windows if you want a dual-boot.
- Download "DSDT.aml", "SSDT-5SgPeg.aml" and "SSDT-8-OptTabl.aml" in the "Nvidia DSDT and SSDT.zip" given below.
- Mount your EFI partition.
- Copy the files you've just downloaded to EFI/Clover/ACPI/patched.
- Reboot.
Display brightness
Note: Display Brightness will not work if you didn't disabled the Nvidia Graphics card.
- Download the latest "AppleBacklightFixup.kext" and "SSDT-PNLF.aml" from here.
- Mount your EFI partition.
- Once downloaded, copy "AppleBacklightFixup.kext" to EFI/Clover/Kexts/Others.
- Copy "SSDT-PNLF.aml" to EFI/Clover/ACPI/Patched.
- Reboot.
- Download the latest "AppleALC.kext" from here.
- Download "SSDT-CX20752.aml" in the "SSDT-CX20752.zip" given below.
- Download the latest "CodecCommander.kext" from here.
- Mount your EFI partition.
- Copy "AppleALC.kext" and "CodecCommander.kext" to EFI/Clover/Kexts/Others.
- Copy "SSDT-CX20752.aml" to EFI/Clover/ACPI/patched
- Open your "config.plist" file under EFI/Clover with Clover Configurator:
- In the "ACPI" tab check the box "FixHPET".
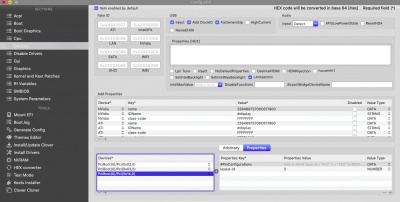
- In the "Devices" tab, click on "properties":
- Go to PciRoot(0)/Pci(0x1b,0), and make sure you have "layout-id" with the number "3" in the "Properties Value". (You might have "#layout-id". If that's the case just delete the "#" from the name.
- Reboot.
Note: The SSDT I'm giving here most probably will work with you K550JX and similar models. However, if you're not confident enough and feel like you have a different port scheme than mine, follow this guide: https://www.tonymacx86.com/threads/guide-creating-a-custom-ssdt-for-usbinjectall-kext.211311/.
- Download "SSDT-UIAC.aml" in the "SSDT-UIAC.zip" given below.
- Copy "SSDT-UIAC.aml" to EFI/Clover/ACPI/pathed.
- Reboot.
- Simply run the following code in terminal:
Code:
sudo pmset -a hibernatemode 0 sudo rm /var/vm/sleepimage sudo mkdir /var/vm/sleepimage - After that, run this:
This will solve some of the issues. Not all of them.Code:
sudo pmset -a standby 0
sudo pmset -a autopoweroff 0
Realtek SD Card Reader
Note: Bear in mind that (at the time I'm writing this) this Kext is an initial release. It still has some errors but it will recognise the SD cards. Follow the link given below for future releases.
- Download "Sinetek-rtsx.kext" from here.
- Mount EFI partition.
- Copy "Sinetek-rtsx.kext" to EFI/Clover/Kexts/Others.
- Reboot.
- Mount EFI partition.
- Go to EFI/Clover and open "config.plist" with Clover Configurator.
- In the "Devices" tab click on "Properties":
- Go to PciRoot(0)/Pci(0x02,0) and remove the "#" from:
- framebuffer-con2-enable
- framebuffer-con2-pipe
- framebuffer-con2-type
- Go to PciRoot(0)/Pci(0x03,0) and remove the "#" from:
- hda-gfx
- layout-id (If you don't have "layout-id" add it. Also, don't forget the number must be "3" in the "Properties Value"
- Go to PciRoot(0)/Pci(0x02,0) and remove the "#" from:
- Reboot.
Troubleshooting
If you have any issues or questions about your installation or you're coming from another ASUS laptop, just comment below.
Thank you Rehabman, acidanthera, and many other people for the incredible support in the hackintosh world.
Attachments
-
 Screenshot 2020-04-05 at 01.40.05.png187 KB · Views: 472
 -
 Screenshot 2020-04-05 at 01.41.13.png93.7 KB · Views: 407
 -
 Screenshot 2020-04-05 at 01.41.41.png171.6 KB · Views: 322
 -
 Screenshot 2020-04-05 at 01.42.02.png161.2 KB · Views: 342
 -
 Screenshot 2020-04-05 at 01.42.19.png161.1 KB · Views: 330
 -
EFI.zip16.9 MB · Views: 881
-
Nvidia DSDT and SSDT.zip36.4 KB · Views: 331
-
SSDT-CX20752.zip910 bytes · Views: 325
-
SSDT-UIAC.zip872 bytes · Views: 314
Last edited by a moderator: