Contribute
Register

[SUCCESS] Gigabyte Designare Z390 (Thunderbolt 3) + i7-9700K + AMD RX 580

As soon as I turn on power to the power supply for the MB I am unable to read the chip
I suppose you found the issue. For me reads and writes were consistent when the power supply to the motherboard was completely detached (including no Thunderbolt device connected to the TB port). Give it a Few minutes after you disconnect the power supply and Then read.
 
** OpenCore Mini-Guide Updated for 0.5.9 Standard Version **

The OpenCore Mini Guide for Z390 Designare has been updated for the standard 0.5.9 version. N-D-K version will be updated once its official release is available.

To migrate from an earlier release of OpenCore, please open the existing and new config.plist files in ProperTree. Then copy the following PlatformInfo parameters from old file to new file:
  • MLB (board serial number)
  • System Serial Number
  • System UUID
  • System Name (e.g. iMac19,1)
Due to significant changes between 0.5.9 and earlier releases, the entire new ZIP file must be used. After making these changes, copy new EFI folder onto a USB flash disk and boot from USB (press F12 at BIOS splash screen and select USB) to verify the 0.5.9 configuration before committing it to the internal macOS SSD.

Where can I find all the features and changes for 0.5.9 or is it just change log on github? Just looking to see upsides to jumping over to OC 0.5.9
 
I suppose you found the issue. For me reads and writes were consistent when the power supply to the motherboard was completely detached (including no thunderbolt device connected to the tb port). Give it a Few minutes after you disconnect the power supply and Then read.
ugh, with no power applied the reads all come back with different checksum values, but here is what is weird. Those 3 reads / those 3 shasum values. they are the same every time time... so 45678 for first bin file and 67890 for the second and 12345 for the third, every single time. ( I made up the values just now).
 
ugh, with no power applied the reads all come back with different checksum values, but here is what is weird. Those 3 reads / those 3 shasum values. they are the same every time time... so 45678 for first bin file and 67890 for the second and 12345 for the third, every single time. ( I made up the values just now).
Not sure I follow. The checksums of each file are the same every time?
 
Hi All
I have this annoying problem -- my system works great but for the last few times when I try to reboot I get the sad Mac (after I get past Clover boot). I can boot into recovery and do a disk first aid, I can boot into Windows, and once I am in Catalina it works perfectly for weeks on end.

The last few times I've managed to 'fix' it by re-installing OSX.... I've also gotten it to boot by various voodoo tricks (none of which I'm sure matter including booting to Windows, powering down completely, going into BIOS and changing some random things) -- To date I've always been able to get it to boot back into Catalina (after which it works great until I am forced to reboot).

I hate to throw out such a weird random problem but I'm hoping someone has seen it before? (I tried to do a search but came up empty)
 
Last edited:
Hi All
I have this annoying problem -- my system works great but for the last few times when I try to reboot I get the sad Mac (after I get past Clover boot). I can boot into recovery and do a disk first aid, I can boot into Windows, and once I am in Catalina it works perfectly for weeks on end.

The last few times I've managed to 'fix' it by re-installing OSX.... I've also gotten it to boot by various voodoo tricks (none of which I'm sure matter including booting to Windows, powering down completely, going into BIOS and changing some random things) -- To date I've always been able to get it to boot back into Catalina (after which it works great until I am forced to reboot).

I hate to throw out such a weird random problem but I'm hoping someone has seen it before? (I tried to do a search but came up empty)

Below is the verbose mode boot screen.

View attachment 473940
This has been coming up somewhat frequently of late. First check list:
  • Check if CFG-LOCK (MSR 0xE2) is still locked or better yet, update firmware (BIOS) to F9h (see last one or two pages for download link). MSR 0xE2 is unlocked by default in F9h.
  • Updating the firmware also has the effect of resetting CMOS, so it's a good 'detox' for the system. We need to configure BIOS parameters again starting with Load Optimized Defaults.
 
Bootcamp on external USB Drive (HDD, SSD, USB Stick)

What you need:
  1. OpenCore Bootloader on your hackintosh drive or on a usb stick.
  2. USB Drive (lol)
  3. Windows installation .iso
  4. Windows operating system
    1. Option 1: Windows PC. if you're planning to use USB 3 Drive then you need Windows 10 because USB 3 is not supported by Win 7 natively.
    2. Option 2: Virtual Windows Machine (VirtualBox, VMware Fusion, Parallels Desktop - my choice,...) with Windows 10 as i said in Option 1
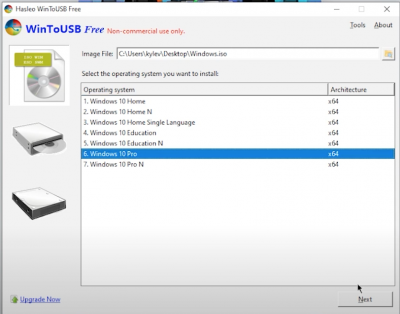
  5. WinToUSB - EasyUEFI
Preparation:
  1. In your Windows machine format your external drive to NTFS
  2. Install and open WinToUSB, chose Windows installer .iso downloaded before. Attention with WintoUSB Free version you can only install Windows Home version.
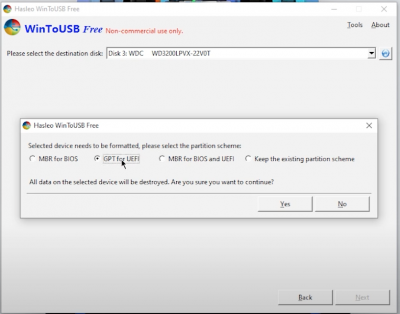
  3. Select your USB Drive and partition scheme to "GPT for UEFI" (very important)select drive and partition scheme.png
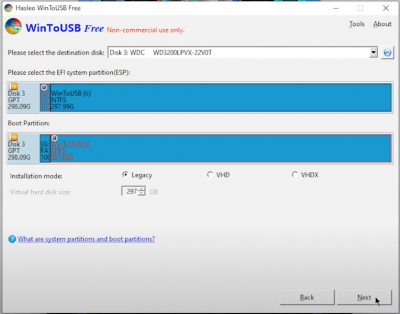
  4. Click to next
    • Next.png
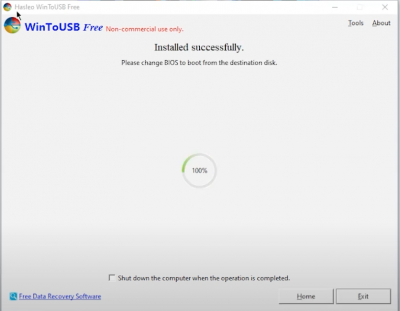
  5. Installation finished, Exit!
    • finish.png

if you made this installation with another computer then remove your USB Drive,
if you are using a wireless keyboard, then connect the USB cable for Windows installation.
Plug your USB Drive to your Hackintosh PC USB port, restart your computer, enter to BIOS, disable "Above 4G decoding", save and exit.

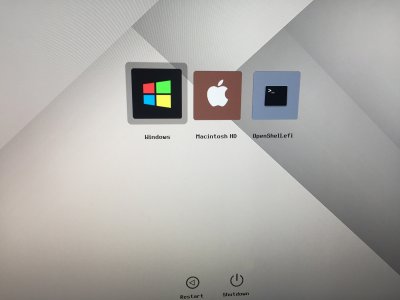
Now boot your Hackintosh PC with OpenCore bootloader, and select Windows
OpenCore.jpeg

Windows will continue and finish the installation
Finishing Installation.jpeg
During this installation, your computer will restart one time, don't touche anything and let OpenCore to boot on Windows to finish the installation.

To boot again to your Hackintosh don't forget to enable "Above 4G decoding" in BIOS.

Congratulations, now you have Bootcamp on your external USB Drive.
 
Last edited:
Hello @CaseySJ
Thank you very much for your help.My Titan Ridge card is working fine in the hackintosh.
About this (After flashing, Thunderbolt may not work fully under Windows and Linux. It may be necessary to boot to macOS first, then warm boot to Windows and Linux.)
I have the same problem .I use the Caldigit connect-10g. Could you solve the problem? Thanks.
 
Bootcamp on external USB Drive (HDD, SSD, USB Stick)
...
Thanks for the Bootcamp guide. Some questions:
  • Bootcamp is used on real Macs because:
    • The UEFI firmware on a Macintosh (including DSDT/SSDT) is different from a Windows PC. Apple creates their own UEFI firmware that includes numerous Apple extensions.
    • Windows does not always provide necessary device drivers for the components inside a real Macintosh.
  • But a Hackintosh is 100% PC...the hardware is designed with Windows in mind.
    • Bootcamp device drivers are not needed.
  • On a real Mac, Windows is the foreign object.
  • On a Hackintosh, macOS is the foreign object, but Windows is the native object.
So I think all of the steps in your guide are fine except that last one. Am I overlooking something? :)
 
I plug the USB-c storage device with the built-in PCIe SSD into the Thunderbolt card, wake up after sleep, the computer will prompt: Disk Not Ejected Properly.

Screen Shot 2020-06-05 at 10.26.04 AM.png


Screen Shot 2020-06-05 at 10.50.07 AM.png
 
Back
Top