Contribute
Register

[SUCCESS] Gigabyte Designare Z390 (Thunderbolt 3) + i7-9700K + AMD RX 580

*** Thunderbolt DROM Micro-Guide for Gigabyte Z490 Vision D ***
Please do not quote this micro-guide in its entirety. Post a link instead.​


Target Audience for this Procedure:
Benefits / Purpose:
  • Just as your Mac's serial number is unique and your Ethernet card's MAC address is unique, we need to assign a unique ID to the Thunderbolt controller.
  • Thunderbolt Ethernet Bridge and Target Disk Mode require this procedure.
  • Most eGPUs require this procedure.
  • QNAP Thunderbolt-based NAS units require this procedure.
    • Other Thunderbolt-based storage and NAS systems may require this procedure as well.
  • This procedure may improve overall compatibility with a wider set of Thunderbolt devices.
Procedure:
There are two options for configuring Thunderbolt DROM. Choose one of the two methods.

Option 1: Web GUI Method (credit: @Inqnuam)
This method is the easiest to use.
  • Click here
  • Follow on-screen instructions carefully
  • Thunderbolt DROM will be customized for you using a randomly generated Unique ID (UID) and all checksums will be auto-computed.
  • A complete Thunderbolt SSDT (with the new DROM) will be presented on screen and it will also be copied to the clipboard for you.
  • Download and run MaciASL, create new file (File --> New) and paste the clipboard.
  • Then save the file in ACPI Machine Language (AML) format: File --> Save As... and choose ACPI Machine Language from the pop-up menu.
  • Give the file an appropriate name such as: SSDT-TB3-DROM-HOTPLUG.aml.
    • Any name is okay as long as it begins with SSDT-
  • However, download SSDT-DTPG.aml from the bottom of this guide.
  • Both SSDT files must be copied to the CLOVER/ACPI/patched folder (for CLOVER users) or OC/ACPI folder (for OpenCore users).
Option 2: Superuser Method (credit: @joevt)
Please see this guide for advanced users.

Option 3: Manual Method
  • Specify a new Unique ID (UID) in the 5 green bytes below (0x11).
  • Replace the 5 green numbers below with 5 randomly selected hex numbers.
  • Now click here to visit an online CRC calculator and configure it as shown:
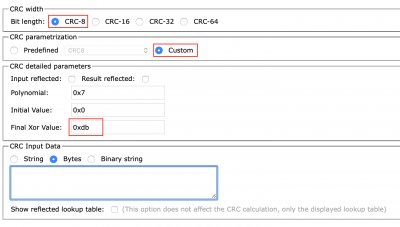
    Screen Shot 2020-03-18 at 9.35.24 AM.png
  • Copy the boldfaced bytes below (bytes 2-9 after replacing the green bytes with your own values) to clipboard and paste them into the Bytes field as shown and click CRC button:
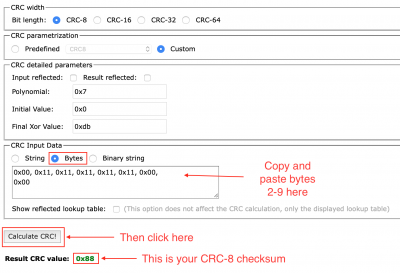
    Screen Shot 2020-03-18 at 9.37.02 AM.png
  • Enter the CRC-8 checksum into the 1st byte of Thunderbolt DROM as shown in red below.
  • Save this into your Thunderbolt SSDT, in the NHI0._DSM method.
  • Optional: Byte #2 below (between 0x88 and 0x11) represents the Thunderbolt Bus ID. If you have multiple Thunderbolt controllers, assign a different bus to each one. If you change this byte, please re-compute the CRC-8 checksum.
    • The first byte of ThunderboltConfig should then be changed to the same Bus ID.
"ThunderboltDROM",​
Buffer (0x75)​
{​
0x88, 0x00, 0x11, 0x11, 0x11, 0x11, 0x11, 0x00,
0x00, 0x43, 0x2B, 0x79, 0xFC, 0x01, 0x68, 0x00,​
0xED, 0x00, 0x0D, 0xC0, 0x01, 0x02, 0x08, 0x81,​
0x80, 0x02, 0x80, 0x00, 0x00, 0x00, 0x08, 0x82,​
0x90, 0x01, 0x80, 0x00, 0x00, 0x00, 0x08, 0x83,​
0x80, 0x04, 0x80, 0x01, 0x00, 0x00, 0x08, 0x84,​
0x90, 0x03, 0x80, 0x01, 0x00, 0x00, 0x05, 0x85,​
0x50, 0x00, 0x00, 0x05, 0x86, 0x50, 0x00, 0x00,​
0x02, 0x87, 0x0B, 0x88, 0x20, 0x01, 0x00, 0x64,​
0x00, 0x00, 0x00, 0x00, 0x00, 0x03, 0x89, 0x80,​
0x05, 0x8A, 0x50, 0x40, 0x00, 0x05, 0x8B, 0x50,​
0x40, 0x00, 0x0B, 0x01, 0x47, 0x49, 0x47, 0x41,​
0x42, 0x59, 0x54, 0x45, 0x00, 0x10, 0x02, 0x5A,​
0x34, 0x39, 0x30, 0x20, 0x56, 0x49, 0x53, 0x49,​
0x4F, 0x4E, 0x20, 0x44, 0x00​
},​
  • CRITICAL WARNING:
    • Do not copy and paste the text above into MaciASL. Instead, copy-and-paste from the spoiler below. Failure to do so will be catastrophic.
Code:
"ThunderboltDROM",
Buffer (0x75)
{
0x88, 0x00, 0x11, 0x11, 0x11, 0x11, 0x11, 0x00,
0x00, 0x43, 0x2B, 0x79, 0xFC, 0x01, 0x68, 0x00,
0xED, 0x00, 0x0D, 0xC0, 0x01, 0x02, 0x08, 0x81,
0x80, 0x02, 0x80, 0x00, 0x00, 0x00, 0x08, 0x82,
0x90, 0x01, 0x80, 0x00, 0x00, 0x00, 0x08, 0x83,
0x80, 0x04, 0x80, 0x01, 0x00, 0x00, 0x08, 0x84,
0x90, 0x03, 0x80, 0x01, 0x00, 0x00, 0x05, 0x85,
0x50, 0x00, 0x00, 0x05, 0x86, 0x50, 0x00, 0x00,
0x02, 0x87, 0x0B, 0x88, 0x20, 0x01, 0x00, 0x64,
0x00, 0x00, 0x00, 0x00, 0x00, 0x03, 0x89, 0x80,
0x05, 0x8A, 0x50, 0x40, 0x00, 0x05, 0x8B, 0x50,
0x40, 0x00, 0x0B, 0x01, 0x47, 0x49, 0x47, 0x41,
0x42, 0x59, 0x54, 0x45, 0x00, 0x10, 0x02, 0x5A,
0x34, 0x39, 0x30, 0x20, 0x56, 0x49, 0x53, 0x49,
0x4F, 0x4E, 0x20, 0x44, 0x00
},

Reboot.
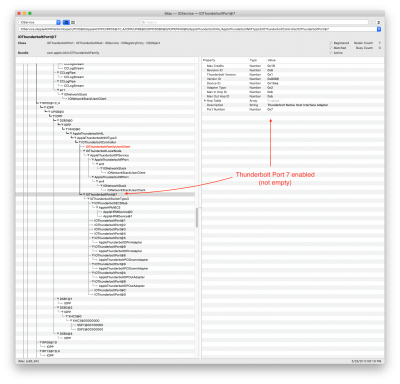
  • Check if Thunderbolt Port 7 is activated.
    Screen Shot 2020-05-29 at 5.08.20 PM.png
Misc:
 

Attachments

  • SSDT-TBOLT3-RP05-PORT7-VISION-D.aml
    2.1 KB · Views: 255
  • SSDT-DTPG.aml
    100 bytes · Views: 293
Last edited:
This is quite funny, who from all the video editors out there would want to see good geek bench scores and lower their productivity that the GPU can deliver?

With a simple 5700XT I can have 8K R3D playing real time, 4k h264 in Davinci and Premiere. I'm quite happy with that.

Bear in mind my current GB score is 52000 and if I add the card in the egpu via TB I get 73000 so how does that make any sense? Forget about Geekbench, they are useless. What's relevant is the real world performance.
what is funny about thank you ? meaning thank you for the sanity check , also Good for you Buddy that you are able to "have 8K R3D playing real time, 4k h264 in Davinci and Premiere" you should be happy ! i didn't ask but nevertheless i now know , Do you have an LG C9 ? I do ,again nobody asked...so i ve been trying to figure why it displays so much better picture from the webOS apps than my computer with a dedicated GPU(8K-48Gbps cable) as a source ...when i see someone got 75k with their 5700xt and i get 42 i ask why , i get an answer ,i say thank you
 
@jiffyslot @JimSalabim

@sttefzheu
I'm not sure if you experienced audio crackling issues with Thunderbolt-based UAD Apollo devices, but if you did, how did you solve those issues?
@sttefzheu
Crackling?

Sounds like the DAW audio device buffer size is too small: Like it's 64 instead of 128, or 128 instead of 256, or 512, etc. Or the user could be using an incompatible sample rate.

I've never had an issue with this since I got rid of my USB-connected Digidesign MBox 2. Some users may have an issue if they are using multiple audio devices (Pro Tools Aggregate Device, etc.) and one of the devices isn't clocking to the master, or there is a sample rate or bit-rate mismatch.

Without knowing the the interface used, I can't really trouble shoot it. However, there are ways to reduce or eliminate noise when using a DAW audio interface:

[1] If you have to use a USB interface, connect it directly to the computer, not a hub.

[2] IME, if you have a lot of hum or whine signals getting into your printed tracks: USB 2 devices are much more susceptible to EMI/RFI interference than Firewire and Thunderbolt interfaces. Also, if your audio interface or your preamp is sittinf atop a UPS or something else with a transformer, you'll have noise issues. Physically isolating/grouping types of equipment is important if you want a low noise floor.

[3] Use the USB cable that shipped with the device and do not use US extenders.

[4] If the device came with a power adapter, use it.

[5] Increase your buffer size and don't track while using plugins: Use one setting for tracking and another for mixing.

[6] Avoid using aggregate devices unless they are identical units like Apollo, RME, Avid, etc., and don't mix sample rates and bit depths.

[7] I never use a computer's onboard audio unless the machine is a HTPC via HDMI.

[8] On the device, if it has TRS/balanced connectors, buy TRS/balanced connectors.

[9] If you are using UAD gear, check your console setup.

I've never had an audio device that didn't go ape-squat with a buffer of less than 128 samples while using virtual instruments. I rarely use a sample rate above 44.1 or 48 KHz, because my sample libraries are all 44.1 KHz. –So my system isn't super stressed.

Hope this helps...
 
Last edited:
@CaseySJ and @Elias64Fr,
It was worth a shot trying out the Vision D firmware. After driving it again today, basically port-2 works fine, port-1 does not. Will revert back to patched GC-Titan Ridge NVM 50. The Z490 Creator MB might make an interesting match for firmware- having 2 DP inputs. Maybe some kind soul will donate the firmware to you masters!
 
@jiffyslot, thank you for the reply. So that the original poster is notified, can you add his username to the post?
 
@CaseySJ and @Elias64Fr,
It was worth a shot trying out the Vision D firmware. After driving it again today, basically port-2 works fine, port-1 does not. Will revert back to patched GC-Titan Ridge NVM 50. The Z490 Creator MB might make an interesting match for firmware- having 2 DP inputs. Maybe some kind soul will donate the firmware to you masters!
Yes the ASUS ProArt Z490 Creator looks very good. I've already offered to modify its Thunderbolt firmware and can also provide a properly reconfigured Thunderbolt DROM (with correct 32-bit CRC and Thunderbolt Switch activated).
 
Yes the ASUS ProArt Z490 Creator looks very good. I've already offered to modify its Thunderbolt firmware and can also provide a properly reconfigured Thunderbolt DROM (with correct 32-bit CRC and Thunderbolt Switch activated).

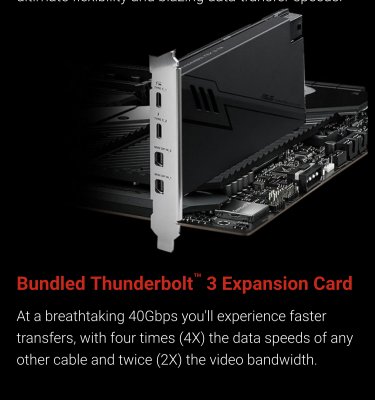
Have you seen the new thunderbolt card from ASUS? They appear not to have the standard 5 pin connector and instead use a 13 pin that’s on their newer Z490 boards.
 

Attachments

  • 8D0F8976-C6E0-41FB-90F2-3E28AB591E2B.jpeg
    8D0F8976-C6E0-41FB-90F2-3E28AB591E2B.jpeg
    465.1 KB · Views: 130
  • CFE140D9-9BE1-4218-84A1-4E1FF9464487.jpeg
    CFE140D9-9BE1-4218-84A1-4E1FF9464487.jpeg
    395.5 KB · Views: 131
It certainly does, as @mango1122 says it's the same chip. Just go ahead and update it using the Windows firmware updater. This little board makes for a great Hackintosh.

Thanks @mango1122 and @dgsga => That worked! Turns out my TB3 issues were because of SSDT not the actual NVM version. Either way, I guess it doesn't hurt to be on the latest firmware. Now onto some testing this weekend :)

@dgsga Just out of curiosity, do you use a Vega 56/64 or a Navi card (5700 series) with this motherboard?
 
Back
Top