Contribute
Register

[SUCCESS] Gigabyte Designare Z390 (Thunderbolt 3) + i7-9700K + AMD RX 580

Hello @CaseySJ, I have just ordered a Z390 Designare and a i9 9900k. Before I have a Z170 Designare. For thunderbolt activation of the Z170 I had installed the Gigabyte drivers in Windows and boot to macOS, and it just works. When I read your great guide, I was afraid by Thunderbolt flashing. It seem so complicated for the newbee I am. So what is your advice for guys as me ? Will Thunderbolt work without flashing (it works on my Z170) or not ? Do I install driver in Windows? Thanks for your time, thanks for your answer. And sorry if this question has already asked.
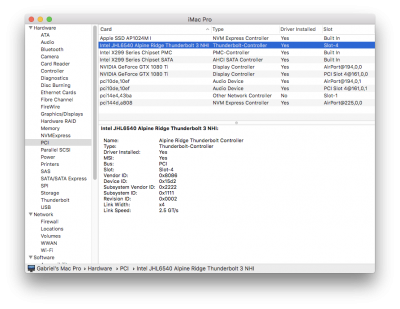
On the Designare Z390 Thunderbolt 3 will work just fine with no flashing. You will be able to hot plug Thunderbolt 3 devices. Sleep/wake will also work. Thunderbolt 1 devices, however, will generally not work. But Thunderbolt 2 and Thunderbolt 3 will be okay.

Flashing the firmware takes Thunderbolt to the next level, but this is optional. I would strongly recommend all new owners to stay with the standard firmware. Just follow the build guide for Catalina (or Mojave) and basic Thunderbolt (w/hot plug) will work.
 
** Aside-Guide: BIOS Update for Gigabyte Z170X-UD5 TH **
Please do not quote this guide in its entirety. Post a link instead.
Credit @losinka


For Whom this Bell Tolls:
  • This guide is only for owners of Gigabyte Z170X-UD5 TH motherboard who want to flash a modified BIOS F22i that contains the following extra user-configurable parameters:​
    • CFG Lock : BIOS => M.I.T => Miscellaneous Settings
      • Default value will be Enabled, so change it to Disabled
    • GPIO3 Force Pwr : BIOS => Peripherals => Thunderbolt(TM) Configuration
      • Default value will be Disabled, so change it to Enabled
    • ACPI Removal Object Support : BIOS => Peripherals => Thunderbolt(TM) Configuration
      • Default value will be Disabled, so change it to Enabled
URGENT WARNING:
  • If something goes wrong or power fails during the BIOS flash process, it could leave the system in an unbootable state. If the motherboard has a "flashback" or "dual BIOS" option it might be able to recover. Otherwise an external SPI Flash ROM programmer would be needed.
  • You assume all risk and liability for your decisions and your actions.
Option 1:
  • Download the attached ZIP that contains three files.
  • Mount EFI partition of your macOS SSD and copy all three files to the root folder of the EFI partition.
  • With all three files copied to root level of the EFI partition, reboot the computer.
  • At the Clover or OpenCore boot menu, select the option for UEFI Shell or EFI Shell.
  • Type the following:
Code:
fs0:
ls
  • The first command switches to the "fs0" disk. The second command lists the contents of the root folder of that disk. Check if the three files are present. The three files are:
  • Z170XUD5TH.F22i
  • FPT.efi
  • fparts.txt
  • If these files are not present, then type fs1: followed by dir. This will list the contents of "fs1" disk. Check if the files are present now. Repeat for a few other disks. If you cannot find the three files, stop and ask for help.
  • If you can see the three files, then type the following to flash the firmware.
Code:
fpt.efi -savemac -f Z170XUD5TH.F22i
  • After the BIOS update is complete, turn the computer off and on if it does not power cycle by itself. When the computer starts, go to BIOS Setup, select Load Optimized Defaults, and configure BIOS parameters again.
Option 2:
  • Use an external flasher (Raspberry Pi or CH341A) to flash the bios directly to the BIOS chip.
  • See this post (firmware files located here) and this post for more information.
  • This option is for advanced users only (who know how to do this).
 

Attachments

  • GA-Z170-UD5-TH-BIOS-F22i-FPT.zip
    6.3 MB · Views: 121
Last edited:
Yes indeed -- this one might do the trick...

@CaseySJ

Not quite there! But definitely progressing.

System Info - PCI now displays the TB Controller! (Shows Slot-4, but who really cares.)

Sys Info PCI.png

System Info - Thunderbolt on a cold start with TB drive attached still only shows a partial display of the TB Bus. It takes an unusually long time - about 10 seconds - to display the partial info. Typically on other hacks this is nearly instantaneous.

Sys Info - TB- Initial.png
A hot plug did not fully populate the TB Bus display, nor display the TB drive in the Finder.

A reboot and hot plug was needed to display the fully populated TB Bus. This time the display showed two ports, but not the attached TB drive.

Sys Info - TB - Reoot Hot Plug.png
You are a genius!
 
@CaseySJ

Not quite there! But definitely progressing.

System Info - PCI now displays the TB Controller! (Shows Slot-4, but who really cares.)

View attachment 469671

System Info - Thunderbolt on a cold start with TB drive attached still only shows a partial display of the TB Bus. It takes an unusually long time - about 10 seconds - to display the partial info. Typically this is nearly instantaneous.

View attachment 469672
A hot plug did not fully populate the TB Bus display, nor display the TB drive in the Finder.

A reboot and hot plug was needed to display the fully populated TB Bus. This time the display showed two ports, but not the attached TB drive.

View attachment 469675
You are a genius!
Please save and post the IOReg again (using IORegistryExplorer). Link status is not quite right. Are there 2 Thunderbolt ports on the NUC 7?
 
Thank you! I'll go ahead with it and hopefully report back with another unit for testing!

Just following up with confirmation that the Raspberry Pi 1 B+ did indeed work just fine thanks to the identical GPIO pins. I was completely out of my element while doing this so I've attached a few photos that will hopefully help others. For the Y-split of the 3V3 pin I was able to get some great results by completely removing the plastic shrouds on two male pins and one female. Additionally, the SOIC8 clip I got didn't have enough spacing for the cables to be plugged in with these plastic shrouds. I ended up sawing off the plastic to expose more of the pins in order to bend them.

The process seemed to go without a hitch as shown in my Thunderbolt Bus screenshot. I unfortunately do not have many devices at the moment to test TB3 since they're at work, but I do have my DeckLink mounted in the Sonnet PCIe Breakaway box. Results here were interesting as the card works if it's powered on and plugged into the AIC Titan Ridge at boot, but hotplug does not work - it gets detected but shows up under PCI as if the drivers haven't been installed.

Thank you so much for all the research @CaseySJ and @Elias64Fr .
 

Attachments

  • Y-bridge.jpeg
    Y-bridge.jpeg
    2 MB · Views: 128
  • Remove shroud.jpg
    Remove shroud.jpg
    1.9 MB · Views: 126
  • Cut SOIC8 Clip.jpeg
    Cut SOIC8 Clip.jpeg
    2.1 MB · Views: 131
  • Screen Shot 2020-05-14 at 8.18.24 PM.png
    Screen Shot 2020-05-14 at 8.18.24 PM.png
    254.3 KB · Views: 137
  • Screen Shot 2020-05-14 at 8.16.20 PM.png
    Screen Shot 2020-05-14 at 8.16.20 PM.png
    254 KB · Views: 127
  • Screen Shot 2020-05-14 at 8.17.32 PM.png
    Screen Shot 2020-05-14 at 8.17.32 PM.png
    247.6 KB · Views: 132
Hey, I had this issue. In clover configurator you will need to go SMBIOS -> Memory, and add 8 entries starting at 0. Then tell the computer you have 8 sticks of 16 gb RAM. I only have 64 gb, but I have attached a screenshot that shows you essentially what you need to do.
Hello @hairyconipiton @CaseySJ ... Say I have a Gigabyte Designare Z390 with an i9-9900K CPU and I would like to load in 128gb RAM .... I was looking at Part Picker which validated my previous research that the following will work on my MOBO ==> Corsair Vengeance LPX 128 GB (4 x 32 GB) DDR4-3600 Memory Now the question I have is since your picture showed a frequency of 2666 ... is that the setting I should put in even though the Ram is 3600 ? or is that just what frequency of RAM you had
 
After the touch command in Terminal we have to reboot in order for macOS to rebuild the caches properly.

It won't take more than a fraction of a second. When you reboot the cache will be rebuilt before the system fully starts. 15.5 is in beta 4 so will probably be released in the next week or so. I'd just wait and try that but if it doesn't work first time then you would be better off just doing a fresh install. The joys of Hackintoshing.

Ah, I did reboot, I was just thinking that touch would take a while.

Looks like I'll wait and see if 15.5 works for me. Thanks for all the help. :)
 
In the ACPI section is an entry that is changing _DSM to XDSM? If so, we just need to disable that big ACPI rename from my previous post and reboot.

Still no dice... Is the SSDT-DESIGNARE-X299EX-NO-INTEL-WIFI.aml dependent on a specific PCI slot for the Broadcom card?

Also,
This has just been added to the Repository. Testing needed...

View attachment 469666

Tested this out, and like @NCMacGuy (post #21,017), the Alpine ridge controller is now visible as a PCI device. 'Thunderbolt' section is not populated at all, however.
Drives show up if attached during boot, but no hot-swapping.
 

Attachments

  • Screen Shot 2020-05-14 at 6.17.10 PM.png
    Screen Shot 2020-05-14 at 6.17.10 PM.png
    166.1 KB · Views: 90
  • IOReg_Thunderbolt SSDT for x299 Designare EX.ioreg
    9 MB · Views: 79
Back
Top