Contribute
Register

[SUCCESS] Gigabyte Designare Z390 (Thunderbolt 3) + i7-9700K + AMD RX 580

Would you say the same is true for macOS 10.15.4 & a RX 5700xt?
Yes you may see improved performance of those specific applications when using iMacPro1,1.
 
@CaseySJ
Hi mate, thx for your fantastic guide, I followed the guide since Z390 Mojave, all work great! But currently, I failed to vanilla install the Catalina 10.15.4, and I found only 10.15 can be vanilla installed to my hacky.

What happened is when I click the install button at step 2, the installation will not continue but flashback to the MacOS Utilities home screen. The issue only happened after the 10.15.1, but I still can have my hacky refreshed on 10.15. Do you have any clue to solve it? Or is it a compatibility issue with my SSD?
Hello @zkejonathan, please clarify the following:
  • Is Catalina 10.15 (original release) already installed on the Designare Z390?
    • If so, did you follow the Catalina Mini-Guide or some other guide?
  • If Catalina 10.15 is already installed, then you should update to 10.15.4 from System Preferences --> Software Update, but first create a new EFI folder on a USB flash disk by following the Mojave to Catalina upgrade guide by clicking here. (Yes I know you are not upgrading from Mojave to Catalina. The procedure in that guide builds a new EFI folder that is compatible with 10.15.4.)
    • Then boot the system with the new USB disk (press F12 at BIOS splash screen and choose the USB).
    • Make sure Catalina 10.15 still boots.
    • Then perform an in-place update from System Preferences --> Software Update.
    • Each time the computer reboots, press F12 at BIOS splash screen and choose the USB.
 
WiFi is working fine. No files touched in the /Library/Extensions

I’d love to possibly not have to open up the computer as I’ve got it all wired into the studio, but I will if necessary. Is that the only other option?
I have seen a similar problem before, namely:
  • The USB splitter seems to work.
  • But none of the physically connected devices appears in IOReg.
In your case the splitter is showing up under HS11, but the Bluetooth device is not appearing as a sub-node under one of the four USB ports on the hub (each 9-pin header on the splitter supports two USB ports, hence total of four ports).

When this happened to me, I connected the Fenvi directly to F_USB and it worked. Later, if I recall correctly, the USB splitter started to work again after detaching and reattaching everything connected to it.
 
I have nearly the exact setup of this guide running 10.14.6 without any issues but recently I wanted to finish out the build and add more drives using one of my already owned cards. I have a couple of working LSI RAID controller cards flashed to IT mode with FW20. Both cards are SAS9207-8i, Windows 10 sees them and can use them perfectly. It freezes immediately when I select my Mac drive in Clover. I've been searching high and low for a driver set or other patches or any tangible information out there but I'm feeling a bit defeated.

Has anyone had any success with this LSI SAS9207-8i or any of the Broadcom/LSI cards in this series on a Hackintosh? I know there are natively supported cards out there but I have these fully functioning cards already and just curious if anyone does have any experience and/or has this working under 10.14? I tried the SASMegaRAID.kext with no success. I also found and tried the AztekFusion2 drivers but it had the same exact result. If it isn't possible, I can easily call it a day and move on. I have an addon SATA card I could drop in that I know works but I liked the performance and stability of these LSI cards, not too mention the mini-SAS to SATA cables clean up the installation a great deal.
If anyone has experience with LSI SAS9207-8i or similar LSI SATA/SAS card, please let us know.
 
I was under the Impression, that you already had prepared an SSDT for the 5700 XT, my bad :rolleyes:
Me thinks thou expecteds too much. ;)

P.S. That's probably going to produce a bunch of crazy translations. Take that, Google Translate.
 
Thanks, good suggestion @svandive ! Will do.
My SOIC8 clip and other parts should be arriving on Wednesday, so I hope to get some pictures shortly after that.

Sensible thinking :thumbup: . Better be safe than rush things if you can't afford any downtime right now. The risks of firmware flashing itself are very low, but you never know what issues you might encounter simply from taking your system apart and putting it back together to get access to the Winbond chip on the motherboard. You'll want to have room to play and fix things, and/or have your backup operational.

Thanks for sharing your experience @SuDoDmz, good to hear it's an easy and fail-safe process! Did you use the breadboard with resistor and capacitor, or not?

I'll try making shots of the motherboard's LEDs status as well.

Enjoy your new build, it's addictive isn't it ;)?
Just to set expectations...
  • It can be tricky both to attach the SOIC clip and to read the chip. These are of course two separate actions as @SuDoDmz mentioned.
  • How to know if you've attached the clip properly?
    • Turn off power to the board completely (physically pull power plug from PSU or from the wall).
    • Connect SOIC clip to Winbond chip with Pin 8 (Vcc) connected.
    • If SOIC clip is properly attached, LEDs on the motherboard should light up.
    • Then gently disconnect Pin 8 (Vcc) from the Raspberry Pi or elsewhere.
  • Now follow the supplemental procedure for reading the chip (link in Spoiler #2 in Post #1).
 
It can be tricky both to attach the SOIC clip and to read the chip. These are of course two separate actions as @SuDoDmz mentioned.

I stand corrected: it wasn't tricky for me, because I used the recommended pomona clip (worth mentioning: didn't try any other clip, though). Hugged the chip like it was it's son :lol:
 
Last edited:
Hi CaseySJ,

I've been using this build for a bit more than a year now and it's flawless, working perfectly. However, I've just noticed that no Thunderbolt is showing in the PCI section, Actually the PCI section is completely empty.
I don't have any real Thunderbolt device to test if this working but I have a Samsung T5 external SSD (for Mojave backup) with USB C 3.1 gen 2. I was curious to see, so I tried to plug it in any of the Thunderbolt and it's not showing.
The SSD works with every other port.

Does that mean Thunderbolt is not working on my build? Or is it the hot-plug function not working?
I read again carefully the whole guide, check everything in config.plist and all the post-install files but I didn't found where I miss something. Only thing I did is to change to imac 19,1 (it was macmini 8,1) .

This is not a real issue for me, since i don't have any Thunderbolt device, but i'm curious to make it work.
Hello @Mochimino,

Thunderbolt will appear in System Information --> PCI if the two Thunderbolt SSDTs are present in CLOVER/ACPI/patched:
  • SSDT-Z390-DESIGNARE-TB3HP-V4.aml
  • SSDT-DTPG.aml
It's also necessary to set BIOS parameters correctly, namely:
  • Thunderbolt Security --> No Security
  • GPIO3 Force Pwr --> Enabled
 
Here we go!
Re cables and PSU: Yes, double checked the DP cable and both DP ports on the Vega.
I have a be quiet! 750W 80+ Gold installed in the system. I also just checked if the two 8 pins to the GPU are properly seated. Looks all okay to me.

I ran the "Shadow of the Tomb Raider" Benchmark and there flickers are quite frequent.
Good job in setting up CLOVER.
  • Were you using a Vega SSDT previously?
  • Does the screen flicker in Windows as well?
  • Please post the output of this command in Terminal: kextstat | grep -v apple
 
Good job in setting up CLOVER.

Thanks! Only followed your excellent guide and help

  • Were you using a Vega SSDT previously?
    • I was but removed it when Mojave got Vega support in one of the last updates.
  • Does the screen flicker in Windows as well?
    • I don't use Windows, but I just switched over to HDMI and no flickers. So problem can be isolated to Displayport. (Same Monitor, same GPU, same Benchmark)
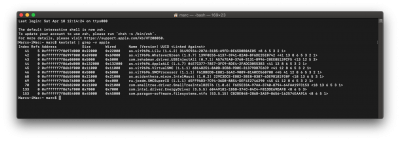
  • Please post the output of this command in Terminal: kextstat | grep -v apple
    • Bildschirmfoto 2020-04-18 um 13.58.46.png
 
Back
Top