Contribute
Register

[SUCCESS] Gigabyte Designare Z390 (Thunderbolt 3) + i7-9700K + AMD RX 580

I'm sure that we have the same firmware. Please look here.
Possibly. Still going to dump my board's chip anyways for posterity/to have a backup if needed. :)
 
Oh no! That sucks. A hot-air station, some flux, tweezers and some Chipquik and you should have that replaced in under 10 minutes without much hassle. Avoiding them tiny passives next to the chip will be the challenge for sure. Personally am not a fan of the solder braid method for SMT parts since its easier to damage them that way.

If I get some time later today I will dump the Winbond chip of my Z170X-Designare board to add to the collection of dumped firmwares.
That’s very helpful. I was debating between solder braid and ChipQuik, but ordered the braid earlier this morning. Will order ChipQuik now.

As for flux, I ordered Circuit Works CW3220 liquid flux.
 
*** OcQuirks / FwRuntimeServices Experiment: Conclusion ***

As a follow-up to the original post describing this experiment, I'm happy to say that TEST 4 works on my system even from the NVMe SSD. This is so far the only combination of parameters that works universally across USB, SATA, Thunderbolt, and NVMe PCIe (on my system).

We may finally have a viable alternative to OsxAptioFix2Drv-free2000. But let's wait for additional user feedback.

Attached ZIP contains both:
  • OcQuirks-4.efi
  • FwRuntimeServes.efi
To test this on your system -- for Clover v5xxx only:
  • Mount EFI partition of macOS SSD.
  • Move or delete existing memory fix driver from CLOVER/drivers/UEFI folder.
  • Copy the two new files into the CLOVER/drivers/UEFI folder.
  • Ensure that EmuVariableUefi.efi is present in that folder.
  • Ensure that slide=0 is present in config.plist --> Boot Arguments.
Please ensure you have another working EFI folder to boot from in case these drivers do not work.

Quirk Default Test 1 Test 2 Test 3 Test 4 (success)
AvoidRuntimeDefrag True True True True True
DevirtualiseMmio False True True True True
DisableSingleUser False False False False False
DisableVariableWrite False False False False False
DiscardHibernateMap False False False False False
EnableSafeModeSlide True True True True True
EnableWriteUnprotector True True True True True
ForceExitBootServices True True True True False
ProtectCsmRegion False False False True False
ProvideCustomSlide True True False True True
SetupVirtualMap True True True True True
ShrinkMemoryMap False False False False False
QuirksProvideConsoleGopEnable True True True True True


Hello CaseySJ,

First of all, many thanks for the time and effort you spent creating this amazing guide, it worked like a charm for me.
Replacing OsxAptioFix2Drv-free2000 also worked with OcQuirks-4.efi and FwRuntimeServes.efi (TEST 4).
We'll see how stable it will be in the future but it seems very promising.
I had a few crashes in the past days (both monitors shutting down at the same time and big fan spin) with OsxAptioFix2Drv-free2000 but it might have been linked to the Telegram Desktop app... We'll see if any update of the app solves this issue.

Anyway, thanks again from the heart for your fantastic work.
All the best!
 
That’s very helpful. I was debating between solder braid and ChipQuik, but ordered the braid earlier this morning. Will order ChipQuik now.

As for flux, I ordered Circuit Works CW3220 liquid flux.
Nice! We use these rework stations at my workplace: Hot Air Station - Amazon
Any fine tip tweezers should work, just needs to be able to handle the hot air gun temp if you need to gently hold the chip in place while it solders. Solder braid is amazing for fixing any small bridges or ballups that occur, so keep that around for finishing touches. A little bit of 99% ISOPROP after to clean the flux and you'll be golden. If all goes will it will look close to factory done.

Edit:

I forgot to mention GLOVES! USE GLOVES! These are solid gloves from Amazon
 
Last edited:
Hello CaseySJ,

First of all, many thanks for the time and effort you spent creating this amazing guide, it worked like a charm for me.
Replacing OsxAptioFix2Drv-free2000 also worked with OcQuirks-4.efi and FwRuntimeServes.efi (TEST 4).
We'll see how stable it will be in the future but it seems very promising.
I had a few crashes in the past days (both monitors shutting down at the same time and big fan spin) with OsxAptioFix2Drv-free2000 but it might have been linked to the Telegram Desktop app... We'll see if any update of the app solves this issue.

Anyway, thanks again from the heart for your fantastic work.
All the best!
Hello @aumacpro,

Glad to hear it, and welcome to the forum! If the crash still occurs after updating or removing Telegram Desktop, we'll try to help.
 
Nice! We use these rework stations at my workplace: Hot Air Station - Amazon
Any fine tip tweezers should work, just needs to be able to handle the hot air gun temp if you need to gently hold the chip in place while it solders. Solder braid is amazing for fixing any small bridges or ballups that occur, so keep that around for finishing touches. A little bit of 99% ISOPROP after to clean the flux and you'll be golden. If all goes will it will look close to factory done.

Edit:

I forgot to mention GLOVES! USE GLOVES! These are solid gloves from Amazon
I'm planning to use this hot air gun that I purchased in July of 2018. If you think that's not a good idea, please let me know!

71ZPZLRBhxL._AC_SL1500_.jpg 81pwun13-dL._AC_SL1500_.jpg 71dr6VEyhBL._AC_SL1500_.jpg
 
@NorthAmTransAm @CaseySJ
This DSDT fix is only for Z390 Designare but methodology can work on all kind of board : It depend on DSDT and TINI related call :)

Methodology is very simple and can be used for any other Patch:
  1. Copy your DSDT.aml on desktop (or wherever you want)
  2. Duplicate this file
  3. On one of these files, make the correction (here one line deleted) with MacIASL
  4. Open two files with HexFiend and make a Compare
  5. Search for one word (example TINI) on what you are removing/modified in order to locate approximately offset on Hex file (most difficult that what I have said!), you should find your files differences for this patch :shifty:
  6. Differences from two files .. added to previous byte is the patch :)
That's all !

Update:
View attachment 456158View attachment 456159

Exemple for Designare removing boot delay due to thunderbolt controller (on thunderbolt patched firmware only):

Comment: disable \_GPE.TINI (Zero, RPS0, RPT0, Zero)
Find: FF5C2E5F 47504554 494E4900 52505330 52505430 00
Replace : FF
attn: @scottkendall
I'm still working on getting the binary side of this down but booting with the edited DSDT really sped things up. Thanks Elias!

I'm this far but still figuring it out.
Screen Shot 2020-03-22 at 11.43.32 AM.png
 
Last edited:
I'm planning to use this hot air gun that I purchased in July of 2018. If you think that's not a good idea, please let me know!

Does this one have tips to go to a smaller air footprint?

You will need to direct the air straight down above the chip and only for long enough to see the solder underneath liquify and you can quickly remove the chip with the tweezers, then reverse that process for resoldering the new chip. Add a tiny bit of flux then a small line of chipquik on the exposed pads (they should still have some solder on them from the factory), place the new chip in the right direction (maybe get some blue nailpolish for the dot?), and reheat the chip so the chipquik solders. Depending on the chipquik you dont need to have the temp too high, I tend to go in the 150-200c range for heat. The tiny passives next to the chip will be the hardest to avoid melting the solder since they are SO small. There are a few ways to help avoid that such as heat tape over them while desoldering the Winbond.

Tape like so:
IMG_5031.JPG
 
Last edited:
Does this one have tips to go to a smaller air footprint?

You will need to direct the air straight down above the chip and only for long enough to see the solder underneath liquify and you can quickly remove the chip with the tweezers, then reverse that process for resoldering the new chip. Add a small line of chipquik on the exposed pads (they should still have some solder on them from the factory), place the new chip in the right direction (maybe get some blue nailpolish for the dot?), and reheat the chip so the chipquik solders. Depending on the chipquik you dont need to have the temp too high, I tend to go in the 150-200c range for heat. The tiny passives next to the chip will be the hardest to avoid melting the solder since they are SO small. There are a few ways to help avoid that such as heat tape over them while desoldering the Winbond.

Tape like so:
View attachment 456268
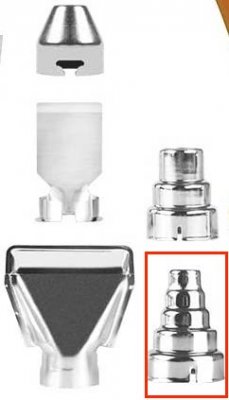
More good information! The hot air gun comes with these nozzles. Planning to start with the one in red:

61IyY2yXwhL._AC_SL1000_.jpg
 
Back
Top