Contribute
Register

[SUCCESS] Gigabyte Designare Z390 (Thunderbolt 3) + i7-9700K + AMD RX 580

Your log is similar to the other two, but you have 2 additional IOThunderboltFamily entries. I will check this on my other system:
  • Asus X99 Deluxe II with flashed GC-Titan Ridge. Will see if IOThunderboltFamily appears there.
On my X99 Deluxe II with flashed GC-Titan Ridge, no problem seeing IOThunderboltFamily. I'll create the Thunderbolt DROM Modification Mini-Guide, but if anyone runs into this problem -- you're on your own until we can figure this out! :)

@maleorderbride : I'm still quite interested in finding a solution. Did you enable Port 7 by updating the firmware? If you need a valid CRC32_C generated for your DROM, just send me a private message with the DROM.


kernel: (AppleThunderboltNHI) AppleThunderboltGenericHAL: Probe
kernel: (AppleThunderboltNHI) 7195944us AppleThunderboltGenericHAL: Probe
kernel: (AppleThunderboltNHI) AppleThunderboltGenericHAL::start
kernel: (AppleThunderboltNHI) 7195978us AppleThunderboltGenericHAL::start
kernel: (AppleThunderboltNHI) Thunderbolt runtime power conservation disabled.
kernel: (AppleThunderboltNHI) AppleThunderboltNHI - ERROR: adding entry to config handler array.
kernel: (AppleThunderboltNHI) 7196414us AppleThunderboltNHI - ERROR: adding entry to config handler array.
kernel: (AppleThunderboltNHI) Thunderbolt 255 PCI - LS=0xf043 LC=0x0040 SS=0x0040 SC=0x07cb PMCSR=0x0008 RT=0xffffffff NLRT=0xffffffff LWRT=0xffffffff PRRT=0xffffffff TRT=0x0000 TNLRT=0x0000 TLWRT=0x0000 TPRRT=0x0000 TLUP=0x0001
kernel: (IOThunderboltFamily) IOThunderboltSwitch<0x0>(0x0)::listenerCallback - Thunderbolt HPD packet for route = 0x0 port = 5 unplug = 0
kernel: (IOThunderboltFamily) IOThunderboltSwitch<0x0>(0x0)::listenerCallback - Thunderbolt HPD packet for route = 0x0 port = 6 unplug = 0
kernel: (IOThunderboltFamily) IOThunderboltEEPROM:: parseDROMData - Failed CRC8 Verification: 0x10 != 0x2b
kernel: (IOThunderboltFamily) IOThunderboltEEPROM::getDROM - Error getting DROM from I/O Registry (0xe0000001)
fud: (MobileAccessoryUpdater) Stream event happened for filter: com.apple.MobileAsset.MobileAccessoryUpdate.ThunderboltType3Switch
fud: (MobileAccessoryUpdater) -[FudStateMachine isActive]: state=6 nextState=-1 filter=com.apple.MobileAsset.MobileAccessoryUpdate.ThunderboltType3Switch
 
*** Calculating CRC32_C for Designare Z390 DOES NOT MATTER ***

In our haste to determine why CRC32_C was not working, we lost sight of something very important:
  • CRC32_C applies only to DROM bytes 14 and after.
  • The private UID, however, is in bytes 2-9 and we can easily calculate its CRC-8 checksum.
  • This means that for Designare Z390 we can hard-code all of the remaining bytes of DROM, including the CRC32_C checksum.
  • The only thing that changes from user to user is the UID in the first 9 bytes.
  • There is no reason to change all of the remaining bytes.
For each make/model of motherboard and each make/model of add-in-card, we will need to compute the CRC32_C checksum one time.
 
Last edited:
After reading through the mini-guide I need to ask what seems to me like a dangerous and basic question, but, is the winbond chip that needs to be flashed, is it under the IO port cover (top side of board) or is it on the back of the motherboard? I'm overly excited by what you guys are finding but I'm also trying to be patient as I'm not a hardware engineer, well not for these types of things. So I'm trying to tread very very cautiously however I want to be prepared to jump in as soon as I feel comfortable...
 
*** Calculating CRC32_C for Designare Z390 DOES NOT MATTER ***

In our haste to determine why CRC32_C was not working, we lost sight of something very important:
  • CRC32_C applies only to the DROM bytes after byte 22.
  • The private UID, however, is in the first 9 bytes and we can easily calculate its CRC-8 checksum.
  • This means that for Designare Z390 we can hard-code all of the remaining bytes of DROM, including the CRC32_C checksum.
  • The only thing that changes from user to user is the UID in the first 9 bytes.
  • There is no reason to change all of the remaining bytes.
For each make/model of motherboard and each make/model of add-in-card, we will need to compute the CRC32_C checksum one time.

  • This means that for Designare Z390 we can hard-code all of the remaining bytes of DROM, including the CRC32_C checksum.

It is already hard-coded, changing of UID can easily be done by copying TDROM (after firmware extraction), changing UID, updating CRC8 and include it on our favourite boot loader as Property ThunderboltDROM :)

.. Oops ! I forget port 7 :crazy:
 
*** Thunderbolt DROM Micro-Guide for Gigabyte Designare Z390 ***
Please do not quote this micro-guide in its entirety. Post a link instead.​


Target Audience for this Procedure:
  • Gigabyte Designare Z390 owners with activated Thunderbolt Bus.
  • This also applies to Gigabyte Designare X299X after it has been flashed with the same modified firmware as the Designare Z390.
  • If System Information --> Thunderbolt says No drivers are loaded, then this does not apply to you.
Benefits / Purpose:
  • Just as your Mac's serial number is unique and your Ethernet card's MAC address is unique, we need to assign a unique ID to the Thunderbolt controller.
  • Thunderbolt Ethernet Bridge and Target Disk Mode require this procedure.
  • Most eGPUs require this procedure.
  • QNAP Thunderbolt-based NAS units require this procedure.
    • Other Thunderbolt-based storage and NAS systems may require this procedure as well.
  • This procedure may improve overall compatibility with a wider set of Thunderbolt devices.
Procedure:
There are two options for configuring Thunderbolt DROM. Choose one of the two methods.

Option 1: Web GUI Method (credit: @Inqnuam)
This method is the easiest to use.
  • Click here
  • Follow on-screen instructions carefully
  • Thunderbolt DROM will be customized for you using a randomly generated Unique ID (UID) and all checksums will be auto-computed.
  • A complete Thunderbolt SSDT (with the new DROM) will be presented on screen and it will also be copied to the clipboard for you.
  • Download and run MaciASL, create new file (File --> New) and paste the clipboard.
  • Then save the file in ACPI Machine Language (AML) format: File --> Save As... and choose ACPI Machine Language from the pop-up menu.
  • Give the file an appropriate name such as: SSDT-TB3-DROM-HOTPLUG.aml.
    • Any name is okay as long as it begins with SSDT-
  • However, download SSDT-DTPG.aml from the bottom of this guide.
  • Both SSDT files must be copied to the CLOVER/ACPI/patched folder (for CLOVER users) or OC/ACPI folder (for OpenCore users).
Option 2: Superuser Method (credit: @joevt)
Please see this guide for advanced users.

Option 3: Manual Method
  • Specify a new Unique ID (UID) in the 5 green bytes below (0x11).
  • Replace the 5 green numbers below with 5 randomly selected hex numbers.
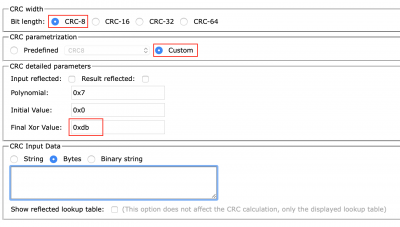
  • Now click here to visit an online CRC calculator and configure it as shown:
    Screen Shot 2020-03-18 at 9.35.24 AM.png
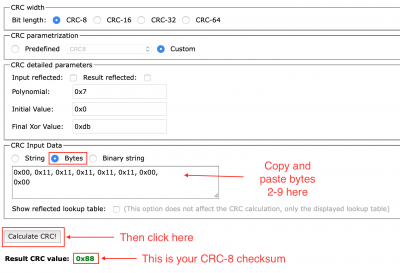
  • Copy the boldfaced bytes below (bytes 2-9 after replacing the green bytes with your own values) to clipboard and paste them into the Bytes field as shown and click CRC button:
    Screen Shot 2020-03-18 at 9.37.02 AM.png
  • Enter the CRC-8 checksum into the 1st byte of Thunderbolt DROM as shown in red below.
  • Save this into your Thunderbolt SSDT, in the NHI0._DSM method.
  • Optional: Byte #2 below (between 0x88 and 0x11) represents the Thunderbolt Bus ID. If you have multiple Thunderbolt controllers, assign a different bus to each one. If you change this byte, please re-compute the CRC-8 checksum.
    • The first byte of ThunderboltConfig should then be changed to the same Bus ID.
"ThunderboltDROM",
Buffer (0x76)
{
0x88, 0x00, 0x11, 0x11, 0x11, 0x11, 0x11, 0x00,
0x00, 0xDF, 0x1C, 0x09, 0x05, 0x01, 0x58, 0x00,
0x01, 0x00, 0x0d, 0x00, 0x01, 0x00, 0x08, 0x81,
0x80, 0x02, 0x80, 0x00, 0x00, 0x00, 0x08, 0x82,
0x90, 0x01, 0x80, 0x00, 0x00, 0x00, 0x08, 0x83,
0x80, 0x04, 0x80, 0x01, 0x00, 0x00, 0x08, 0x84,
0x90, 0x03, 0x80, 0x01, 0x00, 0x00, 0x05, 0x85,
0x50, 0x00, 0x00, 0x05, 0x86, 0x50, 0x00, 0x00,
0x02, 0x87, 0x0B, 0x88, 0x20, 0x01, 0x00, 0x64,
0x00, 0x00, 0x00, 0x00, 0x00, 0x03, 0x89, 0x80,
0x05, 0x8A, 0x50, 0x40, 0x00, 0x05, 0x8B, 0x50,
0x40, 0x00, 0x0B, 0x01, 0x47, 0x49, 0x47, 0x41,
0x42, 0x59, 0x54, 0x45, 0x00, 0x11, 0x02, 0x5A,
0x33, 0x39, 0x30, 0x20, 0x44, 0x45, 0x53, 0x49,
0x47, 0x4E, 0x41, 0x52, 0x45, 0x00
},
  • CRITICAL WARNING:
    • Do not copy and paste the text above into MaciASL. Instead, copy-and-paste from the spoiler below. Failure to do so will be catastrophic.
Code:
"ThunderboltDROM",
Buffer (0x76)
{
0x88, 0x00, 0x11, 0x11, 0x11, 0x11, 0x11, 0x00,
0x00, 0xDF, 0x1C, 0x09, 0x05, 0x01, 0x58, 0x00,
0x01, 0x00, 0x0d, 0x00, 0x01, 0x00, 0x08, 0x81,
0x80, 0x02, 0x80, 0x00, 0x00, 0x00, 0x08, 0x82,
0x90, 0x01, 0x80, 0x00, 0x00, 0x00, 0x08, 0x83,
0x80, 0x04, 0x80, 0x01, 0x00, 0x00, 0x08, 0x84,
0x90, 0x03, 0x80, 0x01, 0x00, 0x00, 0x05, 0x85,
0x50, 0x00, 0x00, 0x05, 0x86, 0x50, 0x00, 0x00,
0x02, 0x87, 0x0B, 0x88, 0x20, 0x01, 0x00, 0x64,
0x00, 0x00, 0x00, 0x00, 0x00, 0x03, 0x89, 0x80,
0x05, 0x8A, 0x50, 0x40, 0x00, 0x05, 0x8B, 0x50,
0x40, 0x00, 0x0B, 0x01, 0x47, 0x49, 0x47, 0x41,
0x42, 0x59, 0x54, 0x45, 0x00, 0x11, 0x02, 0x5A,
0x33, 0x39, 0x30, 0x20, 0x44, 0x45, 0x53, 0x49,
0x47, 0x4E, 0x41, 0x52, 0x45, 0x00
},

Reboot.
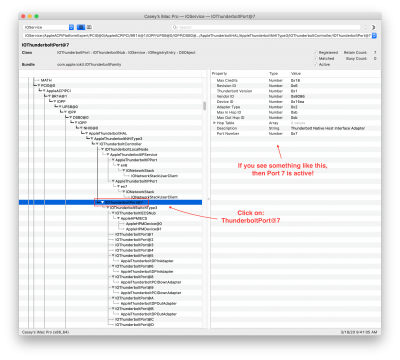
  • Check if Thunderbolt Port 7 is activated.
    Screen Shot 2020-03-18 at 9.41.59 AM.png
Follow-Up:
  • If you experience a longer boot up time after flashing Thunderbolt firmware, it can often be corrected by applying an ACPI patch in Clover or OpenCore, as follows (credit @Elias64Fr):
    • Comment: disable GPE.TINI
    • Find: FF5C2E5F 47504554 494E4900 52505330 52505430 00
    • Replace : FF
 

Attachments

  • SSDT-DTPG.aml
    100 bytes · Views: 389
  • SSDT-TBOLT3-RP05-PORT7-DESIGNARE-Z390.aml
    2 KB · Views: 497
Last edited:
It is already hard-coded, changing of UID can easily be done by copying TDROM (after firmware extraction), changing UID, updating CRC8 and include it on our favourite boot loader as Property ThunderboltDROM :)

.. Oops ! I forget port 7 :crazy:
Correct -- we need to activate Port 7 (02 87).
 
*** Thunderbolt DROM Micro-Guide for Designare Z390 ***

For Designare Z390 owners with activated Thunderbolt Bus, please customize your Thunderbolt DROM as follows:
  • Specify a new Unique ID (UID) in the 5 green bytes below (0x11).
  • Replace the 5 green numbers below with 5 randomly selected hex numbers.
  • Save this into your Thunderbolt SSDT (in NHI0._DSM).
"ThunderboltDROM",
Buffer (0x76)
{
0x11, 0x00, 0x11, 0x11, 0x11, 0x11, 0x11, 0x00,
0x00, 0xDF, 0x1C, 0x09, 0x05, 0x01, 0x58, 0x00,
0x01, 0x00, 0x0d, 0x00, 0x01, 0x00, 0x08, 0x81,
0x80, 0x02, 0x80, 0x00, 0x00, 0x00, 0x08, 0x82,
0x90, 0x01, 0x80, 0x00, 0x00, 0x00, 0x08, 0x83,
0x80, 0x04, 0x80, 0x01, 0x00, 0x00, 0x08, 0x84,
0x90, 0x03, 0x80, 0x01, 0x00, 0x00, 0x05, 0x85,
0x50, 0x00, 0x00, 0x05, 0x86, 0x50, 0x00, 0x00,
0x02, 0x87, 0x0B, 0x88, 0x20, 0x01, 0x00, 0x64,
0x00, 0x00, 0x00, 0x00, 0x00, 0x03, 0x89, 0x80,
0x05, 0x8A, 0x50, 0x40, 0x00, 0x05, 0x8B, 0x50,
0x40, 0x00, 0x0B, 0x01, 0x47, 0x49, 0x47, 0x41,
0x42, 0x59, 0x54, 0x45, 0x00, 0x11, 0x02, 0x5A,
0x33, 0x39, 0x30, 0x20, 0x44, 0x45, 0x53, 0x49,
0x47, 0x4E, 0x41, 0x52, 0x45, 0x00
},
Now reboot.
  • Open Terminal and type log show --last boot | grep IOThunderboltFamily.
  • Look for a line that is similar to this:
    • IOThunderboltEEPROM: ParseDROMData - Failed CRC8 Verification: 0x10 != 0x2b
  • Then edit your ThunderboltDROM and replace byte 1 with the value at the end of that line (0x2b in this example, but your value will be different).
Here's the modified Thunderbolt DROM:

"ThunderboltDROM",
Buffer (0x76)
{
0x2b, 0x00, 0x11, 0x11, 0x11, 0x11, 0x11, 0x00,
0x00, 0xDF, 0x1C, 0x09, 0x05, 0x01, 0x58, 0x00,
0x01, 0x00, 0x0d, 0x00, 0x01, 0x00, 0x08, 0x81,
0x80, 0x02, 0x80, 0x00, 0x00, 0x00, 0x08, 0x82,
0x90, 0x01, 0x80, 0x00, 0x00, 0x00, 0x08, 0x83,
0x80, 0x04, 0x80, 0x01, 0x00, 0x00, 0x08, 0x84,
0x90, 0x03, 0x80, 0x01, 0x00, 0x00, 0x05, 0x85,
0x50, 0x00, 0x00, 0x05, 0x86, 0x50, 0x00, 0x00,
0x02, 0x87, 0x0B, 0x88, 0x20, 0x01, 0x00, 0x64,
0x00, 0x00, 0x00, 0x00, 0x00, 0x03, 0x89, 0x80,
0x05, 0x8A, 0x50, 0x40, 0x00, 0x05, 0x8B, 0x50,
0x40, 0x00, 0x0B, 0x01, 0x47, 0x49, 0x47, 0x41,
0x42, 0x59, 0x54, 0x45, 0x00, 0x11, 0x02, 0x5A,
0x33, 0x39, 0x30, 0x20, 0x44, 0x45, 0x53, 0x49,
0x47, 0x4E, 0x41, 0x52, 0x45, 0x00
},

Reboot again.
  • Check if Thunderbolt Port 7 is activated.
For reading and comprehension, you can bold UID greened data and use same CRC8 that you have below 0x11 != 0x2b :) .. and use same color for all CRC8
 
Last edited:
*** Thunderbolt DROM Micro-Guide for Designare Z390 ***

I have a plain vanilla Z390. What do I need to do exactly, do I just need to follow the drom micro-guide or are other steps involved? No flashing, I hope?

What TB SSDT do we start with?
 
Last edited:
Found the post I needed about the chip...
 
Back
Top